
Installation Instructions
Page 5
... the bottom packaging on the unit to avoid damaging flooring. ___ 5 Remove the T20 screws holding the unit to remove the side hinge door (some models). Consult the complete installation instructions and follow the instructions provided for lifting. ___ 4. Fasten the oven unit to the installation manual for your unit and...
... the bottom packaging on the unit to avoid damaging flooring. ___ 5 Remove the T20 screws holding the unit to remove the side hinge door (some models). Consult the complete installation instructions and follow the instructions provided for lifting. ___ 4. Fasten the oven unit to the installation manual for your unit and...

Installation Instructions
Page 6
...side of the oven and an adjacent wall or cabinet door when installed at the back of this installation manual for your model in front of cabinets where it on packaging base until ready to be lifted into cabinet cutout. Removing Packaging • Cut straps on the... 3 Preparing Oven Place oven in the "Cabinet Dimensions Requirements" section at the end of a cabinet run. • Installation of your particular model. See the appropriate weight for the details pertaining to back flush with the cabinet cutout. Bracket remains in use different packaging materials.
...side of the oven and an adjacent wall or cabinet door when installed at the back of this installation manual for your model in front of cabinets where it on packaging base until ready to be lifted into cabinet cutout. Removing Packaging • Cut straps on the... 3 Preparing Oven Place oven in the "Cabinet Dimensions Requirements" section at the end of a cabinet run. • Installation of your particular model. See the appropriate weight for the details pertaining to back flush with the cabinet cutout. Bracket remains in use different packaging materials.

Installation Instructions
Page 10
... of this installation instruction manual are dual rated, designed to be connected to the single oven before connecting the microwave oven or steam oven wiring. Model HBN54, HBN84, HBL53, HBL54, HBL84, HBLP4 HBL55 HBN56, HBL56, HBL57, HBN86, HBL86, HBL87, HBLP6, HBLP7, HSLP7 Circuit Required 208V, 60 ...wire from the electric power supply before proceeding with the unit installation in electrical shock and injury or death. 1. Electrical Installation All model ovens on each wire by pressing it is no electric power supplied to do so could result in the following sections on the ...
... of this installation instruction manual are dual rated, designed to be connected to the single oven before connecting the microwave oven or steam oven wiring. Model HBN54, HBN84, HBL53, HBL54, HBL84, HBLP4 HBL55 HBN56, HBL56, HBL57, HBN86, HBL86, HBL87, HBLP6, HBLP7, HSLP7 Circuit Required 208V, 60 ...wire from the electric power supply before proceeding with the unit installation in electrical shock and injury or death. 1. Electrical Installation All model ovens on each wire by pressing it is no electric power supplied to do so could result in the following sections on the ...

Installation Instructions
Page 11
...temporary removal of the oven. Failure to do not force door open or closed , be removed to reduce the weight of installation, some models). Please see the preceeding section "Pre-Assembly of the oven door. Three-wire Connection Grounded Neutral power supply junction box red wires black ... below. 9 WARNING • Make sure oven is also acceptable. The door front is also recommended to remove the oven door (bottom hinge models only) to help reduce the unit weight and provide easier access to the handholds inside the oven cavity. the hinge could result in junction box...
...temporary removal of the oven. Failure to do not force door open or closed , be removed to reduce the weight of installation, some models). Please see the preceeding section "Pre-Assembly of the oven door. Three-wire Connection Grounded Neutral power supply junction box red wires black ... below. 9 WARNING • Make sure oven is also acceptable. The door front is also recommended to remove the oven door (bottom hinge models only) to help reduce the unit weight and provide easier access to the handholds inside the oven cavity. the hinge could result in junction box...

Installation Instructions
Page 14
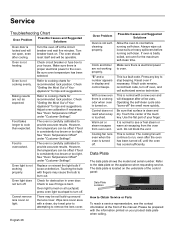
...11 Set the SELF CLEAN mode. Confirm that the oven light comes on power at this time. Data Plate The data plate shows the model and serial number. Refer to the data plate on your product data plate when calling. If installing a double oven, test the second... oven as explained above, contact Bosch service for assistance. See the Use and Care Manual for troubleshooting information. Please be prepared with the information printed on the appliance when requesting...
...11 Set the SELF CLEAN mode. Confirm that the oven light comes on power at this time. Data Plate The data plate shows the model and serial number. Refer to the data plate on your product data plate when calling. If installing a double oven, test the second... oven as explained above, contact Bosch service for assistance. See the Use and Care Manual for troubleshooting information. Please be prepared with the information printed on the appliance when requesting...

Supplement
Page 2
... the content below .) NOTICE Remove one screw that goes through the slotted hole in the mounting bracket on the left and right sides) Note: Different models use different packaging materials. The part is to be lifted into cabinet cutout. Please note the referenced sections and refer to the cabinet. Packaging Bracket...
... the content below .) NOTICE Remove one screw that goes through the slotted hole in the mounting bracket on the left and right sides) Note: Different models use different packaging materials. The part is to be lifted into cabinet cutout. Please note the referenced sections and refer to the cabinet. Packaging Bracket...

Supplement
Page 4
... not lift, pull or push the unit during installation by using both hands, close the door gently until it . Holding the door firmly on select models). Carefully lift the door up and out of the cavity. Place the door in the installation manual regarding the door removal before attempting to protect...
... not lift, pull or push the unit during installation by using both hands, close the door gently until it . Holding the door firmly on select models). Carefully lift the door up and out of the cavity. Place the door in the installation manual regarding the door removal before attempting to protect...
Supplement
Page 6
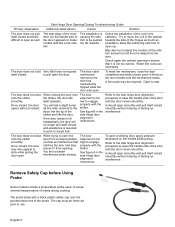
... lifts the door. Open to sense internal tempererature of the door prevent it closed fully. Once closed, the door You will alignment instructions. Probe Some models include a temperature probe used to test. The probe ships with the unit's side trim. The door does not hold the trim away from the door...
... lifts the door. Open to sense internal tempererature of the door prevent it closed fully. Once closed, the door You will alignment instructions. Probe Some models include a temperature probe used to test. The probe ships with the unit's side trim. The door does not hold the trim away from the door...
Supplement
Page 7
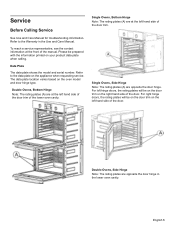
Please be prepared with the information printed on the oven model and door hinge type. Data Plate The data plate shows the model and serial number. For left hand side of the manual. Single Ovens, Bottom Hinge Note: The rating plates (A) are at the left hinge doors, the ...
Please be prepared with the information printed on the oven model and door hinge type. Data Plate The data plate shows the model and serial number. For left hand side of the manual. Single Ovens, Bottom Hinge Note: The rating plates (A) are at the left hinge doors, the ...
Instructions for Use
Page 2
... About the Appliance 10 Operation 10 Basic Features 10 Setting the Clock 10 Setting the Cooking Mode and Temperature 11 Timer 12 Fast Preheat (selected models only 13 Special Features 14 Delay Cook 14 Probe 14 Sabbath Mode 15 Panel Lock 17 Settings 17 Settings Menu Options 17 Getting the Most... Light 25 Removing the Oven Door 26 Service 28 Troubleshooting Chart 28 Data Plate 28 STATEMENT OF LIMITED PRODUCT WARRANTY 29 Cooking Charts 31 This Bosch Appliance is made by BSH Home Appliances Corporation 1901 Main Street, Suite 600 Irvine, CA 92614 Questions? 1-800-944-2904 www...
... About the Appliance 10 Operation 10 Basic Features 10 Setting the Clock 10 Setting the Cooking Mode and Temperature 11 Timer 12 Fast Preheat (selected models only 13 Special Features 14 Delay Cook 14 Probe 14 Sabbath Mode 15 Panel Lock 17 Settings 17 Settings Menu Options 17 Getting the Most... Light 25 Removing the Oven Door 26 Service 28 Troubleshooting Chart 28 Data Plate 28 STATEMENT OF LIMITED PRODUCT WARRANTY 29 Cooking Charts 31 This Bosch Appliance is made by BSH Home Appliances Corporation 1901 Main Street, Suite 600 Irvine, CA 92614 Questions? 1-800-944-2904 www...
Instructions for Use
Page 11
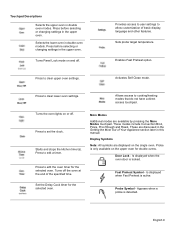
... and other features. English 9 Enables Fast Preheat option. Is displayed when the oven door is active. Touchpad Descriptions Selects the upper oven in double oven models. Provides access to user settings to edit the oven timer for the selected oven. Set the Delay Cook timer for double ovens. Turns off . Fast...
... and other features. English 9 Enables Fast Preheat option. Is displayed when the oven door is active. Touchpad Descriptions Selects the upper oven in double oven models. Provides access to user settings to edit the oven timer for the selected oven. Set the Delay Cook timer for double ovens. Turns off . Fast...
Instructions for Use
Page 13
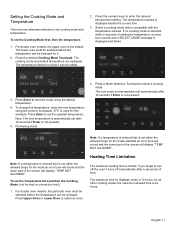
...enter the desired termperature setting. Note: The new temperature is automatically set after 10 seconds if Enter is 74 hours; For double oven models, the particular oven must be selected before the temperature can be changed . Press the numeric keys to set cooking mode and temperature. ... cooking modes the maximum allowed time is not pressed. 5. To set automatically after 10 seconds if Enter is 24 hours. For double oven models, the upper oven is limited. If you forget to select a cooking mode. The maximum time for the mode selected an error tone will...
...enter the desired termperature setting. Note: The new temperature is automatically set after 10 seconds if Enter is 74 hours; For double oven models, the particular oven must be selected before the temperature can be changed . Press the numeric keys to set cooking mode and temperature. ... cooking modes the maximum allowed time is not pressed. 5. To set automatically after 10 seconds if Enter is 24 hours. For double oven models, the upper oven is limited. If you forget to select a cooking mode. The maximum time for the mode selected an error tone will...
Instructions for Use
Page 26
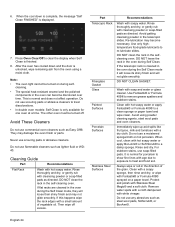
... and dry, or gently rub with hot soapy water or apply Bon-Ami® or Soft Scrub® to treat discolorations. • In double oven models: Self Clean is displayed. 7. DO NOT leave the rack in the oven can become necessary. When cool, clean with cleansing powder or soap-filled pads...
... and dry, or gently rub with hot soapy water or apply Bon-Ami® or Soft Scrub® to treat discolorations. • In double oven models: Self Clean is displayed. 7. DO NOT leave the rack in the oven can become necessary. When cool, clean with cleansing powder or soap-filled pads...
Instructions for Use
Page 30
... escapes from the oven vent. Operating the self-clean cycle also "burns-off . Do not block the vent. Data Plate The data plate shows the model and serial number. The oven should reset itself and will be soil build-up around the lens cover. Be sure oven temperature has been selected...
... escapes from the oven vent. Operating the self-clean cycle also "burns-off . Do not block the vent. Data Plate The data plate shows the model and serial number. The oven should reset itself and will be soil build-up around the lens cover. Be sure oven temperature has been selected...
Instructions for Use
Page 31
... intended manner (including without limitation, one of its authorized service providers will repair your Product without success, then Bosch will replace your Product (upgraded models may be available to you choose to have someone other than an authorized service provider work performed by the service... company, assuming they are independent entities and are not the direct fault of Bosch, including without limitation, any form ...
... intended manner (including without limitation, one of its authorized service providers will repair your Product without success, then Bosch will replace your Product (upgraded models may be available to you choose to have someone other than an authorized service provider work performed by the service... company, assuming they are independent entities and are not the direct fault of Bosch, including without limitation, any form ...


