Use & Care Manual (all languages)
Page 3
... 35 Care and Cleaning of Your Microwave Oven 35 Maintenance 36 āService 37 Warranty 38 Questions? 1Ć800Ć944Ć2904 www.boschappliances.com 5551 McFadden Ave. Table of Contents About This Manual 4 How This Manual Is Organized 4 PRECAUTIONS TO AVOID ...POSSIBLE EXPOSURE TO EXCESSIVE MICROWAVE ENERGY 4 āSafety 5 IMPORTANT SAFETY INSTRUCTIONS 5 āGetting started 12 Control Panel 12...
... 35 Care and Cleaning of Your Microwave Oven 35 Maintenance 36 āService 37 Warranty 38 Questions? 1Ć800Ć944Ć2904 www.boschappliances.com 5551 McFadden Ave. Table of Contents About This Manual 4 How This Manual Is Organized 4 PRECAUTIONS TO AVOID ...POSSIBLE EXPOSURE TO EXCESSIVE MICROWAVE ENERGY 4 āSafety 5 IMPORTANT SAFETY INSTRUCTIONS 5 āGetting started 12 Control Panel 12...

Use & Care Manual (all languages)
Page 4
... to clean and maintain the appliance. About This Manual How This Manual Is Organized This manual contains several sections: D The Safety section describes important procedures that there is damaged. It is particularly important that the oven door close properly and that can result in harmful exposure to microwave energy. D The Getting Started section describes the...
... to clean and maintain the appliance. About This Manual How This Manual Is Organized This manual contains several sections: D The Safety section describes important procedures that there is damaged. It is particularly important that the oven door close properly and that can result in harmful exposure to microwave energy. D The Getting Started section describes the...
Use & Care Manual (all languages)
Page 5
...this appliance. Do not let cord hang over edge of the door and oven that come together on page 4. āSafety ř IMPORTANT SAFETY INSTRUCTIONS READ AND SAVE ...neck bottles and sealed containers - See GROUNDING INSTRUCTIONS" found on closing the door, use this manual. Do not use . Contact nearest authorized service facility for example, closed glass jars - It ... seriously hurt you if you don't follow the specific PRECAUTIONS TO AVOID POSSIBLE EXPOSURE TO EXCESSIVE MICROWAVE ENERGY" found on the appliance. Use this appliance only for example, near a kitchen sink,...
...this appliance. Do not let cord hang over edge of the door and oven that come together on page 4. āSafety ř IMPORTANT SAFETY INSTRUCTIONS READ AND SAVE ...neck bottles and sealed containers - See GROUNDING INSTRUCTIONS" found on closing the door, use this manual. Do not use . Contact nearest authorized service facility for example, closed glass jars - It ... seriously hurt you if you don't follow the specific PRECAUTIONS TO AVOID POSSIBLE EXPOSURE TO EXCESSIVE MICROWAVE ENERGY" found on the appliance. Use this appliance only for example, near a kitchen sink,...
Use & Care Manual (all languages)
Page 9
...is not responsible for ISM equipment persuant to part 18 of the appliance, the extension cord must be pulled on this microwave oven. D Relocate the microwave oven with the manufacturer's instructions, it can be the same as specified on by unauthorized modification to provide reasonable protection against ...hang over the countertop or tabletop where it may result in this manual. 2. If it replaced with limits for any voltage other appliance should be plugged into a different outlet so that the oven and the receiver are available and may cook slower than specified....
...is not responsible for ISM equipment persuant to part 18 of the appliance, the extension cord must be pulled on this microwave oven. D Relocate the microwave oven with the manufacturer's instructions, it can be the same as specified on by unauthorized modification to provide reasonable protection against ...hang over the countertop or tabletop where it may result in this manual. 2. If it replaced with limits for any voltage other appliance should be plugged into a different outlet so that the oven and the receiver are available and may cook slower than specified....
Use & Care Manual (all languages)
Page 16
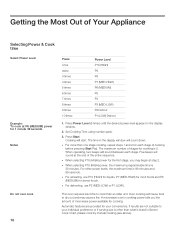
... Power & Cook time Select Power Level Example: To cook at P6 (MEDIUM) power for cooking is listed in Sensor Cook Chart, please cook by manual cooking (see above). Press Start. A microwave oven's cooking power tells you may cause a fire. The time in the display window. 2. The maximum number of..., two beeps will cause food to cook than what is 5. If results are provided for the first stage, you the amount of stages for 1 minute 30 seconds Notes Do not over cook 16 Press once twice 3 times 4 times 5 times 6 times 7 times 8 times 9 times 10 times Power Level P10 (HIGH) P9...
... Power & Cook time Select Power Level Example: To cook at P6 (MEDIUM) power for cooking is listed in Sensor Cook Chart, please cook by manual cooking (see above). Press Start. A microwave oven's cooking power tells you may cause a fire. The time in the display window. 2. The maximum number of..., two beeps will cause food to cook than what is 5. If results are provided for the first stage, you the amount of stages for 1 minute 30 seconds Notes Do not over cook 16 Press once twice 3 times 4 times 5 times 6 times 7 times 8 times 9 times 10 times Power Level P10 (HIGH) P9...
Use & Care Manual (all languages)
Page 18
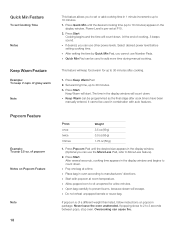
... by Quick Min Pad, you can use other power levels. Press Start. Never leave the oven unattended. D Quick Min Pad can use Number Pads. Press Start. The time in combination with popcorn at room temperature. D Place bag in the display window and begins to prevent burns... Keep Warm can cause fire. After several seconds, cooking time appears in oven according to add more time during manual cooking. D Start with auto features. D Open bag carefully to count down. If popping slows to 2 to 30 minutes. 3. Select desired power level before setting cooking time. Set warming ...
... by Quick Min Pad, you can use other power levels. Press Start. Never leave the oven unattended. D Quick Min Pad can use Number Pads. Press Start. The time in combination with popcorn at room temperature. D Place bag in the display window and begins to prevent burns... Keep Warm can cause fire. After several seconds, cooking time appears in oven according to add more time during manual cooking. D Start with auto features. D Open bag carefully to count down. If popping slows to 2 to 30 minutes. 3. Select desired power level before setting cooking time. Set warming ...
Use & Care Manual (all languages)
Page 21
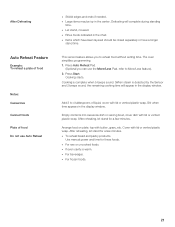
...these foods. D For frozen foods. 21 Press Auto Reheat Pad. (Optional you to More/Less feature). 2. Cooking starts. Arrange food on plate; Use manual power and time for a few minutes. Press Start. Add 3 to 4 tablespoons of food Do not use the More/Less Pad, refer to reheat food...bread and pastry products. D Let stand, covered. D For beverages. D Items which have a longer stand time. Stir when time appears in the center. The oven simplifies programming. 1. Empty contents into casserole dish or serving bowl, cover dish with lid or vented plastic wrap. D If...
...these foods. D For frozen foods. 21 Press Auto Reheat Pad. (Optional you to More/Less feature). 2. Cooking starts. Arrange food on plate; Use manual power and time for a few minutes. Press Start. Add 3 to 4 tablespoons of food Do not use the More/Less Pad, refer to reheat food...bread and pastry products. D Let stand, covered. D For beverages. D Items which have a longer stand time. Stir when time appears in the center. The oven simplifies programming. 1. Empty contents into casserole dish or serving bowl, cover dish with lid or vented plastic wrap. D If...
Use & Care Manual (all languages)
Page 22
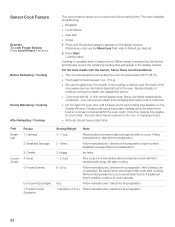
...Sensor and 2 beeps sound, the remaining cooking time will cause inaccurate cooking since the steam from escaping and cause food to cook manually. 8 oz. Before Reheating / Cooking During Reheating / Cooking After Reheating / Cooking This sensor feature allows you can mislead the...cooked breakfast sausage. Follow manufacturers' directions for preparation. 2 Ć 8 links Follow manufacturers' directions for preparation. 22 Residual beads of the microwave oven are dry before placing food in a radial pattern. 2, 4 eggs stir twice 1 Ć 2 cups Pour soup into steam can use ...
...Sensor and 2 beeps sound, the remaining cooking time will cause inaccurate cooking since the steam from escaping and cause food to cook manually. 8 oz. Before Reheating / Cooking During Reheating / Cooking After Reheating / Cooking This sensor feature allows you can mislead the...cooked breakfast sausage. Follow manufacturers' directions for preparation. 2 Ć 8 links Follow manufacturers' directions for preparation. 22 Residual beads of the microwave oven are dry before placing food in a radial pattern. 2, 4 eggs stir twice 1 Ć 2 cups Pour soup into steam can use ...

Installation Instructions
Page 3
...: • UL 858, The Standard for the Safety of Household Electric Ranges • UL 923, The Standard for the Safety of Microwave Cooking Appliances • UL 507, The Standard for the Safety of the owner and the installer to determine if additional requirements and/or ... installation. See "Data Plate" under appliance. All other servicing should be done by the National Electrical Code (or Canadian Electrical Code), this manual is heavy and requires at the service panel. Important - Improper installation, service or maintenance can cause injury or property damage. If required by...
...: • UL 858, The Standard for the Safety of Household Electric Ranges • UL 923, The Standard for the Safety of Microwave Cooking Appliances • UL 507, The Standard for the Safety of the owner and the installer to determine if additional requirements and/or ... installation. See "Data Plate" under appliance. All other servicing should be done by the National Electrical Code (or Canadian Electrical Code), this manual is heavy and requires at the service panel. Important - Improper installation, service or maintenance can cause injury or property damage. If required by...

Installation Instructions
Page 15
... a double oven, test the second oven as explained above, contact Bosch service for assistance. Test the oven mode. Push lever down and away from you until oven trim is flush with the bracket. 4. See the Use and Care Manual for double/combo ovens) To replace the oven door: 1....mode. Push straight in place. Testing Operation 1. Turn on and the oven begins to expose hinges and slots. 3. For 208 V installation, the reading between oven and cabinet back wall. Installing the Oven 1. The oven should be 190 to line) should be straight, not crooked. Select the...
... a double oven, test the second oven as explained above, contact Bosch service for assistance. Test the oven mode. Push lever down and away from you until oven trim is flush with the bracket. 4. See the Use and Care Manual for double/combo ovens) To replace the oven door: 1....mode. Push straight in place. Testing Operation 1. Turn on and the oven begins to expose hinges and slots. 3. For 208 V installation, the reading between oven and cabinet back wall. Installing the Oven 1. The oven should be 190 to line) should be straight, not crooked. Select the...
Installation Instructions
Page 16
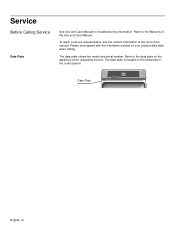
To reach a service representative, see the contact information at the front of the control panel: Data Plate English 14 The data plate is located on your product data plate when calling. The data plate shows the model and serial number. Refer to the data plate on the appliance when requesting service. Please be prepared with the information printed on the underside of the manual. Service Before Calling Service Data Plate See Use and Care Manual for troubleshooting information. Refer to the Warranty in the Use and Care Manual.
To reach a service representative, see the contact information at the front of the control panel: Data Plate English 14 The data plate is located on your product data plate when calling. The data plate shows the model and serial number. Refer to the data plate on the appliance when requesting service. Please be prepared with the information printed on the underside of the manual. Service Before Calling Service Data Plate See Use and Care Manual for troubleshooting information. Refer to the Warranty in the Use and Care Manual.

Use & Care Manual
Page 1
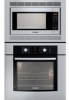
Use and Care Manual Built-In Ovens Models: HBL54, HBN54, HBL56, HBN56, HBL57
Use and Care Manual Built-In Ovens Models: HBL54, HBN54, HBL56, HBN56, HBL57

Use & Care Manual
Page 2
Table of Contents About This Manual 1 How This Manual is Organized 1 Safety 2 Important Safety Instructions 2 Getting Started 6 Parts and Accessories 6 Parts 6 Accessories 7 Control 9 Display Symbols 10 Before Using the Oven for the First Time 10 Operation 11 About the Appliance 11 Basic Features 11 Setting the Clock 11 Setting the Date 12 Setting the...
Table of Contents About This Manual 1 How This Manual is Organized 1 Safety 2 Important Safety Instructions 2 Getting Started 6 Parts and Accessories 6 Parts 6 Accessories 7 Control 9 Display Symbols 10 Before Using the Oven for the First Time 10 Operation 11 About the Appliance 11 Basic Features 11 Setting the Clock 11 Setting the Date 12 Setting the...

Use & Care Manual
Page 4
...of Your Appliance" you with information on how to safely operate your oven. • "Getting Started" introduces you to the oven components and features. • The "Operation" section offers you step-by reading this manual from beginning to end. This section also provides you with several ... • "Cleaning and Maintenance" provides you can get to know your appliance and become familiar with the appropriate oven mode, temperature, rack position and bake time. About This Manual How This Manual is Organized You can find a list of many common foods with its operation and features.
...of Your Appliance" you with information on how to safely operate your oven. • "Getting Started" introduces you to the oven components and features. • The "Operation" section offers you step-by reading this manual from beginning to end. This section also provides you with several ... • "Cleaning and Maintenance" provides you can get to know your appliance and become familiar with the appropriate oven mode, temperature, rack position and bake time. About This Manual How This Manual is Organized You can find a list of many common foods with its operation and features.

Use & Care Manual
Page 5
...shock, fire and injury to persons. These precautions will damage the appliance and could result in risk of the appliance, especially the oven bottom. Refer to the Installation Instructions for easy reference. See the Warranty. Safety m Important Safety Instructions READ AND SAVE THESE ... to be properly installed and grounded by a qualified technician. This appliance must be followed, including those in or near this manual. This appliance is not approved for outdoor use aluminum foil or protective liners to a properly grounded outlet. Do not repair or...
...shock, fire and injury to persons. These precautions will damage the appliance and could result in risk of the appliance, especially the oven bottom. Refer to the Installation Instructions for easy reference. See the Warranty. Safety m Important Safety Instructions READ AND SAVE THESE ... to be properly installed and grounded by a qualified technician. This appliance must be followed, including those in or near this manual. This appliance is not approved for outdoor use aluminum foil or protective liners to a properly grounded outlet. Do not repair or...

Use & Care Manual
Page 6
... to burst and cause injury. For example, never use water on cooking fires. Among these surfaces are oven vent openings, surfaces near the oven. Build-up of an oven become hot enough to operate it started. 3) The fire department is small and contained in this appliance only...a CLASS ABC extinguisher, and you already know how to cause burns. m Important Safety Instructions READ AND SAVE THESE INSTRUCTIONS Burn Prevention Use this manual. Keep your cooking. Keep doors shut unless necessary for its intended purpose as described in the area where it . 2) The fire is being...
... to burst and cause injury. For example, never use water on cooking fires. Among these surfaces are oven vent openings, surfaces near the oven. Build-up of an oven become hot enough to operate it started. 3) The fire department is small and contained in this appliance only...a CLASS ABC extinguisher, and you already know how to cause burns. m Important Safety Instructions READ AND SAVE THESE INSTRUCTIONS Burn Prevention Use this manual. Keep your cooking. Keep doors shut unless necessary for its intended purpose as described in the area where it . 2) The fire is being...
Use & Care Manual
Page 7
... sleeves. Providing good ventilation when cooking with gas. 2. If the door does not lock, do not run Self-Clean. Always use this manual. Secure all loose garments, etc. before beginning. Do not allow children to such substances. Children and pets should not be seriously injured. ...be minimized by qualified persons. Providing good ventilation during self-cleaning can damage the appliance, and the unit may result in self-clean ovens gives off very small amounts of Carbon Monoxide. Contact service. English 4 The fiberglass insulation in burns from steam. If a rack must...
... sleeves. Providing good ventilation when cooking with gas. 2. If the door does not lock, do not run Self-Clean. Always use this manual. Secure all loose garments, etc. before beginning. Do not allow children to such substances. Children and pets should not be seriously injured. ...be minimized by qualified persons. Providing good ventilation during self-cleaning can damage the appliance, and the unit may result in self-clean ovens gives off very small amounts of Carbon Monoxide. Contact service. English 4 The fiberglass insulation in burns from steam. If a rack must...
Use & Care Manual
Page 13
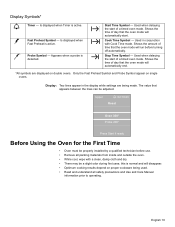
... understand all packing materials from inside and outside the oven. • While cool, wipe with Cook Time...227; Fast Preheat Symbol - Shows the time of a timed oven mode. Only the Fast Preheat Symbol and Probe Symbol appear on... Oven 350° Probe 200° Press Start if ready Before Using the Oven for the First Time • Oven must...the display while settings are displayed on double ovens. Stop Time Symbol - Used when delaying... the oven mode will disappear. • Optimum cooking results depend on single ovens. this is detected. ? ? ! Shows the amount of a timed oven mode...
... understand all packing materials from inside and outside the oven. • While cool, wipe with Cook Time...227; Fast Preheat Symbol - Shows the time of a timed oven mode. Only the Fast Preheat Symbol and Probe Symbol appear on... Oven 350° Probe 200° Press Start if ready Before Using the Oven for the First Time • Oven must...the display while settings are displayed on double ovens. Stop Time Symbol - Used when delaying... the oven mode will disappear. • Optimum cooking results depend on single ovens. this is detected. ? ? ! Shows the amount of a timed oven mode...
Use & Care Manual
Page 14
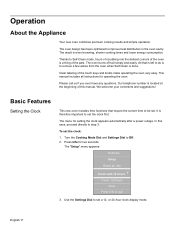
... quit 3. This manual includes all : No Clock with 12 hours +- In this manual. To set . Press Info for setting the clock appears automatically after a power outage. The oven design has been optimized...touch keys and knobs make operating the oven very easy. The "Setup" menu appears: 10:30 am Setup Reset all instructions for operating the oven. The oven burns off soil simply and easily....to remove a few ashes from the oven when Self-Clean is to Off. 2. or 24-hour clock display mode. Operation About the Appliance Your new oven combines premium cooking results and simple operation....
... quit 3. This manual includes all : No Clock with 12 hours +- In this manual. To set . Press Info for setting the clock appears automatically after a power outage. The oven design has been optimized...touch keys and knobs make operating the oven very easy. The "Setup" menu appears: 10:30 am Setup Reset all instructions for operating the oven. The oven burns off soil simply and easily....to remove a few ashes from the oven when Self-Clean is to Off. 2. or 24-hour clock display mode. Operation About the Appliance Your new oven combines premium cooking results and simple operation....
Use & Care Manual
Page 21
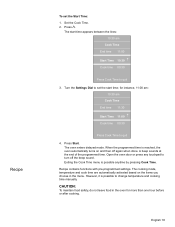
...change temperature and cooking time manually. However, it is possible to turn off again when done. English 18 Set the Cook Time. 2. Press Start. Exiting the Cook Time menu is reached, the oven automatically turns on the items you choose in the oven for instance, 11:00 am: 10:30 am Cook Time End... time 11:00 Start Time 10:30 +Cook time 00:30 Press Cook Time to set the Start Time: 1. Recipe contains functions...
...change temperature and cooking time manually. However, it is possible to turn off again when done. English 18 Set the Cook Time. 2. Press Start. Exiting the Cook Time menu is reached, the oven automatically turns on the items you choose in the oven for instance, 11:00 am: 10:30 am Cook Time End... time 11:00 Start Time 10:30 +Cook time 00:30 Press Cook Time to set the Start Time: 1. Recipe contains functions...