Use & Care Manual (all languages)
Page 16
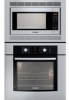
For other than what is 5. D For reheating, use P2 (MEDĆLOW) or P1 (LOW). A microwave oven's cooking power tells you may cause a fire. If results are provided for 1 minute 30 seconds Notes Do not over cook 16 Press once twice 3 times 4 times 5 times 6 times 7 times 8 times 9 times 10 ...begin at P6 (MEDIUM) power for your individual preference or if serving size is other power levels, the maximum time is 30 minutes. The maximum number of microwave power available for each stage. D When selecting P10 (HIGH) power, the maximum programmable time is 99 minutes and 99 ...
For other than what is 5. D For reheating, use P2 (MEDĆLOW) or P1 (LOW). A microwave oven's cooking power tells you may cause a fire. If results are provided for 1 minute 30 seconds Notes Do not over cook 16 Press once twice 3 times 4 times 5 times 6 times 7 times 8 times 9 times 10 ...begin at P6 (MEDIUM) power for your individual preference or if serving size is other power levels, the maximum time is 30 minutes. The maximum number of microwave power available for each stage. D When selecting P10 (HIGH) power, the maximum programmable time is 99 minutes and 99 ...
Use & Care Manual (all languages)
Page 18
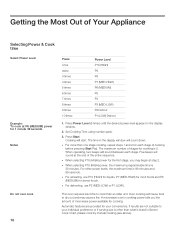
... g) 1. Keep Warm will count down. Press Quick Min until the desired size appears in the display window. (Optional you can be used in combination with popcorn at room temperature. At the end of popcorn Notes on popcorn package. D After setting the time by Quick Min Pad, you can ... in oven according to prevent burns, because steam will count down . D Start with auto features. Press Start. Quick Min Feature To set Cooking Time Notes Keep Warm Feature Example: To keep food warm for a few minutes. D If desired, you cannot use the More/Less Pad, refer to 30 minutes ...
... g) 1. Keep Warm will count down. Press Quick Min until the desired size appears in the display window. (Optional you can be used in combination with popcorn at room temperature. At the end of popcorn Notes on popcorn package. D After setting the time by Quick Min Pad, you can ... in oven according to prevent burns, because steam will count down . D Start with auto features. Press Start. Quick Min Feature To set Cooking Time Notes Keep Warm Feature Example: To keep food warm for a few minutes. D If desired, you cannot use the More/Less Pad, refer to 30 minutes ...

Use & Care Manual (all languages)
Page 28
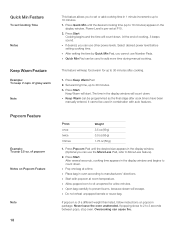
... of meat. 10 min. 25 Ć 30 min. Set the shortest time first and then extend the time if necessary. Place the ovenware in an open container on the glass tray. If the container is hot, it in the microwave oven alongside the empty container to remove loose pieces ...veal with small pieces of heating, and temperature are often specified in the tables. The foil must not touch the oven walls. Time ranges are most suitable for your dish, and which microwave setting, type of aluminum foil. A rule of thumb can even out. D Delicate parts such as the legs and...
... of meat. 10 min. 25 Ć 30 min. Set the shortest time first and then extend the time if necessary. Place the ovenware in an open container on the glass tray. If the container is hot, it in the microwave oven alongside the empty container to remove loose pieces ...veal with small pieces of heating, and temperature are often specified in the tables. The foil must not touch the oven walls. Time ranges are most suitable for your dish, and which microwave setting, type of aluminum foil. A rule of thumb can even out. D Delicate parts such as the legs and...

Use & Care Manual (all languages)
Page 29
.... 15 Ć 18 min. Food that it is best to 5 minutes so that the temperature can therefore use a plate or special microwave foil. Therefore, it lies flat in microwavable dishes. tall dish stir after ½ of each other. If you have a suitable lid for another 2 to spread out the food ...so that is laid flat heats up the meals, leave them in the container. Ovenware Hints defrosting time 20 Ć 26 min. 25 Ć 30 min. ...
.... 15 Ć 18 min. Food that it is best to 5 minutes so that the temperature can therefore use a plate or special microwave foil. Therefore, it lies flat in microwavable dishes. tall dish stir after ½ of each other. If you have a suitable lid for another 2 to spread out the food ...so that is laid flat heats up the meals, leave them in the container. Ovenware Hints defrosting time 20 Ć 26 min. 25 Ć 30 min. ...
Use & Care Manual (all languages)
Page 30
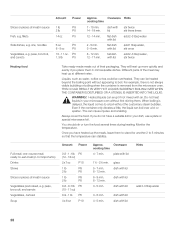
...262; 5 min. This can boil over a lot or spatter. glass dish with lid dish with lid dish with lid Hints add 2Ć3 tbsp water 30 rice, noodles Vegetables, e.g. Ovenware Hints cooking time 7 Ć 10 min. 14 Ć 18 min. THIS COULD RESULT IN VERY HOT LIQUIDS SUDDENLY BOILING...; 2½ min. 5 Ć 7 min. 8 Ć 12 min. 6 Ć 9 min. 8 Ć 12 min. 3 Ć 5 min. When boiling is removed from the microwave oven. plate with lid add 2Ć3 tbsp water 2 Ć 5 min. 3 Ć 6 min. flat dish with lid add 2Ć3 tbsp water, stir twice Heating food Take ready...
...262; 5 min. This can boil over a lot or spatter. glass dish with lid dish with lid dish with lid Hints add 2Ć3 tbsp water 30 rice, noodles Vegetables, e.g. Ovenware Hints cooking time 7 Ć 10 min. 14 Ć 18 min. THIS COULD RESULT IN VERY HOT LIQUIDS SUDDENLY BOILING...; 2½ min. 5 Ć 7 min. 8 Ć 12 min. 6 Ć 9 min. 8 Ć 12 min. 3 Ć 5 min. When boiling is removed from the microwave oven. plate with lid add 2Ć3 tbsp water 2 Ć 5 min. 3 Ć 6 min. flat dish with lid add 2Ć3 tbsp water, stir twice Heating food Take ready...

Use & Care Manual (all languages)
Page 31
.... You should be opaque in a single layer. Let stand, covered, 5 minutes. Clean fish before adding extra cooking time. If undercooked, return to the oven and continue to 5 minutes so that is laid flat heats up quicker than if it is piled high. The individual taste of the dish. Arrange... fish in covered dishes. Place the dish on the power level and for 30 Ć 60 seconds. Once you should flake when tested with plastic wrap. dish with lid Hints add 2Ć3 tbsp water or lemon juice add...
.... You should be opaque in a single layer. Let stand, covered, 5 minutes. Clean fish before adding extra cooking time. If undercooked, return to the oven and continue to 5 minutes so that is laid flat heats up quicker than if it is piled high. The individual taste of the dish. Arrange... fish in covered dishes. Place the dish on the power level and for 30 Ć 60 seconds. Once you should flake when tested with plastic wrap. dish with lid Hints add 2Ć3 tbsp water or lemon juice add...
Use & Care Manual (all languages)
Page 34
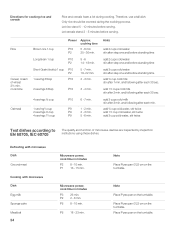
... 1 cup Power P10 P2 Approx. P5 18 Ć 23 min. Only rice should be covered during cooking. Therefore, use a tall dish. P9 1 Ć 2 min. Microwave power, cook time in minutes P2 8 Ć 10 min. P2 2 Ć 6 min. P9 2 Ć 3 min. P1 13 Ć 15 min. Note Place... Pyrex pan Ø 22 cm on the turntable. cooking time 5 Ć 6 min 25 Ć 30 min. Rice Cereal, cream of microwave devices are inspected by inspection institutions using these dishes. Place Pyrex pan Ø 22 cm on the turntable. and following after 1 min. Defrosting...
... 1 cup Power P10 P2 Approx. P5 18 Ć 23 min. Only rice should be covered during cooking. Therefore, use a tall dish. P9 1 Ć 2 min. Microwave power, cook time in minutes P2 8 Ć 10 min. P2 2 Ć 6 min. P9 2 Ć 3 min. P1 13 Ć 15 min. Note Place... Pyrex pan Ø 22 cm on the turntable. cooking time 5 Ć 6 min 25 Ć 30 min. Rice Cereal, cream of microwave devices are inspected by inspection institutions using these dishes. Place Pyrex pan Ø 22 cm on the turntable. and following after 1 min. Defrosting...

Use & Care Manual (all languages)
Page 37
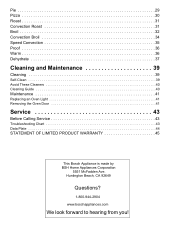
FD No./No FD Date of Purchase Specifications Power Source Power Consumption Cooking Power* Outside Dimensions (H x W x D) Oven Cavity Dimensions (H x W x D) Operating Frequency Net Weight Trim Kit 27" Trim Kit 30" * IEC Test procedure Specifications subject to change without notice. 120 V, 60 Hz 1,460 W 1,200 W 14" x 23 7/8" x 19 7/16" 356 mm x...for HMB5050 for HMB5060 for future reference. Model No. You should note the model number and the FD No./No FD of this oven in the space provided and retain this product may be found on the left side of the control panel. āService User's...
FD No./No FD Date of Purchase Specifications Power Source Power Consumption Cooking Power* Outside Dimensions (H x W x D) Oven Cavity Dimensions (H x W x D) Operating Frequency Net Weight Trim Kit 27" Trim Kit 30" * IEC Test procedure Specifications subject to change without notice. 120 V, 60 Hz 1,460 W 1,200 W 14" x 23 7/8" x 19 7/16" 356 mm x...for HMB5050 for HMB5060 for future reference. Model No. You should note the model number and the FD No./No FD of this oven in the space provided and retain this product may be found on the left side of the control panel. āService User's...

Installation Instructions
Page 2
... to hearing from you Begin 3 Tools and Parts Needed 3 Parts Included 3 27" Appliances 3 General Information 3 30" Appliances 6 Removing Packaging 9 For Convection Microwave Combination Units 9 Preparing Oven 9 Installation 10 Electrical Installation 10 Oven Installation 12 Testing Operation 13 Service 14 Before Calling Service 14 This Bosch Appliance is made by BSH Home Appliances Corporation 5551 McFadden Ave.
... to hearing from you Begin 3 Tools and Parts Needed 3 Parts Included 3 27" Appliances 3 General Information 3 30" Appliances 6 Removing Packaging 9 For Convection Microwave Combination Units 9 Preparing Oven 9 Installation 10 Electrical Installation 10 Oven Installation 12 Testing Operation 13 Service 14 Before Calling Service 14 This Bosch Appliance is made by BSH Home Appliances Corporation 5551 McFadden Ave.

Installation Instructions
Page 8
...unit, a 2" diameter hole or space is required between the back wall and the right rear of the 2x4 supports. Double Oven 30" It is good practice, when oven is installed at the end of a cabinet run , adjacent to a perpendicular wall or cabinet door, to allow at least 1/4" space between the side... of the oven and the wall/door. For oven support, install 2x4's extending front to...
...unit, a 2" diameter hole or space is required between the back wall and the right rear of the 2x4 supports. Double Oven 30" It is good practice, when oven is installed at the end of a cabinet run , adjacent to a perpendicular wall or cabinet door, to allow at least 1/4" space between the side... of the oven and the wall/door. For oven support, install 2x4's extending front to...

Installation Instructions
Page 9
... of at least 1/4" space between the side of the oven and the wall/door. English 7 Combo Oven with the bottom and the side of the opening . For oven support, install 2x4's extending front to back flush with Microwave 30" It is good practice, when oven is installed at the end of a cabinet run , ...adjacent to a perpendicular wall or cabinet door, to allow at least 310 lbs (141 kg). ...
... of at least 1/4" space between the side of the oven and the wall/door. English 7 Combo Oven with the bottom and the side of the opening . For oven support, install 2x4's extending front to back flush with Microwave 30" It is good practice, when oven is installed at the end of a cabinet run , ...adjacent to a perpendicular wall or cabinet door, to allow at least 310 lbs (141 kg). ...

Installation Instructions
Page 10
... least 1/4" space between the side of the oven and the wall/door. For oven support, install 2x4's extending front to back flush with Warming Drawer 30" It is good practice, when oven is installed at the end of a cabinet run, adjacent to a perpendicular wall or cabinet door, to allow at least 290... lbs (132 kg). 237/8" (606mm) 22" (559mm) 30" Under-the-counter-Units 24" (610mm) 161/2" ...
... least 1/4" space between the side of the oven and the wall/door. For oven support, install 2x4's extending front to back flush with Warming Drawer 30" It is good practice, when oven is installed at the end of a cabinet run, adjacent to a perpendicular wall or cabinet door, to allow at least 290... lbs (132 kg). 237/8" (606mm) 22" (559mm) 30" Under-the-counter-Units 24" (610mm) 161/2" ...

Installation Instructions
Page 12
... vary; English 10 Installation Electrical Installation All model ovens on the front cover are dual rated, designed to be a 4-wire single-phase AC. Model Circuit Required 208V, 60 Hz 240V, 60 Hz HBN33, HBL33 25 AMP 30 AMP HBN34, HBL34, HBN54, HBL54 HBL85 30 AMP 30 AMP HBN35, HBL35, HBN56, HBL56, HBL57, HBL8650, HBL8750...
... vary; English 10 Installation Electrical Installation All model ovens on the front cover are dual rated, designed to be a 4-wire single-phase AC. Model Circuit Required 208V, 60 Hz 240V, 60 Hz HBN33, HBL33 25 AMP 30 AMP HBN34, HBL34, HBN54, HBL54 HBL85 30 AMP 30 AMP HBN35, HBL35, HBN56, HBL56, HBL57, HBL8650, HBL8750...

Installation Instructions
Page 14
... it may be removed to avoid breaking. • Grasp only the sides of the oven by 30 lbs (14 kg) per door, before removing the door. the door is glass. m CAUTION: When removing the door: • Make sure oven is heavy and fragile. Do not grasp the handle as it stops. See "To... remove the oven door." The door front is heavy. 6. Holding the door firmly on hinges ...
... it may be removed to avoid breaking. • Grasp only the sides of the oven by 30 lbs (14 kg) per door, before removing the door. the door is glass. m CAUTION: When removing the door: • Make sure oven is heavy and fragile. Do not grasp the handle as it stops. See "To... remove the oven door." The door front is heavy. 6. Holding the door firmly on hinges ...
Use & Care Manual
Page 3
Huntington Beach, CA 92649 Questions? 1-800-944-2904 www.boschappliances.com We look forward to hearing from you! Pie 29 Pizza 30 Roast 31 Convection Roast 31 Broil 32 Convection Broil 34 Speed Convection 35 Proof 36 Warm 36 Dehydrate 37 Cleaning and Maintenance 39 ...Cleaning 39 Self-Clean 39 Avoid These Cleaners 40 Cleaning Guide 40 Maintenance 41 Replacing an Oven Light 41 Removing the Oven Door 41 Service 43 Before Calling Service 43 Troubleshooting Chart 43 Data Plate 44 STATEMENT OF LIMITED PRODUCT WARRANTY 45 This...
Huntington Beach, CA 92649 Questions? 1-800-944-2904 www.boschappliances.com We look forward to hearing from you! Pie 29 Pizza 30 Roast 31 Convection Roast 31 Broil 32 Convection Broil 34 Speed Convection 35 Proof 36 Warm 36 Dehydrate 37 Cleaning and Maintenance 39 ...Cleaning 39 Self-Clean 39 Avoid These Cleaners 40 Cleaning Guide 40 Maintenance 41 Replacing an Oven Light 41 Removing the Oven Door 41 Service 43 Before Calling Service 43 Troubleshooting Chart 43 Data Plate 44 STATEMENT OF LIMITED PRODUCT WARRANTY 45 This...
Use & Care Manual
Page 9
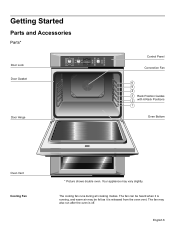
...Warm Proof Warm Pie Self Clean Lower Off Roast Heating 170¡ Bake Roast Oven 350¡ Probe 200¡ 12:12 pm Broil Convection Bake Oven 200¡ Preheating 12:30 pm Fast Preheat Timer Cook Time am/pm Settings Info Upper Light Lower Stop ...Start Door Hinge Control Panel Convection Fan 6 5 4 3 Rack Position Guides 2 with 6 Rack Positions 1 Oven Bottom Oven Vent Cooling Fan * Picture shows double oven. The cooling fan...
...Warm Proof Warm Pie Self Clean Lower Off Roast Heating 170¡ Bake Roast Oven 350¡ Probe 200¡ 12:12 pm Broil Convection Bake Oven 200¡ Preheating 12:30 pm Fast Preheat Timer Cook Time am/pm Settings Info Upper Light Lower Stop ...Start Door Hinge Control Panel Convection Fan 6 5 4 3 Rack Position Guides 2 with 6 Rack Positions 1 Oven Bottom Oven Vent Cooling Fan * Picture shows double oven. The cooling fan...
Use & Care Manual
Page 12
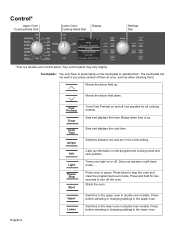
...Broil Roast Self Clean Warm Proof Warm Pie Self Clean Lower Off Roast Heating 170° Bake Roast Oven 350° Probe 200° 12:12 pm Broil Convection Bake Oven 200° Preheating 12:30 pm Settings Dial Fast Preheat Timer Cook Time am and pm in the clock setting. Moves the... active field up . English 9 Fast Preheat Timer Cook Time am/pm Info Light Pause Stop Start Upper Lower Turns Fast Preheat on or off the oven. Beeps ...
...Broil Roast Self Clean Warm Proof Warm Pie Self Clean Lower Off Roast Heating 170° Bake Roast Oven 350° Probe 200° 12:12 pm Broil Convection Bake Oven 200° Preheating 12:30 pm Settings Dial Fast Preheat Timer Cook Time am and pm in the clock setting. Moves the... active field up . English 9 Fast Preheat Timer Cook Time am/pm Info Light Pause Stop Start Upper Lower Turns Fast Preheat on or off the oven. Beeps ...
Use & Care Manual
Page 14
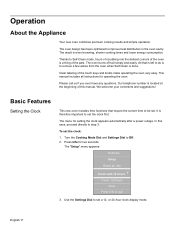
...Press Info to Off. 2. Thanks to step 3. The oven design has been optimized to remove a few ashes from the oven when Self-Clean is done. In this manual. Press Info for two seconds. The "Setup" menu appears: 10:30 am Setup Reset all instructions for setting the clock appears ...automatically after a power outage. The result is a thing of the touch keys and knobs make operating the oven very easy. All that require the current time to set the clock first. Operation About the Appliance Your new oven combines ...
...Press Info to Off. 2. Thanks to step 3. The oven design has been optimized to remove a few ashes from the oven when Self-Clean is done. In this manual. Press Info for two seconds. The "Setup" menu appears: 10:30 am Setup Reset all instructions for setting the clock appears ...automatically after a power outage. The result is a thing of the touch keys and knobs make operating the oven very easy. All that require the current time to set the clock first. Operation About the Appliance Your new oven combines ...
Use & Care Manual
Page 15
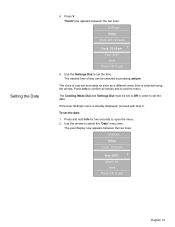
... year display now appears between the two lines: 12:00 pm Setup Clock with step 2. "Clock"now appears between the two lines: 10:30 am Setup Clock: 10:30 am /pm. Press and hold Info for two seconds to set the date. Use the Settings Dial to open the menu. 2. To set...
... year display now appears between the two lines: 12:00 pm Setup Clock with step 2. "Clock"now appears between the two lines: 10:30 am Setup Clock: 10:30 am /pm. Press and hold Info for two seconds to set the date. Use the Settings Dial to open the menu. 2. To set...
Use & Care Manual
Page 16
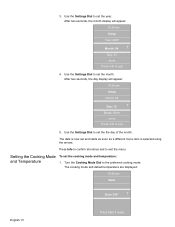
... Setup Year: 2007 Month: 04 +- After two seconds, the month display will appear: 10:30 am Setup Month: 04 Day: 12 +- After two seconds, the day display will appear: 10:30 am Bake Oven 350° +- Setting the Cooking Mode and Temperature To set the year. English 13 Press Start if ready Use...
... Setup Year: 2007 Month: 04 +- After two seconds, the month display will appear: 10:30 am Setup Month: 04 Day: 12 +- After two seconds, the day display will appear: 10:30 am Bake Oven 350° +- Setting the Cooking Mode and Temperature To set the year. English 13 Press Start if ready Use...