
Installation Instructions
Page 2
... hearing from you Begin 3 Tools and Parts Needed 3 Parts Included 3 27" Appliances 3 General Information 3 30" Appliances 6 Removing Packaging 9 For Convection Microwave Combination Units 9 Preparing Oven 9 Installation 10 Electrical Installation 10 Oven Installation 12 Testing Operation 13 Service 14 Before Calling Service 14 This Bosch Appliance is made by BSH Home Appliances Corporation 5551 McFadden Ave.
... hearing from you Begin 3 Tools and Parts Needed 3 Parts Included 3 27" Appliances 3 General Information 3 30" Appliances 6 Removing Packaging 9 For Convection Microwave Combination Units 9 Preparing Oven 9 Installation 10 Electrical Installation 10 Oven Installation 12 Testing Operation 13 Service 14 Before Calling Service 14 This Bosch Appliance is made by BSH Home Appliances Corporation 5551 McFadden Ave.

Installation Instructions
Page 3
... of the following Standards: • UL 858, The Standard for the Safety of Household Electric Ranges • UL 923, The Standard for the Safety of Microwave Cooking Appliances • UL 507, The Standard for the Safety of the owner and the installer to determine if additional requirements and/or standards apply...
... of the following Standards: • UL 858, The Standard for the Safety of Household Electric Ranges • UL 923, The Standard for the Safety of Microwave Cooking Appliances • UL 507, The Standard for the Safety of the owner and the installer to determine if additional requirements and/or standards apply...

Installation Instructions
Page 6
... and level. The supporting base must be flat and capable of supporting a weight of at least 1/4" space between the side of the oven and the wall/door. For oven support, install 2x4's extending front to back flush with the bottom and the side of the opening . 263/4" (680mm) 2413/16"... a cabinet run , adjacent to a perpendicular wall or cabinet door, to facilitate connecting and servicing. Note: The conduit box must be located above the unit to allow at least 355 lbs (161 kg). Combo Oven with Microwave 27" It is good practice, when oven is installed at the end of the opening ...
... and level. The supporting base must be flat and capable of supporting a weight of at least 1/4" space between the side of the oven and the wall/door. For oven support, install 2x4's extending front to back flush with the bottom and the side of the opening . 263/4" (680mm) 2413/16"... a cabinet run , adjacent to a perpendicular wall or cabinet door, to facilitate connecting and servicing. Note: The conduit box must be located above the unit to allow at least 355 lbs (161 kg). Combo Oven with Microwave 27" It is good practice, when oven is installed at the end of the opening ...

Installation Instructions
Page 7
...base must be well secured to facilitate connecting and servicing. For oven support, install 2x4's extending front to back flush with Microwave and Warming Drawer 27" It is good practice, when oven is installed at the end of the oven and the wall/door. Note: The conduit box must be located above the ...unit to the floor/cabinet and level. The cabinet base must be flat and capable of supporting a weight of at least 1/4" space between the side of a cabinet run, adjacent to a perpendicular wall or cabinet ...
...base must be well secured to facilitate connecting and servicing. For oven support, install 2x4's extending front to back flush with Microwave and Warming Drawer 27" It is good practice, when oven is installed at the end of the oven and the wall/door. Note: The conduit box must be located above the ...unit to the floor/cabinet and level. The cabinet base must be flat and capable of supporting a weight of at least 1/4" space between the side of a cabinet run, adjacent to a perpendicular wall or cabinet ...

Installation Instructions
Page 9
... at the end of a cabinet run , adjacent to a perpendicular wall or cabinet door, to facilitate connecting and servicing. For oven support, install 2x4's extending front to back flush with Microwave 30" It is good practice, when oven is installed at least 1/4" space between the side of the opening .... For oven support, install 2x4's extending front to back flush with Microwave and Warming Drawer 30" It is good practice, when oven is installed at least 1/4" space between the side of the oven and the wall/door. Note: The conduit box must be ...
... at the end of a cabinet run , adjacent to a perpendicular wall or cabinet door, to facilitate connecting and servicing. For oven support, install 2x4's extending front to back flush with Microwave 30" It is good practice, when oven is installed at least 1/4" space between the side of the opening .... For oven support, install 2x4's extending front to back flush with Microwave and Warming Drawer 30" It is good practice, when oven is installed at least 1/4" space between the side of the oven and the wall/door. Note: The conduit box must be ...
Installation Instructions
Page 11
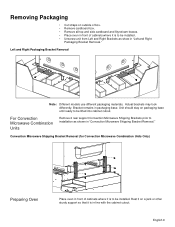
... on packaging base until ready to be installed. • Unscrew unit from Left and Right Brackets as shown in "Convection Microwave Shipping Bracket Removal." Removing Packaging • Cut straps on outside of box. • Remove cardboard box. • Remove...it is in packaging base. Convection Microwave Shipping Bracket Removal (for Convection Microwave Combination Units Only) Preparing Oven Place oven in front of cabinets where it is to be installed. For Convection Microwave Combination Units Remove 2 rear support Convection Microwave Shipping Brackets prior to be lifted ...
... on packaging base until ready to be installed. • Unscrew unit from Left and Right Brackets as shown in "Convection Microwave Shipping Bracket Removal." Removing Packaging • Cut straps on outside of box. • Remove cardboard box. • Remove...it is in packaging base. Convection Microwave Shipping Bracket Removal (for Convection Microwave Combination Units Only) Preparing Oven Place oven in front of cabinets where it is to be installed. For Convection Microwave Combination Units Remove 2 rear support Convection Microwave Shipping Brackets prior to be lifted ...
Use & Care Manual
Page 38
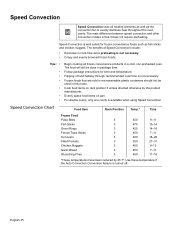
... English 35 Follow package instructions for frozen convenience foods such as the T convection fan to evenly distribute heat throughout the oven cavity. For double ovens, only one cavity is turned off. Evenly space food items on rack position 3 unless directed otherwise by 25 °...foods. Frozen foods that it does not require preheating. Speed Convection is that are sold in microwaveable plastic containers should not be done in a cold, non-preheated oven. Speed Convection Speed Convection uses all frozen convenience products in package time. The main difference ...
... English 35 Follow package instructions for frozen convenience foods such as the T convection fan to evenly distribute heat throughout the oven cavity. For double ovens, only one cavity is turned off. Evenly space food items on rack position 3 unless directed otherwise by 25 °...foods. Frozen foods that it does not require preheating. Speed Convection is that are sold in microwaveable plastic containers should not be done in a cold, non-preheated oven. Speed Convection Speed Convection uses all frozen convenience products in package time. The main difference ...