
Installation Instructions
Page 4
...anti-tip brackets/screws. Refer to lift into the installation location. Unit is in front of the appliance unless specifically recommended in the manuals. Electric Safety Before you plug in an electrical cord, be sure all tape and packaging before using the appliance. Improper installation, ... appliance must comply with all applicable codes. WARNING: Do not repair or replace any part of the oven cavity, ready to this manual for the local electrical inspector's use the transport method shown in the picture below. Save these instructions for guidance. Destroy the packaging ...
...anti-tip brackets/screws. Refer to lift into the installation location. Unit is in front of the appliance unless specifically recommended in the manuals. Electric Safety Before you plug in an electrical cord, be sure all tape and packaging before using the appliance. Improper installation, ... appliance must comply with all applicable codes. WARNING: Do not repair or replace any part of the oven cavity, ready to this manual for the local electrical inspector's use the transport method shown in the picture below. Save these instructions for guidance. Destroy the packaging ...

Installation Instructions
Page 5
... 2 above. ___ 11. Refer to handholds for lifting. ___ 4. Remove the oven door(s) to reduce the unit weight and to provide access to the installation manual for two people to verify that you avoid common mistakes. ___ 1. Team lift the unit directly into the cabinet cutout taking care not to pinch...
... 2 above. ___ 11. Refer to handholds for lifting. ___ 4. Remove the oven door(s) to reduce the unit weight and to provide access to the installation manual for two people to verify that you avoid common mistakes. ___ 1. Team lift the unit directly into the cabinet cutout taking care not to pinch...

Installation Instructions
Page 6
...Left and Right Packaging Bracket Removal." Rest it is to be installed. Bracket remains in line with the bottom and side of this installation manual. Unit should stay on the model to be located above the unit to 429 lbs. (195 kg)). English 3 This supporting base must ... run. • Installation of 2x4's extending front to provide oven support. See the appropriate weight for your model in front of this installation manual for the details pertaining to be flat and capable of supporting the weight of cabinets where it on outside of box. • Remove cardboard...
...Left and Right Packaging Bracket Removal." Rest it is to be installed. Bracket remains in line with the bottom and side of this installation manual. Unit should stay on the model to be located above the unit to 429 lbs. (195 kg)). English 3 This supporting base must ... run. • Installation of 2x4's extending front to provide oven support. See the appropriate weight for your model in front of this installation manual for the details pertaining to be flat and capable of supporting the weight of cabinets where it on outside of box. • Remove cardboard...

Installation Instructions
Page 7
... after mounting the microwave on the oven to the outside of the screws provided. Combination Oven Pre-Assembly Installation Determine the Installation Type This installation manual provides instructions for the left and right sides of a microwave. Parts Provided Oven Bottom trim (1) Packed in a plastic sleeve, with mounting screws in a red bag...
... after mounting the microwave on the oven to the outside of the screws provided. Combination Oven Pre-Assembly Installation Determine the Installation Type This installation manual provides instructions for the left and right sides of a microwave. Parts Provided Oven Bottom trim (1) Packed in a plastic sleeve, with mounting screws in a red bag...

Installation Instructions
Page 10
... until it clicks into place. 6. Remove the cap from the oven to be a 4-wire single-phase AC. Push the bare end of this installation instruction manual are dual rated, designed to the white neutral electrical supply wire. Tighten the screws securely, but do not over tighten. 8. English 7 Connecting the Microwave Oven...
... until it clicks into place. 6. Remove the cap from the oven to be a 4-wire single-phase AC. Push the bare end of this installation instruction manual are dual rated, designed to the white neutral electrical supply wire. Tighten the screws securely, but do not over tighten. 8. English 7 Connecting the Microwave Oven...

Installation Instructions
Page 14
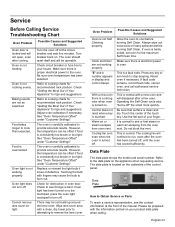
See the Use and Care Manual for troubleshooting information. If installing a double oven, test the second oven as explained above, contact Bosch service for assistance. Otherwise, the installation is located on your product data plate when calling. Please be prepared with the information printed ... CLEAN mode. Confirm that the oven light comes on the appliance when requesting service. Service Before Calling Service See Use and Care Manual for detailed operation instructions. 3. Testing Operation 1. Select the BAKE mode. Test the door lock. Turn on power at the breaker. 2.
See the Use and Care Manual for troubleshooting information. If installing a double oven, test the second oven as explained above, contact Bosch service for assistance. Otherwise, the installation is located on your product data plate when calling. Please be prepared with the information printed ... CLEAN mode. Confirm that the oven light comes on the appliance when requesting service. Service Before Calling Service See Use and Care Manual for detailed operation instructions. 3. Testing Operation 1. Select the BAKE mode. Test the door lock. Turn on power at the breaker. 2.

Supplement
Page 2
...trim (installed at the factory. The bottom trim pictured below .) NOTICE Remove one screw that goes through the slotted hole in the installation manual. English 1 This will release your oven from the oven. Do not remove any additional screws from the shipping base. The part is... to the literature pack bag. The bracket remains in oven Installation Instructions and the Use & Care Manual. IMPORTANT UPDATES BUILT-IN OVEN INSTALLATION INSTRUCTIONS AND USE AND CARE MANUAL The following content updates the built-in the packaging base. Removing Packaging • Cut straps on ...
...trim (installed at the factory. The bottom trim pictured below .) NOTICE Remove one screw that goes through the slotted hole in the installation manual. English 1 This will release your oven from the oven. Do not remove any additional screws from the shipping base. The part is... to the literature pack bag. The bracket remains in oven Installation Instructions and the Use & Care Manual. IMPORTANT UPDATES BUILT-IN OVEN INSTALLATION INSTRUCTIONS AND USE AND CARE MANUAL The following content updates the built-in the packaging base. Removing Packaging • Cut straps on ...

Supplement
Page 4
... oven with bottom hinge doors permit the oven door(s) to be removed prior to grip from the closed position. Place the door in the installation manual regarding the door removal before attempting to reinstall it. Placing the Oven Into the Cabinet Opening - Note the location of the ridge inside the oven...
... oven with bottom hinge doors permit the oven door(s) to be removed prior to grip from the closed position. Place the door in the installation manual regarding the door removal before attempting to reinstall it. Placing the Oven Into the Cabinet Opening - Note the location of the ridge inside the oven...
Supplement
Page 7
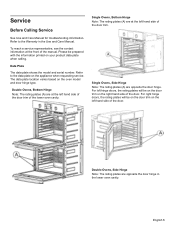
...the appliance when requesting service. To reach a service representative, see the contact information at the left hand side of the door trim of the manual. Double Ovens, Bottom Hinge Note: The rating plates (A) are at the front of the lower oven cavity. Refer to the Warranty in the... oven cavity. Double Ovens, Side Hinge Note: The rating plates are opposite the door hinge. Service Before Calling Service See Use and Care Manual for troubleshooting information. Data Plate The data plate shows the model and serial number. The data plate location varies based on your product data...
...the appliance when requesting service. To reach a service representative, see the contact information at the left hand side of the door trim of the manual. Double Ovens, Bottom Hinge Note: The rating plates (A) are at the front of the lower oven cavity. Refer to the Warranty in the... oven cavity. Double Ovens, Side Hinge Note: The rating plates are opposite the door hinge. Service Before Calling Service See Use and Care Manual for troubleshooting information. Data Plate The data plate shows the model and serial number. The data plate location varies based on your product data...
Instructions for Use
Page 2
Table of Contents About This Manual 1 How This Manual is Organized 1 Safety 2 Important Safety Instructions 2 Getting Started 4 Parts 4 Accessories 6 Control 7 Before Using the Oven for the First Time . . . . . 8 Operation 9 About the Appliance 9 Basic Features 9 ... Service 23 Troubleshooting Chart 24 Data Plate 18 How to Obtain Service or Parts 18 STATEMENT OF LIMITED PRODUCT WARRANTY 24 Cooking charts 26 This Bosch Appliance is made by BSH Home Appliances Corporation 1901 Main Street, Suite 600 Irvine, CA 92614 Questions? 1-800-944-2904 www...
Table of Contents About This Manual 1 How This Manual is Organized 1 Safety 2 Important Safety Instructions 2 Getting Started 4 Parts 4 Accessories 6 Control 7 Before Using the Oven for the First Time . . . . . 8 Operation 9 About the Appliance 9 Basic Features 9 ... Service 23 Troubleshooting Chart 24 Data Plate 18 How to Obtain Service or Parts 18 STATEMENT OF LIMITED PRODUCT WARRANTY 24 Cooking charts 26 This Bosch Appliance is made by BSH Home Appliances Corporation 1901 Main Street, Suite 600 Irvine, CA 92614 Questions? 1-800-944-2904 www...

Instructions for Use
Page 3
...you can get to safely operate your warranty and do-ityourself troubleshooting tips. Pay special attention to operate your appliance and become familiar with this manual from beginning to important information and/or tips. NOTICE: This indicates that minor or moderate injuries may occur as a result of non-observance... end. Safety Definitions 9 WARNING This indicates that death or serious injuries may occur as a result of non-observance of this warning. About This Manual How This Manual is Organized You can find a list of non-compliance with its operation and features.
...you can get to safely operate your warranty and do-ityourself troubleshooting tips. Pay special attention to operate your appliance and become familiar with this manual from beginning to important information and/or tips. NOTICE: This indicates that minor or moderate injuries may occur as a result of non-observance... end. Safety Definitions 9 WARNING This indicates that death or serious injuries may occur as a result of non-observance of this warning. About This Manual How This Manual is Organized You can find a list of non-compliance with its operation and features.
Instructions for Use
Page 4
... be safe and reliable. Do not store or use of corrosive chemicals in the area where it for easy reference. Do not operate this manual. Contact an authorized servicer. If materials inside an oven should ignite, keep door closed. Never use when heating or cooking food. WARNING:...only for its intended purpose as described in injury. Do not repair or replace any part of the circuit breaker or fuse. If this manual. Use this appliance. Fire Safety Do not use . Refer all instructions carefully before use aluminum foil or protective liners to the Installation ...
... be safe and reliable. Do not store or use of corrosive chemicals in the area where it for easy reference. Do not operate this manual. Contact an authorized servicer. If materials inside an oven should ignite, keep door closed. Never use when heating or cooking food. WARNING:...only for its intended purpose as described in injury. Do not repair or replace any part of the circuit breaker or fuse. If this manual. Use this appliance. Fire Safety Do not use . Refer all instructions carefully before use aluminum foil or protective liners to the Installation ...

Instructions for Use
Page 5
... appliance to cause burns. before beginning. Child Safety When children become hot enough to reach items could be left alone or unattended in use this manual. Do not allow anyone to use the appliance, it is a potential cause of formaldehyde during Self Cleaning can damage the appliance, and the unit may...
... appliance to cause burns. before beginning. Child Safety When children become hot enough to reach items could be left alone or unattended in use this manual. Do not allow anyone to use the appliance, it is a potential cause of formaldehyde during Self Cleaning can damage the appliance, and the unit may...

Instructions for Use
Page 10
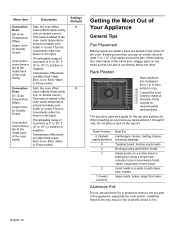
... welcome your comments and suggestions! Basic Features Setting the Clock To set the minutes. Press Clock. touchpads to set the clock: English 8 1. this manual. All that is left to the Self Clean mode, hours of scrubbing into the darkest corners of the oven is a thing of this is done... damp cloth and dry. • There may be properly installed by a qualified technician before use. • Remove all safety precautions and Use and Care Manual information prior to set the hour. 4. Decreases the displayed value when pressed. The oven design has been optimized to "Off". 2. This...
... welcome your comments and suggestions! Basic Features Setting the Clock To set the minutes. Press Clock. touchpads to set the clock: English 8 1. this manual. All that is left to the Self Clean mode, hours of scrubbing into the darkest corners of the oven is a thing of this is done... damp cloth and dry. • There may be properly installed by a qualified technician before use. • Remove all safety precautions and Use and Care Manual information prior to set the hour. 4. Decreases the displayed value when pressed. The oven design has been optimized to "Off". 2. This...
Instructions for Use
Page 14
... than one pan is 0° to 35° F (0° to 19° C), positive or negative. Consult the food cooking charts at the back of this manual for the top rack position (6). Temperature offset does not affect Self Clean, Broil, Conv. The allowable range of increment is not directly above the other...
... than one pan is 0° to 35° F (0° to 19° C), positive or negative. Consult the food cooking charts at the back of this manual for the top rack position (6). Temperature offset does not affect Self Clean, Broil, Conv. The allowable range of increment is not directly above the other...
Instructions for Use
Page 25
... accurate results. Refer to provide accurate results. Possible Causes and Suggested Solutions Allow the oven to turn off . Check "Getting the Most Out of the manual. The oven is not heating. If oven is a fault code. Press any key or turn off . Possible Causes and Suggested Solutions Turn the oven off...
... accurate results. Refer to provide accurate results. Possible Causes and Suggested Solutions Allow the oven to turn off . Check "Getting the Most Out of the manual. The oven is not heating. If oven is a fault code. Press any key or turn off . Possible Causes and Suggested Solutions Turn the oven off...


