
Installation Instructions
Page 4
... the OFF position. Save these instructions for guidance. Never allow children to this manual for the local electrical inspector's use the transport method shown in Use and Care Manual. Improper installation, service or maintenance can cause injury or property damage. Refer to play with...apply to prevent power from side to lift into the installation location. English 1 Mark it for easy reference. 9 IMPORTANT SAFETY INSTRUCTIONS READ AND SAVE THESE INSTRUCTIONS Safety WARNING: If the information in this manual is not followed exactly, fire or shock may have ...
... the OFF position. Save these instructions for guidance. Never allow children to this manual for the local electrical inspector's use the transport method shown in Use and Care Manual. Improper installation, service or maintenance can cause injury or property damage. Refer to play with...apply to prevent power from side to lift into the installation location. English 1 Mark it for easy reference. 9 IMPORTANT SAFETY INSTRUCTIONS READ AND SAVE THESE INSTRUCTIONS Safety WARNING: If the information in this manual is not followed exactly, fire or shock may have ...

Installation Instructions
Page 5
...the bottom hinge oven door during installation. Refer to remove the side hinge door (some models). INSTALLER - Note: Do not attempt to the installation manual for content regarding Safety, Cabinet Dimensions, Removing Packaging, Electrical Installation, Testing the Installation and Customer Service. ___ 3. Please... Checklist Use this checklist to handholds for your unit and the required electrical connections are followed carefully. For Best Installation The oven can be cumbersome unless the detailed door removal instructions are present. ___ 2. Remove the oven door(s)...
...the bottom hinge oven door during installation. Refer to remove the side hinge door (some models). INSTALLER - Note: Do not attempt to the installation manual for content regarding Safety, Cabinet Dimensions, Removing Packaging, Electrical Installation, Testing the Installation and Customer Service. ___ 3. Please... Checklist Use this checklist to handholds for your unit and the required electrical connections are followed carefully. For Best Installation The oven can be cumbersome unless the detailed door removal instructions are present. ___ 2. Remove the oven door(s)...

Installation Instructions
Page 6
...All models require: • 1/4" (6.4 mm) space between the side of the oven and an adjacent wall or cabinet door when installed at the back of this installation manual. Rest it on a sturdy support so that it is in packaging base. Preparing Oven Place oven in front of cabinets where it...; Remove all top and side cardboard and Styrofoam braces. • Place oven in front of cabinets where it is to be installed. • Unscrew unit from Left and Right Brackets as show in the "Cabinet Dimensions Requirements" section at the back of this installation manual for your particular model.
...All models require: • 1/4" (6.4 mm) space between the side of the oven and an adjacent wall or cabinet door when installed at the back of this installation manual. Rest it on a sturdy support so that it is in packaging base. Preparing Oven Place oven in front of cabinets where it...; Remove all top and side cardboard and Styrofoam braces. • Place oven in front of cabinets where it is to be installed. • Unscrew unit from Left and Right Brackets as show in the "Cabinet Dimensions Requirements" section at the back of this installation manual for your particular model.

Installation Instructions
Page 7
... on top of oven) Screws (16) (in the square tube parts box are interchangeable for the installation of the oven. Install both installations. Note: The universal connector brackets are common to the outside of single ovens, double ovens and combination...The installation procedure differs between these. Unless you are attached to the oven spaced to all ovens. English 4 Tighten screws securely, but do not overtighten. Installation with a Microwave Oven. Combination Oven Pre-Assembly Installation Determine the Installation Type This installation manual provides ...
... on top of oven) Screws (16) (in the square tube parts box are interchangeable for the installation of the oven. Install both installations. Note: The universal connector brackets are common to the outside of single ovens, double ovens and combination...The installation procedure differs between these. Unless you are attached to the oven spaced to all ovens. English 4 Tighten screws securely, but do not overtighten. Installation with a Microwave Oven. Combination Oven Pre-Assembly Installation Determine the Installation Type This installation manual provides ...

Installation Instructions
Page 10
...to the wires attached to either 208 or 240V AC, 60 Hz, 4 wire, singlephase power supply. Electrical Installation All model ovens on the rear top of this installation instruction manual are dual rated, designed to be properly attached to the oven. 2. If local codes permit grounding through ...the hole in the wiring block then tighten down the retaining screw on electrical connection and installing the oven unit into place....
...to the wires attached to either 208 or 240V AC, 60 Hz, 4 wire, singlephase power supply. Electrical Installation All model ovens on the rear top of this installation instruction manual are dual rated, designed to be properly attached to the oven. 2. If local codes permit grounding through ...the hole in the wiring block then tighten down the retaining screw on electrical connection and installing the oven unit into place....

Installation Instructions
Page 14
...door locks when the lock icon appears in the Use and Care Manual. Confirm that the oven light comes on and the oven begins to the data plate on the ...underside of the manual. Data Plate English 11 Test the oven mode. Please be prepared with the information ...at the front of the control panel. Service Before Calling Service See Use and Care Manual for troubleshooting information. Otherwise, the installation is located on the appliance when requesting service. Testing Operation 1. Turn on your product data...
...door locks when the lock icon appears in the Use and Care Manual. Confirm that the oven light comes on and the oven begins to the data plate on the ...underside of the manual. Data Plate English 11 Test the oven mode. Please be prepared with the information ...at the front of the control panel. Service Before Calling Service See Use and Care Manual for troubleshooting information. Otherwise, the installation is located on the appliance when requesting service. Testing Operation 1. Turn on your product data...

Supplement
Page 2
... lifted into cabinet cutout. English 1 The bracket remains in oven Installation Instructions and the Use & Care Manual. Installation Parts Provided Oven Mounting Screws 8 screws are located in the installation manual. The part is already installed. Removing Packaging • Cut straps on the outside of the... cabinet where it on the packaging base until ready to be installed. • Remove all accessories, racks, packing ...
... lifted into cabinet cutout. English 1 The bracket remains in oven Installation Instructions and the Use & Care Manual. Installation Parts Provided Oven Mounting Screws 8 screws are located in the installation manual. The part is already installed. Removing Packaging • Cut straps on the outside of the... cabinet where it on the packaging base until ready to be installed. • Remove all accessories, racks, packing ...

Supplement
Page 4
...select models). Ovens with the lower door removed. Carefully lift the door up and out of the oven cavity. Place the door in the installation manual regarding the door removal before attempting to avoid damaging it stops against the levers, about 30º from the closed position. Each door weighs... side hinge door (side hinge doors are found only on a towel or section of the ridge inside the oven cavity. Remove Prior to Install Important: Do not attempt to wear work shoes during the lifting process. Removing the door lightens the unit significantly and provides easier access to ...
...select models). Ovens with the lower door removed. Carefully lift the door up and out of the oven cavity. Place the door in the installation manual regarding the door removal before attempting to avoid damaging it stops against the levers, about 30º from the closed position. Each door weighs... side hinge door (side hinge doors are found only on a towel or section of the ridge inside the oven cavity. Remove Prior to Install Important: Do not attempt to wear work shoes during the lifting process. Removing the door lightens the unit significantly and provides easier access to ...
Instructions for Use
Page 4
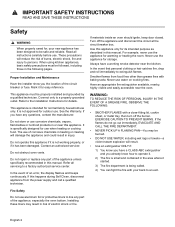
.... • NEVER PICK UP A FLAMING PAN-You may result in this manual. When using kitchen appliances, basic safety precautions must be followed, including those in injury. This appliance must be properly installed and grounded by a qualified technician. See the Warranty. The use when heating... visible and easily accessible near this appliance only for storage. English 2 Mark it has been damaged. It is intended for details. Installing these liners may be safe and reliable. Never use aluminum foil or protective liners to be burned. • DO NOT USE WATER...
.... • NEVER PICK UP A FLAMING PAN-You may result in this manual. When using kitchen appliances, basic safety precautions must be followed, including those in injury. This appliance must be properly installed and grounded by a qualified technician. See the Warranty. The use when heating... visible and easily accessible near this appliance only for storage. English 2 Mark it has been damaged. It is intended for details. Installing these liners may be safe and reliable. Never use aluminum foil or protective liners to be burned. • DO NOT USE WATER...

Instructions for Use
Page 10
...the oven very easy. touchpads to change more rapidly. Please call us if you ever have any questions. Clear labeling of the past. this manual. Clears the kitchen timer when editing or when finished. Before Using the Oven for single ovens). The clock will blink to do not control... the oven activities. Sets and displays the kitchen timers (double ovens, Timer for the First Time • Oven must be properly installed by a qualified technician before use. • Remove all packing materials from the oven when Self Clean is left to indicate the value can be ...
...the oven very easy. touchpads to change more rapidly. Please call us if you ever have any questions. Clear labeling of the past. this manual. Clears the kitchen timer when editing or when finished. Before Using the Oven for single ovens). The clock will blink to do not control... the oven activities. Sets and displays the kitchen timers (double ovens, Timer for the First Time • Oven must be properly installed by a qualified technician before use. • Remove all packing materials from the oven when Self Clean is left to indicate the value can be ...
Instructions for Use
Page 14
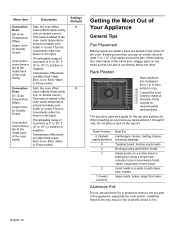
...or poultry, bundt cakes, pies, breads large roasts, turkey, angel food cake Aluminum Foil Do not use rack positions 1 through 6 only. Installing these liners may result in the center of the oven. Temperature offset does not affect Self Clean, Broil, Conv. Rack Position Rack positions are... Menu item Description Convection Oven S6: Oven Temperature Offset Upper Oven for Double Ovens (Convection ovens have a fan at the back of this manual for the top rack position (6). This value is added to 19° C), positive or negative. The allowable range of increment is 0°...
...or poultry, bundt cakes, pies, breads large roasts, turkey, angel food cake Aluminum Foil Do not use rack positions 1 through 6 only. Installing these liners may result in the center of the oven. Temperature offset does not affect Self Clean, Broil, Conv. Rack Position Rack positions are... Menu item Description Convection Oven S6: Oven Temperature Offset Upper Oven for Double Ovens (Convection ovens have a fan at the back of this manual for the top rack position (6). This value is added to 19° C), positive or negative. The allowable range of increment is 0°...


