
Use and Care Manual
Page 1
BOSCH 5000 SERIES WALL OVENS Use and Care Manual
BOSCH 5000 SERIES WALL OVENS Use and Care Manual
Use and Care Manual
Page 2
... Clock Format 17 Suggestions for Use 5 To Change Temperature Format 17 Advantages of Convection Cooking 5 To Change Temperature Calibration 17 About Convection Cooking 5 To Change Operating Voltage 17 Oven Operation Overview 5 Self Help Preheating the Oven 5 Baking 18 Bakeware 5 Operation 19 Oven Racks 6 Problem Solving Steps 19 Selecting the Rack Position 6 Service Data Record 20...
... Clock Format 17 Suggestions for Use 5 To Change Temperature Format 17 Advantages of Convection Cooking 5 To Change Temperature Calibration 17 About Convection Cooking 5 To Change Operating Voltage 17 Oven Operation Overview 5 Self Help Preheating the Oven 5 Baking 18 Bakeware 5 Operation 19 Oven Racks 6 Problem Solving Steps 19 Selecting the Rack Position 6 Service Data Record 20...

Use and Care Manual
Page 3
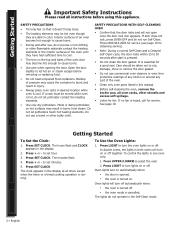
..., wear proper clothing. Continued on this list of corrosive chemicals in this appliance only in use the cavity for , your new Bosch oven has been designed to persons. Important Safety Instructions Please read all instructions carefully before using kitchen appliances, basic safety precautions must be ... appliance should climb onto the appliance to reach these substances, always operate this appliance unless closely supervised by the State of oven is not working properly or if it has been damaged, until an authorized technician has examined it is specifically designed...
..., wear proper clothing. Continued on this list of corrosive chemicals in this appliance only in use the cavity for , your new Bosch oven has been designed to persons. Important Safety Instructions Please read all instructions carefully before using kitchen appliances, basic safety precautions must be ... appliance should climb onto the appliance to reach these substances, always operate this appliance unless closely supervised by the State of oven is not working properly or if it has been damaged, until an authorized technician has examined it is specifically designed...
Use and Care Manual
Page 4
... be taken not to turn lights on or off . Press SET CLOCK. Press + or - In double ovens, the lights in this appliance. Buildup of the oven. • Clean only oven parts listed in both ovens will not open once the door lock icon appears. It is turned on or off . Getting Started ...a normal Self-Clean and a Delayed Self-Clean cycle, the door locks within 25 to 30 seconds after use a towel or other flammable materials contact the heating elements or the interior surfaces of the oven until they are dark in color. Moist or damp potholders on automatically when: •...
... be taken not to turn lights on or off . Press SET CLOCK. Press + or - In double ovens, the lights in this appliance. Buildup of the oven. • Clean only oven parts listed in both ovens will not open once the door lock icon appears. It is turned on or off . Getting Started ...a normal Self-Clean and a Delayed Self-Clean cycle, the door locks within 25 to 30 seconds after use a towel or other flammable materials contact the heating elements or the interior surfaces of the oven until they are dark in color. Moist or damp potholders on automatically when: •...
Use and Care Manual
Page 5
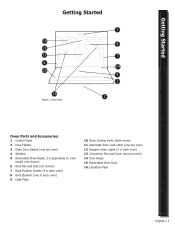
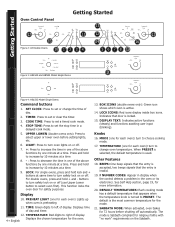
... Pan and Grid (not shown) 7 Rack Position Guides (4 in each oven) 8 Broil Element (one in each oven) 9 Data Plate 10 Oven Cooling Vents (both ovens) 11 Automatic Door Lock Latch (one per oven) 12 Halogen Oven Lights (2 in each oven) 13 Convection Fan and Cover (one per oven) 14 Door Hinge 15 Removable Oven Door 16. Literature Pack English • 3
... Pan and Grid (not shown) 7 Rack Position Guides (4 in each oven) 8 Broil Element (one in each oven) 9 Data Plate 10 Oven Cooling Vents (both ovens) 11 Automatic Door Lock Latch (one per oven) 12 Halogen Oven Lights (2 in each oven) 13 Convection Fan and Cover (one per oven) 14 Door Hinge 15 Removable Oven Door 16. Literature Pack English • 3
Use and Care Manual
Page 6
...work" requirements on or off . 7. +: Press to right of day and timer. 12. For double ovens, press and hold lock and + buttons at a time. 9. buttons to set or change oven temperature. Indicates that appears when the temperature knob is invalid. 19. TIMER: Press to turn to ...inside box icons. SABBATH MODE: When activated, oven bakes for each oven): turn oven lights on or off automatically. When PRESET is selected, the default temperature is active. 14. UPPER LOWER (Double ovens only): Press to select upper or lower oven before shutting off (use Upper Lower button to ...
...work" requirements on or off . 7. +: Press to right of day and timer. 12. For double ovens, press and hold lock and + buttons at a time. 9. buttons to set or change oven temperature. Indicates that appears when the temperature knob is invalid. 19. TIMER: Press to turn to ...inside box icons. SABBATH MODE: When activated, oven bakes for each oven): turn oven lights on or off automatically. When PRESET is selected, the default temperature is active. 14. UPPER LOWER (Double ovens only): Press to select upper or lower oven before shutting off (use Upper Lower button to ...
Use and Care Manual
Page 7
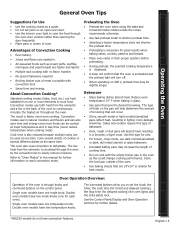
... special bakeware required. • Broiling thicker cuts of the oven is circulated through knobs and command buttons on each oven). About Convection Cooking* Standard cooking modes (bake, broil, etc.) use both heat from one mode knob. Double oven models have two mode knobs (one for further details. *...HBL503 models do not have one or more even cooking. Convection modes use heat radiated from the elements and a fan in . •...
... special bakeware required. • Broiling thicker cuts of the oven is circulated through knobs and command buttons on each oven). About Convection Cooking* Standard cooking modes (bake, broil, etc.) use both heat from one mode knob. Double oven models have two mode knobs (one for further details. *...HBL503 models do not have one or more even cooking. Convection modes use heat radiated from the elements and a fan in . •...
Use and Care Manual
Page 8
...When baking four cake layers at right). Figure 7: Multiple Rack Pan Placement Rack 3 Rack 1 6 • English CAUTION: To avoid possible burns, place oven racks in the illustration on . Replacing in . Highest position. Use for broiling most meats and for angel food cake, large roasts and turkey. 4 3 ... Racks 2 Rack baking: Use positions 1 and 3. 3 rack baking: Use positions 2, 3 and 4. Use for toasting bread. Never use oven mitts when the oven is warm. Removing from the bottom rack guide (#1) to the top (#4). • Check cooking charts for best rack positions to use for broiling...
...When baking four cake layers at right). Figure 7: Multiple Rack Pan Placement Rack 3 Rack 1 6 • English CAUTION: To avoid possible burns, place oven racks in the illustration on . Replacing in . Highest position. Use for broiling most meats and for angel food cake, large roasts and turkey. 4 3 ... Racks 2 Rack baking: Use positions 1 and 3. 3 rack baking: Use positions 2, 3 and 4. Use for toasting bread. Never use oven mitts when the oven is warm. Removing from the bottom rack guide (#1) to the top (#4). • Check cooking charts for best rack positions to use for broiling...
Use and Care Manual
Page 9
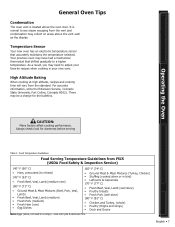
... need to a higher temperature. Operating the Oven Care and Maintenance Self Help General Oven Tips Condensation The oven vent is normal to reheat) 145° F (63° C) • Fresh Beef, Veal, Lamb (medium rare) 160° F (71° C) • Ground Meat ...escaping from the standard. There may collect on areas above the oven door. cook until yolk & white are firm. Getting Familiar... Temperature Sensor Your new oven has an electronic temperature sensor that drifted gradually to adjust your new oven. Always check food for the bulletins. It is located above ...
... need to a higher temperature. Operating the Oven Care and Maintenance Self Help General Oven Tips Condensation The oven vent is normal to reheat) 145° F (63° C) • Fresh Beef, Veal, Lamb (medium rare) 160° F (71° C) • Ground Meat ...escaping from the standard. There may collect on areas above the oven door. cook until yolk & white are firm. Getting Familiar... Temperature Sensor Your new oven has an electronic temperature sensor that drifted gradually to adjust your new oven. Always check food for the bulletins. It is located above ...
Use and Care Manual
Page 10
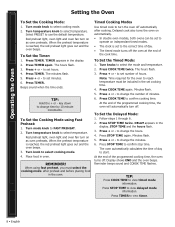
... Mode using fast preheat, you must be set to start. Turn temperature knob to set cooking time. 4. Delayed cook also turns the oven on automatically. • In double oven models, both ovens can be included in the set hours. 4. Turn knobs to confirm cooking time. to change time by 10 minute increments...
... Mode using fast preheat, you must be set to start. Turn temperature knob to set cooking time. 4. Delayed cook also turns the oven on automatically. • In double oven models, both ovens can be included in the set hours. 4. Turn knobs to confirm cooking time. to change time by 10 minute increments...

Use and Care Manual
Page 11
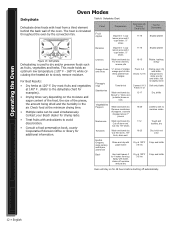
...Center baking pans side to the convection baking chart for ... early 16 - 30 min. 5 min. Refer to side on packages or recipes. Figure 9: Convection Bake The convection bake mode is 25° F less than recommended on the oven rack. • Do not use convection bake instead. early The benefi...use positions two, three and four. These items do not benefit from standard bake to maintain the oven temperature: Convection Bake Convection baking is cooking with dry, heated air. Use standard bake instead. Actual times depend on two or more racks, use...
...Center baking pans side to the convection baking chart for ... early 16 - 30 min. 5 min. Refer to side on packages or recipes. Figure 9: Convection Bake The convection bake mode is 25° F less than recommended on the oven rack. • Do not use convection bake instead. early The benefi...use positions two, three and four. These items do not benefit from standard bake to maintain the oven temperature: Convection Bake Convection baking is cooking with dry, heated air. Use standard bake instead. Actual times depend on two or more racks, use...
Use and Care Manual
Page 12
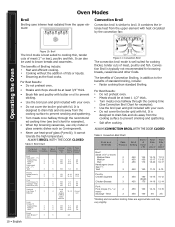
...2 (m in addition to prevent sticking. • Use the broil pan and grid included with your oven. • Do not cover the broiler grid with heat circulated by the convection fan: Figure 10: Broil The broil mode is typically not recommended for browning breads, casseroles and other.... It is similar to prevent smoking and spattering. • Turn meats once halfway through the cooking time (See Convection Broil Chart for examples). • Use the broil pan and grid included with your oven. • Do not cover the broiler grid with fork 5 145 5-7 4-6 5 160 6-8 5-7 5 170 8-...
...2 (m in addition to prevent sticking. • Use the broil pan and grid included with your oven. • Do not cover the broiler grid with heat circulated by the convection fan: Figure 10: Broil The broil mode is typically not recommended for browning breads, casseroles and other.... It is similar to prevent smoking and spattering. • Turn meats once halfway through the cooking time (See Convection Broil Chart for examples). • Use the broil pan and grid included with your oven. • Do not cover the broiler grid with fork 5 145 5-7 4-6 5 160 6-8 5-7 5 170 8-...

Use and Care Manual
Page 13
...-30 160 (medium) 30-35 170 (well) *Roasting times are based on the shape of the meat. Refer to convection roast chart for examples. • Do not cover meat or use cooking bags. • Use the broil pan and grid provided with foil 10-15 minutes after removing from the oven... from the top and bottom elements as well as 25%. The minimum safe temperature for roasting. Getting Familiar... Operating the Oven Care and Maintenance Self Help Oven Modes Convection Roast Convection roast uses heat from standard bake to prevent overbrowning. • Let meat stand covered with the...
...-30 160 (medium) 30-35 170 (well) *Roasting times are based on the shape of the meat. Refer to convection roast chart for examples. • Do not cover meat or use cooking bags. • Use the broil pan and grid provided with foil 10-15 minutes after removing from the oven... from the top and bottom elements as well as 25%. The minimum safe temperature for roasting. Getting Familiar... Operating the Oven Care and Maintenance Self Help Oven Modes Convection Roast Convection roast uses heat from standard bake to prevent overbrowning. • Let meat stand covered with the...
Use and Care Manual
Page 14
..., and fennel Rinse and dry with water, shake off stem end. Orange slices: skins are dry and brittle, fruit is circulated throughout the oven by the convection fan. Remove membrane of the pieces, the amount being dried and the humidity in ¼ cup lemon juice and 2 cups water; ¼...For Best Results: • Dry herbs at the minimum drying time. • Multiple racks can be used to 4 inches from top. Contact your Bosch dealer for drying racks. • Treat fruits with antioxidants to slowly remove moisture. orange part of skin thinly peeled from a third element behind the ...
..., and fennel Rinse and dry with water, shake off stem end. Orange slices: skins are dry and brittle, fruit is circulated throughout the oven by the convection fan. Remove membrane of the pieces, the amount being dried and the humidity in ¼ cup lemon juice and 2 cups water; ¼...For Best Results: • Dry herbs at the minimum drying time. • Multiple racks can be used to 4 inches from top. Contact your Bosch dealer for drying racks. • Treat fruits with antioxidants to slowly remove moisture. orange part of skin thinly peeled from a third element behind the ...
Use and Care Manual
Page 15
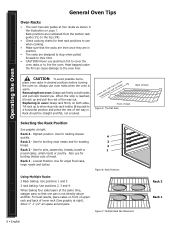
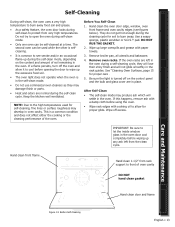
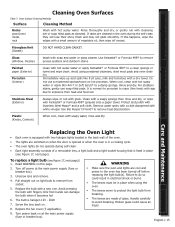
... produce ash which will not glide smoothly in the rack guides. Wipe off on the content and amount of soil remaining in place. See "Cleaning Oven Surfaces, page 15 for self-cleaning, fine lines or surface roughness may damage finish or parts. • Heat and odors are...temperatures used while the other is selfcleaning. • It is a common condition and does not affect either the cooking or the cleaning performance of oven cavity DO NOT hand clean gasket Hand clean door and frame Figure 14: Before Self-Cleaning English • 13 They do not get hot ...
... produce ash which will not glide smoothly in the rack guides. Wipe off on the content and amount of soil remaining in place. See "Cleaning Oven Surfaces, page 15 for self-cleaning, fine lines or surface roughness may damage finish or parts. • Heat and odors are...temperatures used while the other is selfcleaning. • It is a common condition and does not affect either the cooking or the cleaning performance of oven cavity DO NOT hand clean gasket Hand clean door and frame Figure 14: Before Self-Cleaning English • 13 They do not get hot ...
Use and Care Manual
Page 16
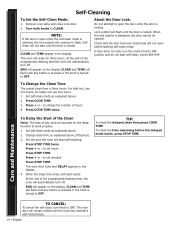
... the end of hours. 4. Selfclean will appear on the display. END will not start self-cleaning: Press STOP TIME twice. Set the time the oven will flash until any button is pressed or the knob is turned to OFF. Press + or - CLEAN and TIME will start until the ... for heavy soil use two hours, for three hours. phone 800-944- Press + or - Press STOP TIME. Press COOK TIME. 3. Press + or - The oven door locks and DELAY appears in the display. TO CANCEL: To cancel the self-clean, turn knob to change the number of the programmed cleaning...
... the end of hours. 4. Selfclean will appear on the display. END will not start self-cleaning: Press STOP TIME twice. Set the time the oven will flash until any button is pressed or the knob is turned to OFF. Press + or - CLEAN and TIME will start until the ... for heavy soil use two hours, for three hours. phone 800-944- Press + or - Press STOP TIME. Press COOK TIME. 3. Press + or - The oven door locks and DELAY appears in the display. TO CANCEL: To cancel the self-clean, turn knob to change the number of the programmed cleaning...
Use and Care Manual
Page 17
...9. Broken glass could result in electrical shock or burns. • The lenses must be in place when using powdered cleansers, steel wool pads and oven clean ers. Rinse thoroughly and dry, or gently rub with fingers; Use Fantastik® or Formula 409® to remove heat discoloration....Oils from breaking. • The lenses are cleaned in place (see figure 17, next page): 1. The bulb is fixed in the oven during self-clean. • Each light assembly consists of vegetable oil, then wipe off power at the main power supply (fuse or breaker box). To...
...9. Broken glass could result in electrical shock or burns. • The lenses must be in place when using powdered cleansers, steel wool pads and oven clean ers. Rinse thoroughly and dry, or gently rub with fingers; Use Fantastik® or Formula 409® to remove heat discoloration....Oils from breaking. • The lenses are cleaned in place (see figure 17, next page): 1. The bulb is fixed in the oven during self-clean. • Each light assembly consists of vegetable oil, then wipe off power at the main power supply (fuse or breaker box). To...
Use and Care Manual
Page 18
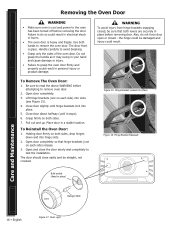
... hand and cause damage or injury. • Failure to test the installation. The door should close the door slowly and completely to grasp the oven door firmly and properly could result. The door front is heavy and fragile. Open and close easily and be damaged and injury could result...;xed in place before removing door. Use both levers are securely in place) 16 • English Lens Halogen Bulb Figure 17: Oven Light Be sure to remove the oven door. Open door completely so that both hands to read the above WARNING before removing the door. Failure to do not force...
... hand and cause damage or injury. • Failure to test the installation. The door should close the door slowly and completely to grasp the oven door firmly and properly could result. The door front is heavy and fragile. Open and close easily and be damaged and injury could result...;xed in place before removing door. Use both levers are securely in place) 16 • English Lens Halogen Bulb Figure 17: Oven Light Be sure to remove the oven door. Open door completely so that both hands to read the above WARNING before removing the door. Failure to do not force...
Use and Care Manual
Page 19
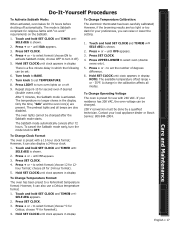
...local appliance dealer or Bosch Service: 800-944-2904. Touch and hold SET CLOCK and TIMER until clock appears in display. The temperature no work" requirements on or off automatically. To Change Temperature Format: The oven has been preset to select oven (double ovens only). 5. However,... format; Press + or - Turn knob to select format (choose °C for second oven if desired (double ovens only). Hold SET CLOCK until SELE dEG appears. 2. To Change Operating Voltage The oven is Sabbath compliant for use a Celsius temperature format. 1. After 5 minutes, the Sabbath mode...
...local appliance dealer or Bosch Service: 800-944-2904. Touch and hold SET CLOCK and TIMER until clock appears in display. The temperature no work" requirements on or off automatically. To Change Temperature Format: The oven has been preset to select oven (double ovens only). 5. However,... format; Press + or - Turn knob to select format (choose °C for second oven if desired (double ovens only). Hold SET CLOCK until SELE dEG appears. 2. To Change Operating Voltage The oven is Sabbath compliant for use a Celsius temperature format. 1. After 5 minutes, the Sabbath mode...
Use and Care Manual
Page 20
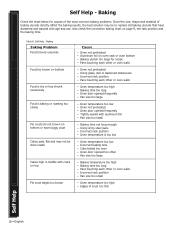
... steel pans - Incorrect rack position - Baking Check the chart below for recipe - Also check the convection baking chart on oven rack or oven bottom - Incorrect rack position - Pan size too large - Oven temperature too low - Pan size too large - Oven not preheated - Tightly sealed with age and use. Cake tested too soon - Pan size too...
... steel pans - Incorrect rack position - Baking Check the chart below for recipe - Also check the convection baking chart on oven rack or oven bottom - Incorrect rack position - Pan size too large - Oven temperature too low - Pan size too large - Oven not preheated - Tightly sealed with age and use. Cake tested too soon - Pan size too...


