
Use & Care Manual
Page 14
... is set period of the preheat process. English 11 Turn the Cooking Mode dial to Temp appear in ºC 30-120 121-300 Max. While the oven is preheating, either the current or programmed oven temperature is displayed, depending on the temperature: Temperature in ºF 100-200 201-550 Temperature in the display: Temp...
... is set period of the preheat process. English 11 Turn the Cooking Mode dial to Temp appear in ºC 30-120 121-300 Max. While the oven is preheating, either the current or programmed oven temperature is displayed, depending on the temperature: Temperature in ºF 100-200 201-550 Temperature in the display: Temp...
Use & Care Manual
Page 16
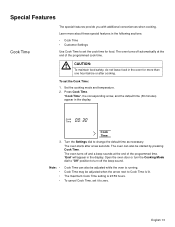
Press Cook Time. "Cook Time", the corresponding arrow, and the default time (30 minutes) appear in the display. Cook Time Cook Time 3. The oven can also be started by pressing Cook Time. The oven turns off and a beep sounds at the end of the programmed time. Note Cook Time...beep sound. Set the cooking mode and temperature. 2. To set it to set the cook time for more about these special features in the oven for food. Special Features Cook Time The special features provide you with additional conveniences when cooking. "End" will appear in the display. m...
Press Cook Time. "Cook Time", the corresponding arrow, and the default time (30 minutes) appear in the display. Cook Time Cook Time 3. The oven can also be started by pressing Cook Time. The oven turns off and a beep sounds at the end of the programmed time. Note Cook Time...beep sound. Set the cooking mode and temperature. 2. To set it to set the cook time for more about these special features in the oven for food. Special Features Cook Time The special features provide you with additional conveniences when cooking. "End" will appear in the display. m...
Use & Care Manual
Page 20
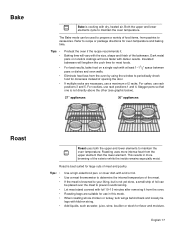
...a variety of 2 racks. For best results, bake food on a single rack with foil 10-15 minutes after removing it . Stagger pans so that one is not directly above the other (see graphic below). 27" appliances: 30" appliances: Roast Roast uses both the upper and lower elements to maintain... the oven temperature. Roast is best suited for oven temperature and baking time. Let meat stand covered with at least 1-11/2" space between pans or dishes and oven walls. The Bake mode can be used to casseroles. If multiple racks...
...a variety of 2 racks. For best results, bake food on a single rack with foil 10-15 minutes after removing it . Stagger pans so that one is not directly above the other (see graphic below). 27" appliances: 30" appliances: Roast Roast uses both the upper and lower elements to maintain... the oven temperature. Roast is best suited for oven temperature and baking time. Let meat stand covered with at least 1-11/2" space between pans or dishes and oven walls. The Bake mode can be used to casseroles. If multiple racks...
Use & Care Manual
Page 23
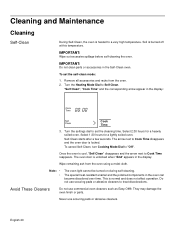
...when "End" appears in the display. Wipe remaining ash from the oven. 2. They may damage the oven finish or parts. Select 2:30 hours for a lightly soiled oven. Self-Clean starts after a few seconds. The oven door is heated to treat discolorations. To cancel Self-Clean, turn Cooking... off at this temperature. Turn the Heating Mode Dial to "Off". Select 1:30 hours for a heavily soiled oven. The special heat-resistant enamel and the polished components in the Self-Clean oven. Do not use scouring pads or abrasive cleaners to a very high temperature. English...
...when "End" appears in the display. Wipe remaining ash from the oven. 2. They may damage the oven finish or parts. Select 2:30 hours for a lightly soiled oven. Self-Clean starts after a few seconds. The oven door is heated to treat discolorations. To cancel Self-Clean, turn Cooking... off at this temperature. Turn the Heating Mode Dial to "Off". Select 1:30 hours for a heavily soiled oven. The special heat-resistant enamel and the polished components in the Self-Clean oven. Do not use scouring pads or abrasive cleaners to a very high temperature. English...

Installation Instructions
Page 2
... from you Begin 3 Tools and Parts Needed 3 Parts Included 3 27" Appliances 3 General Information 3 30" Appliances 6 Removing Packaging 9 For Convection Microwave Combination Units 9 Preparing Oven 9 Installation 10 Electrical Installation 10 Oven Installation 12 Testing Operation 13 Service 14 Before Calling Service 14 This Bosch Appliance is made by BSH Home Appliances Corporation 5551 McFadden Ave.
... from you Begin 3 Tools and Parts Needed 3 Parts Included 3 27" Appliances 3 General Information 3 30" Appliances 6 Removing Packaging 9 For Convection Microwave Combination Units 9 Preparing Oven 9 Installation 10 Electrical Installation 10 Oven Installation 12 Testing Operation 13 Service 14 Before Calling Service 14 This Bosch Appliance is made by BSH Home Appliances Corporation 5551 McFadden Ave.

Installation Instructions
Page 8
...) 293/4" (755mm) 2713/16" (706mm) 24" (610mm) 281/2" (724mm) 513/4" (1314mm) 511/8" (1299mm) 493/4" (1264mm) 93/4" (248mm) 237/8" (606mm) 22" (559mm) Single Oven 30" It is good practice, when oven is installed at the end of a cabinet run , adjacent to a perpendicular wall or cabinet door, to allow at least 1/4" space between the side of the...
...) 293/4" (755mm) 2713/16" (706mm) 24" (610mm) 281/2" (724mm) 513/4" (1314mm) 511/8" (1299mm) 493/4" (1264mm) 93/4" (248mm) 237/8" (606mm) 22" (559mm) Single Oven 30" It is good practice, when oven is installed at the end of a cabinet run , adjacent to a perpendicular wall or cabinet door, to allow at least 1/4" space between the side of the...

Installation Instructions
Page 9
... (1543mm) 613/8" (1559mm) 595/8" (1514mm) 93/4" (248mm) 237/8" (606mm) 22" (559mm) Combo Oven with Microwave 30" It is good practice, when oven is installed at the end of a cabinet run , adjacent to a perpendicular wall or cabinet door, to allow at least 1/4" space between the side of at least 310 lbs... be flat and capable of supporting a weight of the oven and the wall/door. Combo Oven with Microwave and Warming Drawer 30" It is good practice, when oven is installed at the end of a cabinet run , adjacent to a perpendicular wall or cabinet door, to the floor/cabinet and level. ...
... (1543mm) 613/8" (1559mm) 595/8" (1514mm) 93/4" (248mm) 237/8" (606mm) 22" (559mm) Combo Oven with Microwave 30" It is good practice, when oven is installed at the end of a cabinet run , adjacent to a perpendicular wall or cabinet door, to allow at least 1/4" space between the side of at least 310 lbs... be flat and capable of supporting a weight of the oven and the wall/door. Combo Oven with Microwave and Warming Drawer 30" It is good practice, when oven is installed at the end of a cabinet run , adjacent to a perpendicular wall or cabinet door, to the floor/cabinet and level. ...

Installation Instructions
Page 10
... located above the unit to facilitate connecting and servicing. Note: The conduit box must be flat and capable of supporting a weight of the oven and the wall/door. The cabinet base must be well secured to allow at least 1/4" space between the side of at the end of a cabinet run...) 40" (1016mm) 407/16" (1027mm) 381/8" (968mm) 93/4" (248mm) Combo Oven with the bottom and the side of the opening. For oven support, install 2x4's extending front to back flush with Warming Drawer 30" It is good practice, when oven is installed at least 290 lbs (132 kg). 237/8" (606mm) 22" (559mm...
... located above the unit to facilitate connecting and servicing. Note: The conduit box must be flat and capable of supporting a weight of the oven and the wall/door. The cabinet base must be well secured to allow at least 1/4" space between the side of at the end of a cabinet run...) 40" (1016mm) 407/16" (1027mm) 381/8" (968mm) 93/4" (248mm) Combo Oven with the bottom and the side of the opening. For oven support, install 2x4's extending front to back flush with Warming Drawer 30" It is good practice, when oven is installed at least 290 lbs (132 kg). 237/8" (606mm) 22" (559mm...

Installation Instructions
Page 12
Model Circuit Required 208V, 60 Hz 240V, 60 Hz HBN33, HBL33 25 AMP 30 AMP HBN34, HBL34, HBN54, HBL54 HBL85 30 AMP 30 AMP HBN35, HBL35, HBN56, HBL56, HBL57, HBL8650, HBL8750 40 or 50 Amp circuit. Install a suitable conduit box (not furnished). English 10 An ...supply neutral, connect both the white neutral wire and the bare ground wire from the oven to either 208/240V AC, 60 Hz, 4 wire, single-phase power supply. The electrical supply should be a 4-wire single-phase AC. installation, electrical connections and grounding must be used to correctly attach the conduit...
Model Circuit Required 208V, 60 Hz 240V, 60 Hz HBN33, HBL33 25 AMP 30 AMP HBN34, HBL34, HBN54, HBL54 HBL85 30 AMP 30 AMP HBN35, HBL35, HBN56, HBL56, HBL57, HBL8650, HBL8750 40 or 50 Amp circuit. Install a suitable conduit box (not furnished). English 10 An ...supply neutral, connect both the white neutral wire and the bare ground wire from the oven to either 208/240V AC, 60 Hz, 4 wire, single-phase power supply. The electrical supply should be a 4-wire single-phase AC. installation, electrical connections and grounding must be used to correctly attach the conduit...

Installation Instructions
Page 14
...the door is heavy and fragile. Oven Installation Note: Before installing the oven, be damaged and injury could result. m CAUTION: When removing the door: • Make sure oven is glass. Flip levers on both sides using both hands, pull the door up and out of the oven by 30 lbs (14 kg) per door,... before removing the door. Open the door completely. 3. To remove the oven door: 1. the hinge could be sure to the oven has been turned off before installing into the cabinet. See "To ...
...the door is heavy and fragile. Oven Installation Note: Before installing the oven, be damaged and injury could result. m CAUTION: When removing the door: • Make sure oven is glass. Flip levers on both sides using both hands, pull the door up and out of the oven by 30 lbs (14 kg) per door,... before removing the door. Open the door completely. 3. To remove the oven door: 1. the hinge could be sure to the oven has been turned off before installing into the cabinet. See "To ...