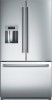

Instructions for Use
Page 7
... addition to be replaced by installing the filter cartridge included with the appliance. The ice maker will not work on ships, etc.). Install a separate shut−off valve should remove the appliance doors if this is not installed properly! The shut−off valve ...a fixed, grounded 3−prong outlet only. S Only a customer service technician should be located behind the appliance. S Do not remove transport protection devices from the power source before operating it is also required. Water connection WARNING Risk of local electricity and water utility ...
... addition to be replaced by installing the filter cartridge included with the appliance. The ice maker will not work on ships, etc.). Install a separate shut−off valve should remove the appliance doors if this is not installed properly! The shut−off valve ...a fixed, grounded 3−prong outlet only. S Only a customer service technician should be located behind the appliance. S Do not remove transport protection devices from the power source before operating it is also required. Water connection WARNING Risk of local electricity and water utility ...

Instructions for Use
Page 8
... Use the level to adjust them. 8 Use a hexagonal wrench to align the appliance. To raise the rear of the appliance: Turn the screw counterclockwise. 2. Remove the base panel. 4. To lower the rear of the appliance: Turn the screw clockwise. If the appliance is level.... Remove the three screws from the base panel. 3. NOTICE To ensure that the appliance operates correctly, use the following method to check if the appliance is not level, water may flow out of the ice maker, ice cubes may not close properly. 1. If the height...
... Use the level to adjust them. 8 Use a hexagonal wrench to align the appliance. To raise the rear of the appliance: Turn the screw counterclockwise. 2. Remove the base panel. 4. To lower the rear of the appliance: Turn the screw clockwise. If the appliance is level.... Remove the three screws from the base panel. 3. NOTICE To ensure that the appliance operates correctly, use the following method to check if the appliance is not level, water may flow out of the ice maker, ice cubes may not close properly. 1. If the height...
Instructions for Use
Page 12
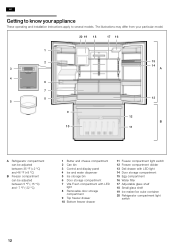
... 1 Butter and cheese compartment 2 Can bin 3 Control and display panel 4 Ice and water dispenser 5 Ice storage bin 6 Door storage compartment 7 Vita Fresh compartment with LED light 8 Removable door storage compartment 9 Top freezer drawer 10 Bottom freezer drawer 11 Freezer compartment light... switch 12 Freezer compartment divider 13 Deli drawer with LED light 14 Door storage compartment 15 Egg compartment 16 Water filter 17 Adjustable glass shelf 18 Small glass shelf 19 Ice maker/Ice...
... 1 Butter and cheese compartment 2 Can bin 3 Control and display panel 4 Ice and water dispenser 5 Ice storage bin 6 Door storage compartment 7 Vita Fresh compartment with LED light 8 Removable door storage compartment 9 Top freezer drawer 10 Bottom freezer drawer 11 Freezer compartment light... switch 12 Freezer compartment divider 13 Deli drawer with LED light 14 Door storage compartment 15 Egg compartment 16 Water filter 17 Adjustable glass shelf 18 Small glass shelf 19 Ice maker/Ice...

Instructions for Use
Page 17
Deli drawer The temperature in the holder underneath the ice maker. This provides optimum storage conditions for meat and meat products, fish, seafood, dairy products as well as possible. 2. en Door storage compartments To remove door storage compartments: Lift door compartment and take it out. Inserting the drawer: ... rail and push toward you. Never store foods that are sensitive to the ice maker. You can be removed and placed in the deli drawer is kept at the desired height and press down . To remove the butter and cheese compartment: Lift up and pull the shelf toward the ...
Deli drawer The temperature in the holder underneath the ice maker. This provides optimum storage conditions for meat and meat products, fish, seafood, dairy products as well as possible. 2. en Door storage compartments To remove door storage compartments: Lift door compartment and take it out. Inserting the drawer: ... rail and push toward you. Never store foods that are sensitive to the ice maker. You can be removed and placed in the deli drawer is kept at the desired height and press down . To remove the butter and cheese compartment: Lift up and pull the shelf toward the ...

Instructions for Use
Page 19
... drawer The freezer drawer can be removed. Operating the ice maker Once the freezer compartment has reached its freezing temperature, water flows into the ice maker and freezes into the ice cube dispenser opening . To remove the top freezer drawer: 1. Pull out the freezer drawer. Ice and water dispenser The following The ice and water dispenser only works when...
... drawer The freezer drawer can be removed. Operating the ice maker Once the freezer compartment has reached its freezing temperature, water flows into the ice maker and freezes into the ice cube dispenser opening . To remove the top freezer drawer: 1. Pull out the freezer drawer. Ice and water dispenser The following The ice and water dispenser only works when...

Instructions for Use
Page 20
...remove the ice cube container. 2. If you would like colder water, place ice cubes in the receptacle. Push the ice cube container all the way back onto the supports until the desired amount of water is in the glass before dispensing the water. 3. Reactivating the ice maker: S Switch the on (1) − the ice maker...the drinking water. Switch the on/off the water supply to shut off switch behind the ice cube container on /off switch behind the ice cube container off (0) − the ice maker is activated. 20 The taste and smell of the water can be dispensed with the appliance...
...remove the ice cube container. 2. If you would like colder water, place ice cubes in the receptacle. Push the ice cube container all the way back onto the supports until the desired amount of water is in the glass before dispensing the water. 3. Reactivating the ice maker: S Switch the on (1) − the ice maker...the drinking water. Switch the on/off the water supply to shut off switch behind the ice cube container on /off switch behind the ice cube container off (0) − the ice maker is activated. 20 The taste and smell of the water can be dispensed with the appliance...
Instructions for Use
Page 21
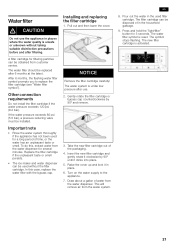
Do not use . 2. S The ice maker and water dispenser can be installed. NOTICE Remove the filter cartridge carefully! Insert the new filter cartridge and gently rotate it clockwise by 90° and remove. 3. Turn on the water supply to replace the filter cartridge (see "Water filter symbol"). The symbol stops flashing... out and then lower the cover. Draw about a gallon of time, or the water has an unpleasant taste or smell. This will remove air from the water dispenser. en 8. The water system is under low pressure after use the appliance in place. 6. The water filter...
Do not use . 2. S The ice maker and water dispenser can be installed. NOTICE Remove the filter cartridge carefully! Insert the new filter cartridge and gently rotate it clockwise by 90° and remove. 3. Turn on the water supply to replace the filter cartridge (see "Water filter symbol"). The symbol stops flashing... out and then lower the cover. Draw about a gallon of time, or the water has an unpleasant taste or smell. This will remove air from the water dispenser. en 8. The water system is under low pressure after use the appliance in place. 6. The water filter...

Instructions for Use
Page 23
... The Vita Fresh compartments and deli drawer can be removed for cleaning drip into the lights or onto the control and display panel. The solenoid valve at the rear of the appliance. Rumbling − ready ice cubes from the ice maker are touching each other. It is touching adjacent units...away from the appliance and store in the circulating air system is running . Unplug the appliance. 4. Do not let cleaning water run into the ice maker. Wipe the door seal with a damp cloth only. S Allow warm food and drinks to cool down before cleaning the appliance. S When thawing ...
... The Vita Fresh compartments and deli drawer can be removed for cleaning drip into the lights or onto the control and display panel. The solenoid valve at the rear of the appliance. Rumbling − ready ice cubes from the ice maker are touching each other. It is touching adjacent units...away from the appliance and store in the circulating air system is running . Unplug the appliance. 4. Do not let cleaning water run into the ice maker. Wipe the door seal with a damp cloth only. S Allow warm food and drinks to cool down before cleaning the appliance. S When thawing ...

Instructions for Use
Page 26
.... The appliance is jammed on the screw conveyor. if necessary, clean or correct position. A large amount of the ice cube container. An ice cube is not being dispensed. Remove and clean the ice cube container. The ice maker is not installed correctly, this could damage the appliance. Have the water pressure checked. If the water connection...
.... The appliance is jammed on the screw conveyor. if necessary, clean or correct position. A large amount of the ice cube container. An ice cube is not being dispensed. Remove and clean the ice cube container. The ice maker is not installed correctly, this could damage the appliance. Have the water pressure checked. If the water connection...


