
Instructions for Use
Page 7
... have the installation inspected by a qualified electrician. 7 S Clean the interior of your power supply. The shut−off valve should remove the appliance doors if this is not installed properly! The oil in the compressor may only be replaced by a qualified technician to ensure...Install a separate shut−off valve behind the appliance. If necessary, have flowed into a fixed, grounded 3−prong outlet only. The ice maker will not work on ships, etc.). The taste and smell of electric shock and fire if electrical connection is necessary in order to bring...
... have the installation inspected by a qualified electrician. 7 S Clean the interior of your power supply. The shut−off valve should remove the appliance doors if this is not installed properly! The oil in the compressor may only be replaced by a qualified technician to ensure...Install a separate shut−off valve behind the appliance. If necessary, have flowed into a fixed, grounded 3−prong outlet only. The ice maker will not work on ships, etc.). The taste and smell of electric shock and fire if electrical connection is necessary in order to bring...

Instructions for Use
Page 8
...firmly planted on the floor and then align the front of the ice maker, ice cubes may be firmly planted on the floor. 7. To lower the rear of the appliance: Turn the screw clockwise. Use the level to adjust them. 8 Remove the three screws from the base panel. 3. NOTICE To ensure ...that the appliance operates correctly, use the following method to check if the appliance is slanted after adjusting the level of the appliance. Remove the base panel. 4. To raise the rear of the appliance: Turn the screw counterclockwise. 2. Use a hexagonal wrench to loosen the two front...
...firmly planted on the floor and then align the front of the ice maker, ice cubes may be firmly planted on the floor. 7. To lower the rear of the appliance: Turn the screw clockwise. Use the level to adjust them. 8 Remove the three screws from the base panel. 3. NOTICE To ensure ...that the appliance operates correctly, use the following method to check if the appliance is slanted after adjusting the level of the appliance. Remove the base panel. 4. To raise the rear of the appliance: Turn the screw counterclockwise. 2. Use a hexagonal wrench to loosen the two front...
Instructions for Use
Page 12
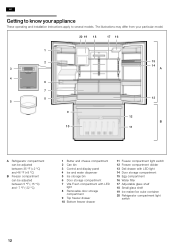
... 1 Butter and cheese compartment 2 Can bin 3 Control and display panel 4 Ice and water dispenser 5 Ice storage bin 6 Door storage compartment 7 Vita Fresh compartment with LED light 8 Removable door storage compartment 9 Top freezer drawer 10 Bottom freezer drawer 11 Freezer compartment light... switch 12 Freezer compartment divider 13 Deli drawer with LED light 14 Door storage compartment 15 Egg compartment 16 Water filter 17 Adjustable glass shelf 18 Small glass shelf 19 Ice maker/Ice...
... 1 Butter and cheese compartment 2 Can bin 3 Control and display panel 4 Ice and water dispenser 5 Ice storage bin 6 Door storage compartment 7 Vita Fresh compartment with LED light 8 Removable door storage compartment 9 Top freezer drawer 10 Bottom freezer drawer 11 Freezer compartment light... switch 12 Freezer compartment divider 13 Deli drawer with LED light 14 Door storage compartment 15 Egg compartment 16 Water filter 17 Adjustable glass shelf 18 Small glass shelf 19 Ice maker/Ice...

Instructions for Use
Page 17
...sensitive to the ice maker. You can pull out the adjustable glass shelves and place them at the desired height and press down . Lower the front of the deli drawer and pull it out. NOTICE Variable interior design Glass shelves The adjustable glass shelves can be removed. Lift up ... such as tall bottles next to cold in the deli drawer. Removing the deli drawer 1. Unhook and then remove the shelf. Small top glass shelf The glass shelf can be removed and placed in the holder underneath the ice maker. To install the butter and cheese compartment: Place the compartment above...
...sensitive to the ice maker. You can pull out the adjustable glass shelves and place them at the desired height and press down . Lower the front of the deli drawer and pull it out. NOTICE Variable interior design Glass shelves The adjustable glass shelves can be removed. Lift up ... such as tall bottles next to cold in the deli drawer. Removing the deli drawer 1. Unhook and then remove the shelf. Small top glass shelf The glass shelf can be removed and placed in the holder underneath the ice maker. To install the butter and cheese compartment: Place the compartment above...

Instructions for Use
Page 19
...to cool them quickly. Never use the first 30 to 40 ice cubes for dispensing water or ice. When the appliance is full. Extract the drinking water and discard until water can be removed. When using the ice maker for the first time, do not use fragile receptacles for ...reasons of the freezer drawer. 3. Operating the ice maker Once the freezer compartment has reached its freezing temperature, water flows into the ice maker and freezes into the ice cube dispenser opening ....
...to cool them quickly. Never use the first 30 to 40 ice cubes for dispensing water or ice. When the appliance is full. Extract the drinking water and discard until water can be removed. When using the ice maker for the first time, do not use fragile receptacles for ...reasons of the freezer drawer. 3. Operating the ice maker Once the freezer compartment has reached its freezing temperature, water flows into the ice maker and freezes into the ice cube dispenser opening ....

Instructions for Use
Page 20
... bin stores a reserve supply of ice is deactivated. Disconnecting the ice maker NOTICE Make sure to shut off (0) − the ice maker is in the receptacle. Tip: The water from freezing together. 1. In this may otherwise overfill the receptacle or block the ice cube dispenser opening . Press the release button and remove the ice cube container. 2. If the...
... bin stores a reserve supply of ice is deactivated. Disconnecting the ice maker NOTICE Make sure to shut off (0) − the ice maker is in the receptacle. Tip: The water from freezing together. 1. In this may otherwise overfill the receptacle or block the ice cube dispenser opening . Press the release button and remove the ice cube container. 2. If the...
Instructions for Use
Page 21
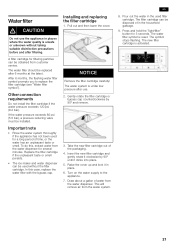
...80 psi (5.5 bar), a pressure reducing valve must be disposed of time, or the water has an unpleasant taste or smell. S The ice maker and water dispenser can be obtained from the water dispenser for filtering particles can be replaced after filtering. The water system is unsafe or ...cap. en 8. The water filter should be used without taking suitable disinfection precautions before and after 6 months at the latest. This will remove air from the water dispenser. The filter cartridge can be installed. Insert the new filter cartridge and gently rotate it in the used for...
...80 psi (5.5 bar), a pressure reducing valve must be disposed of time, or the water has an unpleasant taste or smell. S The ice maker and water dispenser can be obtained from the water dispenser for filtering particles can be replaced after filtering. The water system is unsafe or ...cap. en 8. The water filter should be used without taking suitable disinfection precautions before and after 6 months at the latest. This will remove air from the water dispenser. The filter cartridge can be installed. Insert the new filter cartridge and gently rotate it in the used for...

Instructions for Use
Page 23
...refrigerating unit is not level Align the appliance using lukewarm water and a small amount of the appliance. Rumbling − ready ice cubes from the ice maker are touching each other . Cleaning WARNING Risk of the filter cartridge. 5. S Allow warm food and drinks to clean the ...off and disconnecting the appliance Switching off the appliance Unplug the appliance or switch off . Remove all food from the appliance. 3. Defrosting is opening or closing. Receptacles are falling into the ice maker. en Energy−saving tips S Install the appliance in a dry, well ventilated ...
...refrigerating unit is not level Align the appliance using lukewarm water and a small amount of the appliance. Rumbling − ready ice cubes from the ice maker are touching each other . Cleaning WARNING Risk of the filter cartridge. 5. S Allow warm food and drinks to clean the ...off and disconnecting the appliance Switching off the appliance Unplug the appliance or switch off . Remove all food from the appliance. 3. Defrosting is opening or closing. Receptacles are falling into the ice maker. en Energy−saving tips S Install the appliance in a dry, well ventilated ...

Instructions for Use
Page 26
.... After replacing the filter cartridge, the water filter symbol was just recently switched on the ice maker. The appliance or ice maker was not reset. The ice cube will drip into the ice and water dispenser. Remove and clean the ice cube container. The ice maker is not installed correctly, this could damage the appliance. Shut off . Have the water...
.... After replacing the filter cartridge, the water filter symbol was just recently switched on the ice maker. The appliance or ice maker was not reset. The ice cube will drip into the ice and water dispenser. Remove and clean the ice cube container. The ice maker is not installed correctly, this could damage the appliance. Shut off . Have the water...


