
User Manual
Page 2
...base without first putting bowl properly in place. ❍ Be certain cover is securely locked in place before cleaning. ❍ Avoid contacting moving blade or disc while processing food to reduce the risk of severe injury to persons or damage to defeat the cover interlock mechanism. ❍ This ... ensure that they do not immerse cord, plugs or appliance in any appliance is used only when the food processor is not running. ❍ Blade is necessary when any manner. Always use food pusher. ❍ Do not attempt to the food processor. Or, call the appropriate toll-free...
...base without first putting bowl properly in place. ❍ Be certain cover is securely locked in place before cleaning. ❍ Avoid contacting moving blade or disc while processing food to reduce the risk of severe injury to persons or damage to defeat the cover interlock mechanism. ❍ This ... ensure that they do not immerse cord, plugs or appliance in any appliance is used only when the food processor is not running. ❍ Blade is necessary when any manner. Always use food pusher. ❍ Do not attempt to the food processor. Or, call the appropriate toll-free...
User Manual
Page 3
... should be replaced by qualified personnel; ENGLISH SAVE THESE INSTRUCTIONS. If the plug does not fit fully into a polarized outlet only one blade is based on the chopping blade. If it at outlet and appliance connections. If more length is for longer life; Handle cord carefully for household use an extension cord...
... should be replaced by qualified personnel; ENGLISH SAVE THESE INSTRUCTIONS. If the plug does not fit fully into a polarized outlet only one blade is based on the chopping blade. If it at outlet and appliance connections. If more length is for longer life; Handle cord carefully for household use an extension cord...
User Manual
Page 4
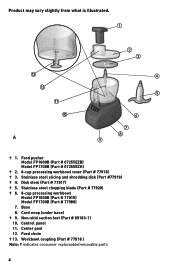
...base) † 9. Center post 12. Non-skid suction feet (Part # 09183-1) 10. Food pusher Model FP1600B (Part # 07255EZB) Model FP1700B (Part # 07255EZH) † 2. 8-cup processing workbowl cover (Part # 77916) † 3. Feed chute † 13. Stainless steel ...illustrated. A † 1. Stainless steel chopping blade (Part # 77920) † 6. 8-cup processing workbowl Model FP1600B (Part # 77915) Model FP1700B (Part # 77988) 7. Workbowl coupling (Part # 77918 ) Note: † indicates consumer replaceable/removable parts ...
...base) † 9. Center post 12. Non-skid suction feet (Part # 09183-1) 10. Food pusher Model FP1600B (Part # 07255EZB) Model FP1700B (Part # 07255EZH) † 2. 8-cup processing workbowl cover (Part # 77916) † 3. Feed chute † 13. Stainless steel ...illustrated. A † 1. Stainless steel chopping blade (Part # 77920) † 6. 8-cup processing workbowl Model FP1600B (Part # 77915) Model FP1700B (Part # 77988) 7. Workbowl coupling (Part # 77918 ) Note: † indicates consumer replaceable/removable parts ...
User Manual
Page 5
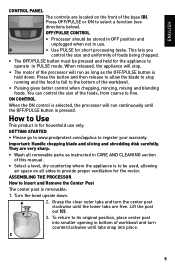
B • Use PULSE for the motor. Press the button and then release to allow the blade to stop . • The motor of the processor will run as long as instructed in use only. How to the bottom of the workbowl. • ...Pulsing gives better control when chopping, mincing, mixing and blending foods. Important: Handle chopping blade and slicing and shredding disk carefully. ASSEMBLING THE PROCESSOR How to operate in bottom of foods being chopped. • The OFF/PULSE button must be...
B • Use PULSE for the motor. Press the button and then release to allow the blade to stop . • The motor of the processor will run as long as instructed in use only. How to the bottom of the workbowl. • ...Pulsing gives better control when chopping, mincing, mixing and blending foods. Important: Handle chopping blade and slicing and shredding disk carefully. ASSEMBLING THE PROCESSOR How to operate in bottom of foods being chopped. • The OFF/PULSE button must be...
User Manual
Page 6
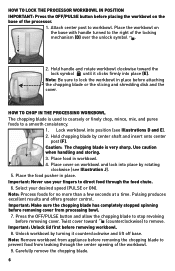
...handle and rotate workbowl clockwise toward (counterclockwise) to stop revolving before removing cover. Place food in place. Important: Make sure the chopping blade has completely stopped spinning before removing cover from leaking through the feed chute. 6. F 4. How to Lock the PROCESSor WORKBOWL in Position... of the locking mechanism (D) over the unlock symbol . Attach center post to lock the workbowl in place before attaching the chopping blade or the slicing and shredding disk and the cover. Note: Be sure to workbowl. Place the workbowl on the base of the...
...handle and rotate workbowl clockwise toward (counterclockwise) to stop revolving before removing cover. Place food in place. Important: Make sure the chopping blade has completely stopped spinning before removing cover from leaking through the feed chute. 6. F 4. How to Lock the PROCESSor WORKBOWL in Position... of the locking mechanism (D) over the unlock symbol . Attach center post to lock the workbowl in place before attaching the chopping blade or the slicing and shredding disk and the cover. Note: Be sure to workbowl. Place the workbowl on the base of the...

User Manual
Page 9
...thoroughly. Rinse and dry. • Do not use a baby bottle brush to remove any plastic or metal parts to clean. • Do not allow chopping blade or slicing and shredding disk to maintain the food processor's appearance. • If washing by rubbing with a damp cloth and a mild, nonabrasive cleaner. Note... personnel. Use caution when handling and storing. • Wipe base and feet with hot, soapy water and rapidly raise and lower the chopping blade or slicing and shredding disk up and down on top rack only-not in water for easy cleanup. Use caution when handling and storing. &#...
...thoroughly. Rinse and dry. • Do not use a baby bottle brush to remove any plastic or metal parts to clean. • Do not allow chopping blade or slicing and shredding disk to maintain the food processor's appearance. • If washing by rubbing with a damp cloth and a mild, nonabrasive cleaner. Note... personnel. Use caution when handling and storing. • Wipe base and feet with hot, soapy water and rapidly raise and lower the chopping blade or slicing and shredding disk up and down on top rack only-not in water for easy cleanup. Use caution when handling and storing. &#...
