User Guide
Page 1
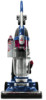
See details on back page USER'S GUIDE 81M9 SERIES 2 Thank You 3 Safety Instructions 4 Product View 5-6 Assembly 6-9 Operations 10-15 Maintenance and Care 16-17 Troubleshooting 18 Replacement Parts 18 Accessories 19 Warranty 20 Product Registration 20 Consumer Services Earn BISSELL Rewards! Register your product today!
See details on back page USER'S GUIDE 81M9 SERIES 2 Thank You 3 Safety Instructions 4 Product View 5-6 Assembly 6-9 Operations 10-15 Maintenance and Care 16-17 Troubleshooting 18 Replacement Parts 18 Accessories 19 Warranty 20 Product Registration 20 Consumer Services Earn BISSELL Rewards! Register your product today!

User Guide
Page 2
... high quality homecare products like your BISSELL vacuum. Bissell Chairman, President & CEO 2 www.bissell.com 800.237.7691 Thanks for buying a BISSELL vacuum We're glad you 'll receive fast, considerate assistance. Your BISSELL vacuum is a global leader in 1876. Mark J. Today, BISSELL is well made, and we know about floor care went into the design and...
... high quality homecare products like your BISSELL vacuum. Bissell Chairman, President & CEO 2 www.bissell.com 800.237.7691 Thanks for buying a BISSELL vacuum We're glad you 'll receive fast, considerate assistance. Your BISSELL vacuum is a global leader in 1876. Mark J. Today, BISSELL is well made, and we know about floor care went into the design and...
User Guide
Page 3
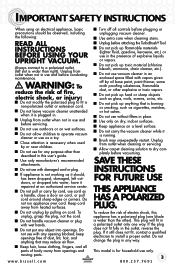
...may reduce air flow. ■ Keep hair, loose clothing, fingers, and all controls before plugging or unplugging vacuum cleaner. ■ Use extra care when cleaning stairs. ■ Unplug before using an electrical appliance, basic precautions should , has been dropped, damaged, left slot is for any way..., such as a handle, close a door on cord. keep openings free of dust, lint, hair, and anything that may unexpectedly restart. www.bissell.com ■ Turn off all parts of electric shock, this user's guide. ■ Use only manufacturer's recommended attachments. ■ Do not ...
...may reduce air flow. ■ Keep hair, loose clothing, fingers, and all controls before plugging or unplugging vacuum cleaner. ■ Use extra care when cleaning stairs. ■ Unplug before using an electrical appliance, basic precautions should , has been dropped, damaged, left slot is for any way..., such as a handle, close a door on cord. keep openings free of dust, lint, hair, and anything that may unexpectedly restart. www.bissell.com ■ Turn off all parts of electric shock, this user's guide. ■ Use only manufacturer's recommended attachments. ■ Do not ...
User Guide
Page 10
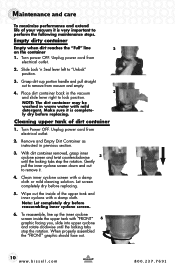
...maintenance steps. Let screen completely dry before reassembling inner cyclone screen. 6. When properly assembled the "FRONT" graphic should face out. 10 www.bissell.com 800.237.7691 Grasp dirt cup portion handle and pull straight out to remove it. 4. Place dirt container back in the vacuum ... cloth. To reassemble, line up the inner cyclone screen inside of the upper tank and inner cyclone with mild detergent. Maintenance and care To maximize performance and extend life of your vacuum it is completely dry before replacing. Empty dirty container Empty when dirt reaches the ...
...maintenance steps. Let screen completely dry before reassembling inner cyclone screen. 6. When properly assembled the "FRONT" graphic should face out. 10 www.bissell.com 800.237.7691 Grasp dirt cup portion handle and pull straight out to remove it. 4. Place dirt container back in the vacuum ... cloth. To reassemble, line up the inner cyclone screen inside of the upper tank and inner cyclone with mild detergent. Maintenance and care To maximize performance and extend life of your vacuum it is completely dry before replacing. Empty dirty container Empty when dirt reaches the ...
User Guide
Page 11
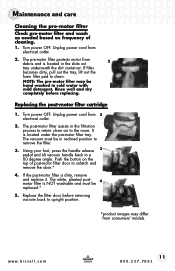
Turn power OFF. www.bissell.com 11 800.237.7691 Turn power OFF. Maintenance and care Cleaning the pre-motor filter Check pre-motor filter and wash as needed based on the top of cleaning. 1. NOTE: The pre-motor filter may ...
Turn power OFF. www.bissell.com 11 800.237.7691 Turn power OFF. Maintenance and care Cleaning the pre-motor filter Check pre-motor filter and wash as needed based on the top of cleaning. 1. NOTE: The pre-motor filter may ...
User Guide
Page 12
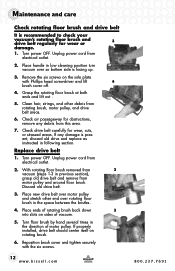
... brush, motor pulley, and drive belt areas. 6. Place new drive belt over motor pulley and stretch other debris from this area. 7. Maintenance and care Check rotating floor brush and drive belt It is facing up. 3. Remove the six screws on the sole plate with the six screws. 12 www....bissell.com 800.237.7691 Discard old drive belt. 3. Check drive belt carefully for wear or 3 damage. 1. Turn power OFF. Place handle in low cleaning position turn vacuum over rotating floor...
... brush, motor pulley, and drive belt areas. 6. Place new drive belt over motor pulley and stretch other debris from this area. 7. Maintenance and care Check rotating floor brush and drive belt It is facing up. 3. Remove the six screws on the sole plate with the six screws. 12 www....bissell.com 800.237.7691 Discard old drive belt. 3. Check drive belt carefully for wear or 3 damage. 1. Turn power OFF. Place handle in low cleaning position turn vacuum over rotating floor...
User Guide
Page 13
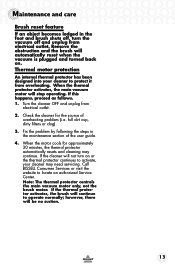
Call BISSELL Consumer Services or visit the website to protect it from overheating. Thermal motor protection An internal thermal protector has been designed into your cleaner may .... 4. When the thermal protector activates, the main vacuum motor will continue to operate normally; Turn the cleaner OFF and unplug from electrical outlet. Maintenance and care Brush reset feature If an object becomes lodged in the maintenance section of overheating problem (i.e. however, there will automatically reset when the vacuum is plugged...
Call BISSELL Consumer Services or visit the website to protect it from overheating. Thermal motor protection An internal thermal protector has been designed into your cleaner may .... 4. When the thermal protector activates, the main vacuum motor will continue to operate normally; Turn the cleaner OFF and unplug from electrical outlet. Maintenance and care Brush reset feature If an object becomes lodged in the maintenance section of overheating problem (i.e. however, there will automatically reset when the vacuum is plugged...
User Guide
Page 14
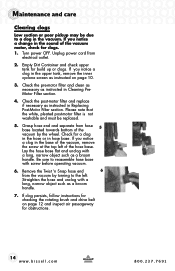
Maintenance and care Clearing clogs Low suction or poor pickup may be replaced. 5. Check the pre-motor filter and clean as necessary as a broom handle. 7. Unplug power cord ... 12 and inspect air passageway for checking the rotating brush and drive belt on page 10. 3. If clog persists, follow instructions for obstructions. 14 www.bissell.com 800.237.7691 If you notice a clog in the sound of the vacuum motor, check for build up or clogs. Empty Dirt Container and...
Maintenance and care Clearing clogs Low suction or poor pickup may be replaced. 5. Check the pre-motor filter and clean as necessary as a broom handle. 7. Unplug power cord ... 12 and inspect air passageway for checking the rotating brush and drive belt on page 10. 3. If clog persists, follow instructions for obstructions. 14 www.bissell.com 800.237.7691 If you notice a clog in the sound of the vacuum motor, check for build up or clogs. Empty Dirt Container and...
User Guide
Page 15
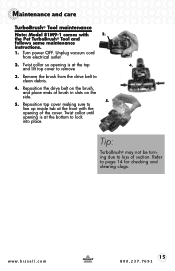
the Pet TurboBrush® Tool and follows same maintenance instructions. 1. Reposition the drive belt on the side. 5. 5. Unplug vacuum cord from the drive belt to clean debris. 4. ... tab at the bottom to loss of brush in slots on the brush, and place ends of suction. Refer to remove 3. www.bissell.com 15 800.237.7691 Maintenance and care TurboBrush® Tool maintenance Note: Model 81M9-1 comes with the opening of the cover. Remove the brush from electrical outlet 2. Twist...
the Pet TurboBrush® Tool and follows same maintenance instructions. 1. Reposition the drive belt on the side. 5. 5. Unplug vacuum cord from the drive belt to clean debris. 4. ... tab at the bottom to loss of brush in slots on the brush, and place ends of suction. Refer to remove 3. www.bissell.com 15 800.237.7691 Maintenance and care TurboBrush® Tool maintenance Note: Model 81M9-1 comes with the opening of the cover. Remove the brush from electrical outlet 2. Twist...