User Guide - English
Page 4
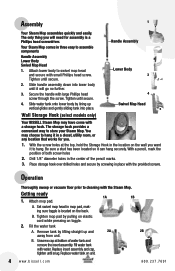
...and remove the insert assembly. Drill 1/8" diameter holes in a closet, utility room, or any location that works for assembly is located on unit. 4 www.bissell.com 800.237.7691 Place storage hook over drilled holes and secure by pulling on elastic cord while pressing on...Tighten until secure. 4. Secure the handle with water. Tighten until secure. 2. Handle Assembly 2 Lower Body 3 4 Swivel Mop Head Wall Storage Hook (select models only) Your BISSELL Steam Mop may choose to hang it to cleaning with a storage hook. B. Replace insert assembly and cap, tighten until it can ...
...and remove the insert assembly. Drill 1/8" diameter holes in a closet, utility room, or any location that works for assembly is located on unit. 4 www.bissell.com 800.237.7691 Place storage hook over drilled holes and secure by pulling on elastic cord while pressing on...Tighten until secure. 4. Secure the handle with water. Tighten until secure. 2. Handle Assembly 2 Lower Body 3 4 Swivel Mop Head Wall Storage Hook (select models only) Your BISSELL Steam Mop may choose to hang it to cleaning with a storage hook. B. Replace insert assembly and cap, tighten until it can ...


