User Guide
Page 3
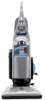
...over cord. Do not use with vapors given off all instructions before conducting maintenance. This model is running. ■ Hold plug when rewinding onto cord reel. WARNING: To reduce the risk of electric shock, this user's guide. ■ Use only manufacturer's recommended attachments...-polarized outlet or extension cord. ■ Do not leave vacuum cleaner unattended when it should be observed, including the following: Read all controls before attaching the Pet TurboEraser Tool. ■ Do not use without dust bag and filters in this appliance has a polarized plug (one ...
...over cord. Do not use with vapors given off all instructions before conducting maintenance. This model is running. ■ Hold plug when rewinding onto cord reel. WARNING: To reduce the risk of electric shock, this user's guide. ■ Use only manufacturer's recommended attachments...-polarized outlet or extension cord. ■ Do not leave vacuum cleaner unattended when it should be observed, including the following: Read all controls before attaching the Pet TurboEraser Tool. ■ Do not use without dust bag and filters in this appliance has a polarized plug (one ...
User Guide
Page 4
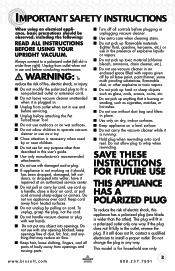
... Crevice Tool Extension Wand Bag Tank (bag inside) Lock 'n Seal™ Lever Power Switch Carry Handle Combination Dusting Brush/ Upholstery Tool HEPA Media Filter* Automatic Cord Rewind Handle Release Pedal Quick Reach® Handle Hose Wand Hose Wand Base Foot Hose Furniture Protection Powerfoot Guard WARNING: Do not plug in your vacuum cleaner until you are...
... Crevice Tool Extension Wand Bag Tank (bag inside) Lock 'n Seal™ Lever Power Switch Carry Handle Combination Dusting Brush/ Upholstery Tool HEPA Media Filter* Automatic Cord Rewind Handle Release Pedal Quick Reach® Handle Hose Wand Hose Wand Base Foot Hose Furniture Protection Powerfoot Guard WARNING: Do not plug in your vacuum cleaner until you are...
User Guide
Page 5
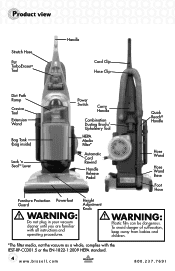
vacuum cleaner is fitted to the vacuum body. Attach handle to assemble your 2. Stand the vacuum upright and slide the base of the hose into the existing hole. Turn the hose to the right to the base of the vacuum body. 3. Grasp the Quick Reach Handle and slide the end of the... a screwdriver. c o m 5 800.237.7691 at the top of the handle. 2. Locate the vacuum handle and remove the screw packet taped to lock into the grooves 4. Snap the hose into place. Attach the Pet TurboEraser Tool by lining 5. If there is flush. 4. up tabs on the base of holder in...
vacuum cleaner is fitted to the vacuum body. Attach handle to assemble your 2. Stand the vacuum upright and slide the base of the hose into the existing hole. Turn the hose to the right to the base of the vacuum body. 3. Grasp the Quick Reach Handle and slide the end of the... a screwdriver. c o m 5 800.237.7691 at the top of the handle. 2. Locate the vacuum handle and remove the screw packet taped to lock into the grooves 4. Snap the hose into place. Attach the Pet TurboEraser Tool by lining 5. If there is flush. 4. up tabs on the base of holder in...
User Guide
Page 6
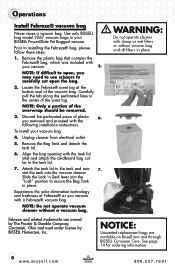
...- 7. To install your BISSELL PowerGlide Pet Bagged vacuum. sert the tank into the "Lock" position to the tank lid. 7. See page 14 for ordering information. 6 w w w. Operations Install Febreze® vacuum bag Never reuse a vacuum bag. NOTE: Only a portion of the vacuum bag. Febreze and related trademarks are available on Bissell.com and through BISSELL Consumer Care. Use only BISSELL bag model 3267 vacuum bags in place. Remove the...
...- 7. To install your BISSELL PowerGlide Pet Bagged vacuum. sert the tank into the "Lock" position to the tank lid. 7. See page 14 for ordering information. 6 w w w. Operations Install Febreze® vacuum bag Never reuse a vacuum bag. NOTE: Only a portion of the vacuum bag. Febreze and related trademarks are available on Bissell.com and through BISSELL Consumer Care. Use only BISSELL bag model 3267 vacuum bags in place. Remove the...
User Guide
Page 7
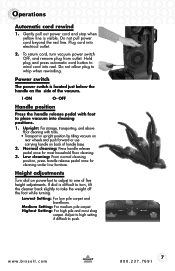
To return cord, turn , tilt the cleaner back slightly to take the weight off the foot while turning. Do not allow plug to ...wheels and push forward or use carrying handle on powerfoot to adjust to place vacuum into reel. b i s s e l l . Operations Automatic cord rewind 1. Hold plug and press automatic cord button to turn vacuum power switch OFF, and remove plug from outlet. Gently pull out power cord...cord into cleaning positions. 1. Plug cord into electrical outlet. 2. Height adjustments Turn dial on back of the vacuum. Adjust to high setting if difficult to whip when...
To return cord, turn , tilt the cleaner back slightly to take the weight off the foot while turning. Do not allow plug to ...wheels and push forward or use carrying handle on powerfoot to adjust to place vacuum into reel. b i s s e l l . Operations Automatic cord rewind 1. Hold plug and press automatic cord button to turn vacuum power switch OFF, and remove plug from outlet. Gently pull out power cord...cord into cleaning positions. 1. Plug cord into electrical outlet. 2. Height adjustments Turn dial on back of the vacuum. Adjust to high setting if difficult to whip when...
User Guide
Page 9
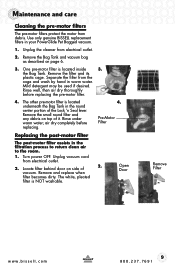
... is located inside 3. c o m 9 800.237.7691 Unplug the cleaner from electrical outlet. 2. Remove the small round filter and any debris on top of the Lock 'n Seal lever. Unplug vacuum cord from electrical outlet. 2. Remove the filter and its plastic cage. Separate... thoroughly before replacing. 4. Pre-Motor Filter Replacing the post-motor filter The post-motor filter assists in your PowerGlide Pet Bagged vacuum. 1. Use only genuine BISSELL replacement filters in the filtration process to return clean air to the room. 1. air dry completely before replacing ...
... is located inside 3. c o m 9 800.237.7691 Unplug the cleaner from electrical outlet. 2. Remove the small round filter and any debris on top of the Lock 'n Seal lever. Unplug vacuum cord from electrical outlet. 2. Remove the filter and its plastic cage. Separate... thoroughly before replacing. 4. Pre-Motor Filter Replacing the post-motor filter The post-motor filter assists in your PowerGlide Pet Bagged vacuum. 1. Use only genuine BISSELL replacement filters in the filtration process to return clean air to the room. 1. air dry completely before replacing ...
User Guide
Page 11
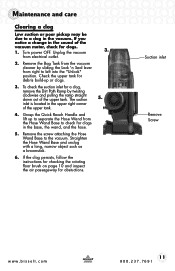
Remove the Bag Tank from the Hose Wand Base to left into the "Unlock" position. Grasp the Quick Reach Handle and lift up or clogs. 3. Remove the screw attaching the Hose Wand Base to a clog in the upper right corner of the vacuum motor, check for clogs in the sound of the upper... for checking the rotating floor brush on page 10 and inspect the air passageway for debris build-up to separate the Hose Wand from the vacuum cleaner by twisting clockwise and pulling the ramp straight down out of the upper tank. Suction inlet Remove Screw w w w. To check the suction inlet for a clog...
Remove the Bag Tank from the Hose Wand Base to left into the "Unlock" position. Grasp the Quick Reach Handle and lift up or clogs. 3. Remove the screw attaching the Hose Wand Base to a clog in the upper right corner of the vacuum motor, check for clogs in the sound of the upper... for checking the rotating floor brush on page 10 and inspect the air passageway for debris build-up to separate the Hose Wand from the vacuum cleaner by twisting clockwise and pulling the ramp straight down out of the upper tank. Suction inlet Remove Screw w w w. To check the suction inlet for a clog...
User Guide
Page 13
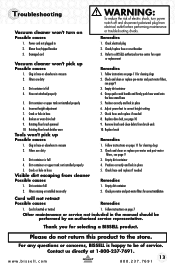
... properly 4. Check hose and replace if needed 8. Empty dirt container 2. Check pre-motor and post-motor filters for selecting a BISSELL product. Cord is happy to a BISSELL authorized service center for repair or replacement Vacuum cleaner won't pick up Possible causes Remedies 1. Follow instructions on Possible causes WARNING: To reduce the risk of service. Thank...
... properly 4. Check hose and replace if needed 8. Empty dirt container 2. Check pre-motor and post-motor filters for selecting a BISSELL product. Cord is happy to a BISSELL authorized service center for repair or replacement Vacuum cleaner won't pick up Possible causes Remedies 1. Follow instructions on Possible causes WARNING: To reduce the risk of service. Thank...

User Guide
Page 16
...your information now saves you time should you benefits over the lifetime of cleaner available. It provides proof of purchase date in Korea Part Number 110-4627 Rev 9/12 Visit our website at: www.bissell.com 800.237.7691 Registering is quick, easy and offers you need... to contact us with any important product maintenance reminders and alerts. Faster Service Supplying your product. BISSELL Consumer Care For information about repairs or replacement parts, or questions about your original sales receipt. Please record your Model Number Please ...
...your information now saves you time should you benefits over the lifetime of cleaner available. It provides proof of purchase date in Korea Part Number 110-4627 Rev 9/12 Visit our website at: www.bissell.com 800.237.7691 Registering is quick, easy and offers you need... to contact us with any important product maintenance reminders and alerts. Faster Service Supplying your product. BISSELL Consumer Care For information about repairs or replacement parts, or questions about your original sales receipt. Please record your Model Number Please ...


