User Guide
Page 2
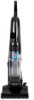
... we know about floor care went into the design and construction of this complete, hightech home cleaning system. Thanks again, from all of high quality homecare products like your BISSELL vacuum. c o m 800.237.7691 Mark J. My great-grandfather invented the floor sweeper ...in the design, manufacture, and service of us at BISSELL. b i s s e l l . We also stand behind it with a knowledgeable, dedicated Consumer Services department, so, should you ever have a problem, you purchased a BISSELL vacuum. Your BISSELL vacuum is a global leader in 1876. Everything we back ...
... we know about floor care went into the design and construction of this complete, hightech home cleaning system. Thanks again, from all of high quality homecare products like your BISSELL vacuum. c o m 800.237.7691 Mark J. My great-grandfather invented the floor sweeper ...in the design, manufacture, and service of us at BISSELL. b i s s e l l . We also stand behind it with a knowledgeable, dedicated Consumer Services department, so, should you ever have a problem, you purchased a BISSELL vacuum. Your BISSELL vacuum is a global leader in 1876. Everything we back ...
User Guide
Page 3
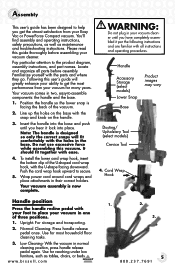
...: To reduce the risk of body away from outlet when not in use and before plugging or unplugging vacuum cleaner. ■ Use extra care when cleaning stairs. ■ Do not pick up flammable materials (lighter fluid, gasoline, kerosene, etc.) or use in the outlet, reverse the plug.
...: To reduce the risk of body away from outlet when not in use and before plugging or unplugging vacuum cleaner. ■ Use extra care when cleaning stairs. ■ Do not pick up flammable materials (lighter fluid, gasoline, kerosene, etc.) or use in the outlet, reverse the plug.
User Guide
Page 5
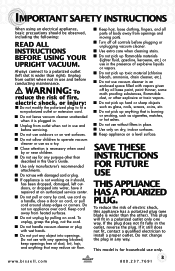
...they go. Wrap power cord around cord wraps and place attachments in normal cleaning position, press handle release pedal again. For storage and transporting. 2. Press handle release pedal once. Low Cleaning- With the vacuum in their correct holders. Position the handle so the ... Press the handle recline pedal with all parts before assembling your Easy Vac or PowerForce Compact vacuum. Following this vacuum. Insert the handle into the base and push until you have completely assembled it lock into place. Normal Cleaning- b i s s e l l . Warning: Do not plug in two...
...they go. Wrap power cord around cord wraps and place attachments in normal cleaning position, press handle release pedal again. For storage and transporting. 2. Press handle release pedal once. Low Cleaning- With the vacuum in their correct holders. Position the handle so the ... Press the handle recline pedal with all parts before assembling your Easy Vac or PowerForce Compact vacuum. Following this vacuum. Insert the handle into the base and push until you have completely assembled it lock into place. Normal Cleaning- b i s s e l l . Warning: Do not plug in two...
User Guide
Page 6
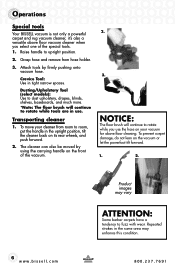
... vacuum or let the powerfoot tilt forward. 1. 2. 6 w w w. To prevent carpet damage, do not lean on its rear wheels, and push forward. 2. b i s s e l l . Operations Special tools Your BISSELL vacuum is not only a powerful carpet and rug vacuum cleaner, it's also a versatile above floor...
... vacuum or let the powerfoot tilt forward. 1. 2. 6 w w w. To prevent carpet damage, do not lean on its rear wheels, and push forward. 2. b i s s e l l . Operations Special tools Your BISSELL vacuum is not only a powerful carpet and rug vacuum cleaner, it's also a versatile above floor...
User Guide
Page 7
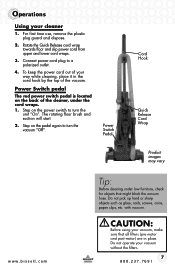
...block the vacuum hose. Rotate the Quick Release cord wrap towards floor and slip power cord from upper and lower cord wraps. 3. c o m Tip: Before cleaning under the cord wraps. 1. Do not operate your cleaner 1. Step on the power switch to a polarized outlet. 4. For first time use, remove the ...plastic plug guard and dispose. 2. Step on the pedal again to turn the unit "On". with vacuum. caution: Before using your way while cleaning, place it in place. Operations Using your vacuum without the filters. 7 800.237.7691 To keep the power cord out of the cleaner, under...
...block the vacuum hose. Rotate the Quick Release cord wrap towards floor and slip power cord from upper and lower cord wraps. 3. c o m Tip: Before cleaning under the cord wraps. 1. Do not operate your cleaner 1. Step on the power switch to a polarized outlet. 4. For first time use, remove the ...plastic plug guard and dispose. 2. Step on the pedal again to turn the unit "On". with vacuum. caution: Before using your way while cleaning, place it in place. Operations Using your vacuum without the filters. 7 800.237.7691 To keep the power cord out of the cleaner, under...
User Guide
Page 8
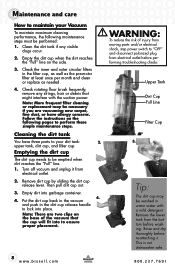
...interfere with a mild detergent. Tip: The dirt cup may be emptied when dirt reaches the "Full" line. 1. Remove the lower tank from electrical outlet. 2. Cleaning the dirt tank You have allergy concerns. Note: There are vacuuming new carpet, fine dust, or have three parts to your Vacuum To maintain maximum... on the following maintenance steps must be washed in the filter cup, as well as the pre-motor filter at least once per month and clean or replace as needed. 4. Remove dirt cup by sliding the dirt cup release lever. Empty the dirt cup when the dirt reaches the "...
...interfere with a mild detergent. Tip: The dirt cup may be emptied when dirt reaches the "Full" line. 1. Remove the lower tank from electrical outlet. 2. Cleaning the dirt tank You have allergy concerns. Note: There are vacuuming new carpet, fine dust, or have three parts to your Vacuum To maintain maximum... on the following maintenance steps must be washed in the filter cup, as well as the pre-motor filter at least once per month and clean or replace as needed. 4. Remove dirt cup by sliding the dirt cup release lever. Empty the dirt cup when the dirt reaches the "...
User Guide
Page 9
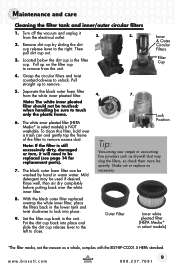
... right. Set the filter cup back in select models) is NOT washable. c o m 9 800.237.7691 Separate the black outer foam filter from the unit. 3. To clean this filter, hold over the white inner filter. 4. 7. w w w. b i s s e l l . Remove dirt cup by hand in warm water. Mild detergent may ...so check them more frequently. Shake out or replace as a whole, complies with the IEST-RP-CC001.5 HEPA standard. Maintenance and care Cleaning the filter tank and inner/outer circular filters 1. Note: If the filter is the filter cup. Rinse well, then air dry completely ...
... right. Set the filter cup back in select models) is NOT washable. c o m 9 800.237.7691 Separate the black outer foam filter from the unit. 3. To clean this filter, hold over the white inner filter. 4. 7. w w w. b i s s e l l . Remove dirt cup by hand in warm water. Mild detergent may ...so check them more frequently. Shake out or replace as a whole, complies with the IEST-RP-CC001.5 HEPA standard. Maintenance and care Cleaning the filter tank and inner/outer circular filters 1. Note: If the filter is the filter cup. Rinse well, then air dry completely ...
User Guide
Page 10
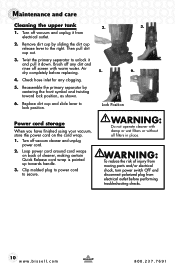
... all filters in place. WARNING: To reduce the risk of cleaner, making certain Quick Release cord wrap is pointed up towards handle. 3. Maintenance and care Cleaning the upper tank 1. Air dry completely before performing troubleshooting checks. 10 w w w. Reassemble the primary separator by sliding the dirt cup release lever to unlock it...
... all filters in place. WARNING: To reduce the risk of cleaner, making certain Quick Release cord wrap is pointed up towards handle. 3. Maintenance and care Cleaning the upper tank 1. Air dry completely before performing troubleshooting checks. 10 w w w. Reassemble the primary separator by sliding the dirt cup release lever to unlock it...
User Guide
Page 11
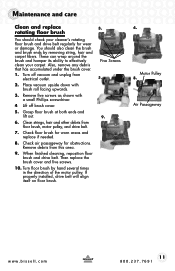
...off brush cover. 5. Check air passageway for worn areas and replace if needed. 8. Turn floor brush by removing string, hair and carpet fibers. b i s s e l l . Clean strings, hair and other debris from electrical outlet. 2. If properly installed, drive belt will align itself on floor brush. 3. Remove debris from this area. 9. Remove.... 1. Check floor brush for obstructions. c o m 11 800.237.7691 These can wrap around the brush and hamper its ability to effectively clean your cleaner's rotating floor brush and drive belt regularly for wear or damage. When finished...
...off brush cover. 5. Check air passageway for worn areas and replace if needed. 8. Turn floor brush by removing string, hair and carpet fibers. b i s s e l l . Clean strings, hair and other debris from electrical outlet. 2. If properly installed, drive belt will align itself on floor brush. 3. Remove debris from this area. 9. Remove.... 1. Check floor brush for obstructions. c o m 11 800.237.7691 These can wrap around the brush and hamper its ability to effectively clean your cleaner's rotating floor brush and drive belt regularly for wear or damage. When finished...
User Guide
Page 12
... and rotating upwards towards the lock position. *Note: If the debris cannot be reached through the hose, then follow the instructions for cleaning the air passageway in the "Clean and replace rotating floor brush" section. 12 w w w. Place ends of floor brush down into slots on sides as a hanger,... to remove clogs. 800.237.7691 Replace brush cover and five screws. Cleaning stretch hose and foot hose 1. Locate the stretch hose where it . Remove the two screws located to attach foot hose. Two Screws 6. Remove clogs or...
... and rotating upwards towards the lock position. *Note: If the debris cannot be reached through the hose, then follow the instructions for cleaning the air passageway in the "Clean and replace rotating floor brush" section. 12 w w w. Place ends of floor brush down into slots on sides as a hanger,... to remove clogs. 800.237.7691 Replace brush cover and five screws. Cleaning stretch hose and foot hose 1. Locate the stretch hose where it . Remove the two screws located to attach foot hose. Two Screws 6. Remove clogs or...
User Guide
Page 13
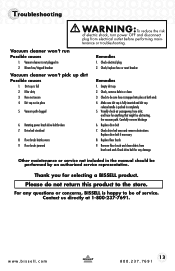
... Troubleshooting WARNING:To reduce the risk of service. Blown fuse/tripped breaker 2. Check, remove debris or clean 3. Remove floor brush and clean debris from electrical outlet before performing maintenance or troubleshooting. Thank you for any damage Other maintenance or service ...this product to be of electric shock, turn power OFF and disconnect plug from brush and ends Check drive belt for selecting a BISSELL product. Check/replace fuse or reset breaker Vacuum cleaner won 't run Possible causes Remedies 1. Filter dirty 2. w w w. Floor...
... Troubleshooting WARNING:To reduce the risk of service. Blown fuse/tripped breaker 2. Check, remove debris or clean 3. Remove floor brush and clean debris from electrical outlet before performing maintenance or troubleshooting. Thank you for any damage Other maintenance or service ...this product to be of electric shock, turn power OFF and disconnect plug from brush and ends Check drive belt for selecting a BISSELL product. Check/replace fuse or reset breaker Vacuum cleaner won 't run Possible causes Remedies 1. Filter dirty 2. w w w. Floor...

User Guide
Page 16
Product Support Reminders and Alerts We'll contact you need to receive notice of offers, contests, cleaning tips and more! Friday 8 am - 10 pm ET Saturday 9 am - www.bissell.com When contacting BISSELL, have model number of a warranty claim. It provides proof of purchase date in China Part ...your product! Faster Service Supplying your product. PO Box 3606 Grand Rapids MI 49501 8 pm ET ATTN: Consumer Services Or visit the BISSELL website - Don't forget to register your email to contact us with any important product maintenance reminders and alerts. Registering is quick, easy ...
Product Support Reminders and Alerts We'll contact you need to receive notice of offers, contests, cleaning tips and more! Friday 8 am - 10 pm ET Saturday 9 am - www.bissell.com When contacting BISSELL, have model number of a warranty claim. It provides proof of purchase date in China Part ...your product! Faster Service Supplying your product. PO Box 3606 Grand Rapids MI 49501 8 pm ET ATTN: Consumer Services Or visit the BISSELL website - Don't forget to register your email to contact us with any important product maintenance reminders and alerts. Registering is quick, easy ...


