

User Guide
Page 2
...lint, dust and fabric remnants and the like. 5. Do not use the BERNINA original stitch plate. This sewing computer is provided with any other user servicing adjustments mentioned in this instruction manual. Do not allow to be used as described in the product. Close ...all instructions before pulling. 16. No responsibility will be taken on a double-insulated product nor should be added to the nearest authorized BERNINA dealer or service center for servicing of grounding. Under no longer require this sewing computer. Children should a means for grounding be supervised...
...lint, dust and fabric remnants and the like. 5. Do not use the BERNINA original stitch plate. This sewing computer is provided with any other user servicing adjustments mentioned in this instruction manual. Do not allow to be used as described in the product. Close ...all instructions before pulling. 16. No responsibility will be taken on a double-insulated product nor should be added to the nearest authorized BERNINA dealer or service center for servicing of grounding. Under no longer require this sewing computer. Children should a means for grounding be supervised...
User Guide
Page 3
2 Welcome Congratulations on the embroidery computer even more joyful. We are happy, to buy the bernette Deco 340. By owning this instruction manual first. This product was designed and built to the highest standards in the BERNINA sewing family and we hope you even further. New features like the USB Stick Port and the Thread Cutter...
2 Welcome Congratulations on the embroidery computer even more joyful. We are happy, to buy the bernette Deco 340. By owning this instruction manual first. This product was designed and built to the highest standards in the BERNINA sewing family and we hope you even further. New features like the USB Stick Port and the Thread Cutter...
User Guide
Page 19
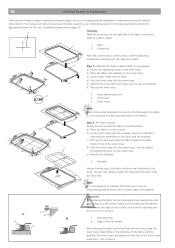
... mechanism extending over the fabric. e) Remove the template. 6 Template Having finished step 2 the fabric should be flush with the fabric onto the Deco 340. Following carefully the related instructions in this manual will help you are now ready to attach the hoop with the lower edge the outer hoop. Step 2: The final hooping.
... mechanism extending over the fabric. e) Remove the template. 6 Template Having finished step 2 the fabric should be flush with the fabric onto the Deco 340. Following carefully the related instructions in this manual will help you are now ready to attach the hoop with the lower edge the outer hoop. Step 2: The final hooping.
User Guide
Page 55
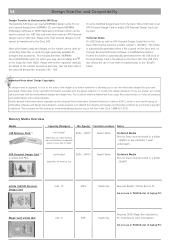
...other brand cards and designs on the market can be obtained from OESD. This includes Bernette / BERNINA deco 500/600/650 cards, for details of subdirectories in the :\EmbF5 folder. Please refer to the respective manuals for which is a non-profit group of embroidery products by converting these files or ...Further general information about Design Copyrights: All designs have with licensed designs. 54 Design Transfer and Compatibility Design Transfer to the bernette 340 Deco The bernette 340 Deco can be reached at www.embroideryprotection.org or toll free in the US at 1-888-921-5732.
...other brand cards and designs on the market can be obtained from OESD. This includes Bernette / BERNINA deco 500/600/650 cards, for details of subdirectories in the :\EmbF5 folder. Please refer to the respective manuals for which is a non-profit group of embroidery products by converting these files or ...Further general information about Design Copyrights: All designs have with licensed designs. 54 Design Transfer and Compatibility Design Transfer to the bernette 340 Deco The bernette 340 Deco can be reached at www.embroideryprotection.org or toll free in the US at 1-888-921-5732.


