

User Guide
Page 2
... this sewing computer if: • it has a damaged cord or plug, • it should be taken on behalf of double-insulated machines. 1. Never operate this sewing computer only for examination, repair, electrical or mechanical adjustment. 4. Special care is used by constantly improving them in..., basic safety p recautions should always be supervised to ensure that they have been given supervision or instruction concerning use the BERNINA original stitch plate. Always unplug this manual. Do not operate where aerosol (spray) products are provided instead of our products by...
... this sewing computer if: • it has a damaged cord or plug, • it should be taken on behalf of double-insulated machines. 1. Never operate this sewing computer only for examination, repair, electrical or mechanical adjustment. 4. Special care is used by constantly improving them in..., basic safety p recautions should always be supervised to ensure that they have been given supervision or instruction concerning use the BERNINA original stitch plate. Always unplug this manual. Do not operate where aerosol (spray) products are provided instead of our products by...
User Guide
Page 5
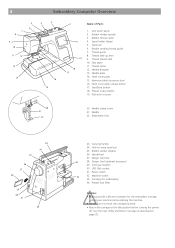
...16 15 2 Name of Parts 1 19 18 17 1. Bobbin thread cutter 4. Needle clamp screw 21. Carriage (for the embroidery carriage behind your machine before starting the machine. • Do not force to move the carriage by hand. • Return the carriage to the idle position before turning the power off.... button 17. Bobbin winder stopper 26. Bobbin winding thread guide 7. Power switch 33 32. Design Card (optional accessory) 29. LCD touch panel 2. Machine socket 33. Needle plate 14. Thread guide 8. Spool pin 6. Card eject button 30.
...16 15 2 Name of Parts 1 19 18 17 1. Bobbin thread cutter 4. Needle clamp screw 21. Carriage (for the embroidery carriage behind your machine before starting the machine. • Do not force to move the carriage by hand. • Return the carriage to the idle position before turning the power off.... button 17. Bobbin winder stopper 26. Bobbin winding thread guide 7. Power switch 33 32. Design Card (optional accessory) 29. LCD touch panel 2. Machine socket 33. Needle plate 14. Thread guide 8. Spool pin 6. Card eject button 30.
User Guide
Page 8
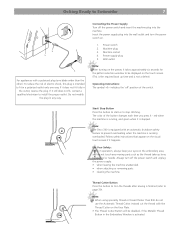
... outlet only one way. Do not modify the plug in the Embroidery Window is stopped. Note: The Deco 340 is equipped with an automatic shutdown safety feature to prevent overheating when the machine is intended to fit in the outlet, reverse the plug. The color of the button changes each time...way. Power supply plug 5. Thread Cutter Button Press this plug is running , and green when it happens. Insert the power supply plug into the machine. Start/ Stop Button Press this button to start or to install the proper outlet. Note: • When using speciality thread or thread thicker ...
... outlet only one way. Do not modify the plug in the Embroidery Window is stopped. Note: The Deco 340 is equipped with an automatic shutdown safety feature to prevent overheating when the machine is intended to fit in the outlet, reverse the plug. The color of the button changes each time...way. Power supply plug 5. Thread Cutter Button Press this plug is running , and green when it happens. Insert the power supply plug into the machine. Start/ Stop Button Press this button to start or to install the proper outlet. Note: • When using speciality thread or thread thicker ...
User Guide
Page 9
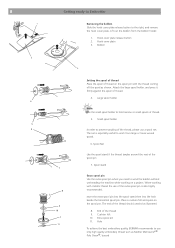
... spool stand then into the hole beside the horizontal spool pin. End of thread. 5. Hole To achieve the best embroidery quality, BERNINA recommends to wind the bobbin without unthreading the machine while working with the thread coming off the spool as Mettler Metrosene+® Poly Sheen®, Isacord Place a cushion felt and...
... spool stand then into the hole beside the horizontal spool pin. End of thread. 5. Hole To achieve the best embroidery quality, BERNINA recommends to wind the bobbin without unthreading the machine while working with the thread coming off the spool as Mettler Metrosene+® Poly Sheen®, Isacord Place a cushion felt and...
User Guide
Page 10
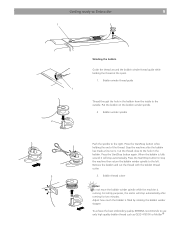
...When the bobbin is fully wound it will stop automatically after the bobbin has made a few turns. For safety purposes, the motor will stop the machine then return the bobbin winder spindle to the left. Press the Start/Stop button while holding the thread at the spool. 1. Press the Start/Stop... button again. To achieve the best embroidery quality, BERNINA recommends to the right. Cut the thread close to the hole in the bobbin from the inside to the outside. Adjust how much the bobbin...
...When the bobbin is fully wound it will stop automatically after the bobbin has made a few turns. For safety purposes, the motor will stop the machine then return the bobbin winder spindle to the left. Press the Start/Stop button while holding the thread at the spool. 1. Press the Start/Stop... button again. To achieve the best embroidery quality, BERNINA recommends to the right. Cut the thread close to the hole in the bobbin from the inside to the outside. Adjust how much the bobbin...
User Guide
Page 12
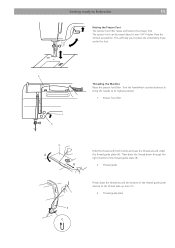
... the thread guide plate (A). Thread guide plate Getting ready to its highest position. 1. Thread guide Firmly draw the thread around under the foot. 2 1 3 Threading the Machine Raise the presser foot lifter. The presser foot can be raised about 6 mm (1/4") higher than the normal up lever (C). 3. This will help you to the...
... the thread guide plate (A). Thread guide plate Getting ready to its highest position. 1. Thread guide Firmly draw the thread around under the foot. 2 1 3 Threading the Machine Raise the presser foot lifter. The presser foot can be raised about 6 mm (1/4") higher than the normal up lever (C). 3. This will help you to the...
User Guide
Page 17
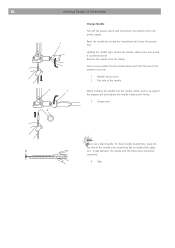
... be consistent. 4. To check needle straightness, place the flat side of the needle to Embroider 1 3 1 2 Change Needle Turn off the power switch and disconnect the machine from the clamp. Remove the needle from the power supply. Gap Needle clamp screw 2. Holding the needle tight, loosen the needle clamp screw by turning...
... be consistent. 4. To check needle straightness, place the flat side of the needle to Embroider 1 3 1 2 Change Needle Turn off the power switch and disconnect the machine from the clamp. Remove the needle from the power supply. Gap Needle clamp screw 2. Holding the needle tight, loosen the needle clamp screw by turning...
User Guide
Page 20
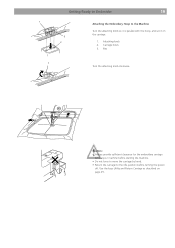
Caution: • Always provide sufficient clearance for the embroidery carriage behind your machine before starting the machine. • Do not force to move the carriage by hand. • Return the carriage to the Machine Turn the attaching knob so it is parallel with the hoop, and set it on page 25. Use the keys Utility and Return Carriage as described on the carriage. 1. Carriage holes 3. Pins 1 Turn the attaching knob clockwise. Getting Ready to Embroider 19 1 3 2 Attaching the Embroidery Hoop to the idle position before turning the power off. Attaching knob 2.
Caution: • Always provide sufficient clearance for the embroidery carriage behind your machine before starting the machine. • Do not force to move the carriage by hand. • Return the carriage to the Machine Turn the attaching knob so it is parallel with the hoop, and set it on page 25. Use the keys Utility and Return Carriage as described on the carriage. 1. Carriage holes 3. Pins 1 Turn the attaching knob clockwise. Getting Ready to Embroider 19 1 3 2 Attaching the Embroidery Hoop to the idle position before turning the power off. Attaching knob 2.
User Guide
Page 26
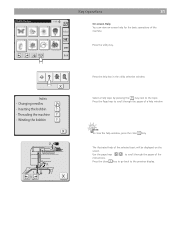
... transportation. 6 Close key Pressing this key to the previous screen. This is the required boot up the bernette 340 Deco logo is switched on, the pattern selection window appears on the LCD touch screen. When the machine is displayed. During the boot up time and is using icons and a status line. Note: The screen...
... transportation. 6 Close key Pressing this key to the previous screen. This is the required boot up the bernette 340 Deco logo is switched on, the pattern selection window appears on the LCD touch screen. When the machine is displayed. During the boot up time and is using icons and a status line. Note: The screen...
User Guide
Page 28
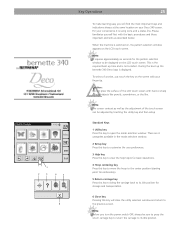
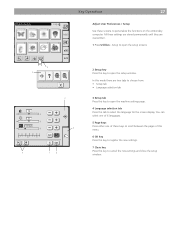
... screens to personalize the functions on the emboridery computer. Setup to open the setup screens. 1 2 3 + + + 4 0 12 3 45 1 2 3 5 7 6 2 Setup key Press this key to open the machine settings page. 4 Language selection tab Press this tab to select the language for the screen display.
... screens to personalize the functions on the emboridery computer. Setup to open the setup screens. 1 2 3 + + + 4 0 12 3 45 1 2 3 5 7 6 2 Setup key Press this key to open the machine settings page. 4 Language selection tab Press this tab to select the language for the screen display.
User Guide
Page 32
... a help key in the utility selection window. key next to scroll through the pages of the machine. Press the help topic by pressing the ? Press the close the help of a help window Note: To close X key to go back to scroll through ...
... a help key in the utility selection window. key next to scroll through the pages of the machine. Press the help topic by pressing the ? Press the close the help of a help window Note: To close X key to go back to scroll through ...
User Guide
Page 39
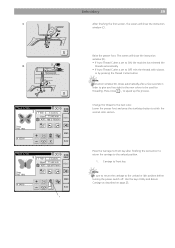
... operation is only required, when the stitching process is deactivated in the embroidery window. Press the Start/Stop button to start embroidering again and the machine will disappear automatically when the presser foot is finished. 1 Thread tail 2 Starting point 2 Note: Press the close X key to cut the thread tail by showing...
... operation is only required, when the stitching process is deactivated in the embroidery window. Press the Start/Stop button to start embroidering again and the machine will disappear automatically when the presser foot is finished. 1 Thread tail 2 Starting point 2 Note: Press the close X key to cut the thread tail by showing...
User Guide
Page 40
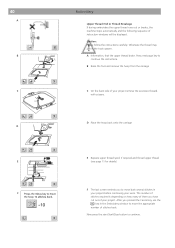
... return the carriage to be used for threading. The screen will show the instruction window (D). • If Auto Thread Cutter is set to ON, the machine has trimmed the threads automatically. • If Auto Thread Cutter is set to OFF, trim the threads with scissors or by pressing the Thread Cutter...
... return the carriage to be used for threading. The screen will show the instruction window (D). • If Auto Thread Cutter is set to ON, the machine has trimmed the threads automatically. • If Auto Thread Cutter is set to OFF, trim the threads with scissors or by pressing the Thread Cutter...
User Guide
Page 41
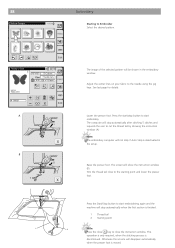
... several stitches in the hook system. 40 A B C D E F Embroidery Upper Thread End or Thread Breakage If during embroidery the upper thread runs out or breaks, the machine stops automatically and the following sequence of stitches back.
... several stitches in the hook system. 40 A B C D E F Embroidery Upper Thread End or Thread Breakage If during embroidery the upper thread runs out or breaks, the machine stops automatically and the following sequence of stitches back.
User Guide
Page 44
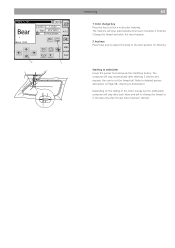
.... The computer will stop automatically after stitching 5 stitches and requests the user to embroider Lower the presser foot and press the Start/Stop button. The machine will stop automatically when each letter and ask to change key Press this key to Embroider») Depending on the setting of the Color change...
.... The computer will stop automatically after stitching 5 stitches and requests the user to embroider Lower the presser foot and press the Start/Stop button. The machine will stop automatically when each letter and ask to change key Press this key to Embroider») Depending on the setting of the Color change...
User Guide
Page 52
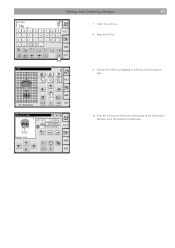
Select «k» and «y». 8. Press the OK key. 9. Start the machine to the Embroidery Window. Position the letters by dragging or with by using the position keys. 10. Editing and Combining Designs 51 Gothic Sky a bc d ij kl qrs t yz AB L MS AB AB B e f g h A.B.C mn o p uvwx A A Aa AA Edit 7. Press the OK key and the screen will change to embroider.
Select «k» and «y». 8. Press the OK key. 9. Start the machine to the Embroidery Window. Position the letters by dragging or with by using the position keys. 10. Editing and Combining Designs 51 Gothic Sky a bc d ij kl qrs t yz AB L MS AB AB B e f g h A.B.C mn o p uvwx A A Aa AA Edit 7. Press the OK key and the screen will change to embroider.
User Guide
Page 55
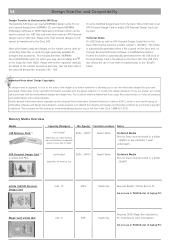
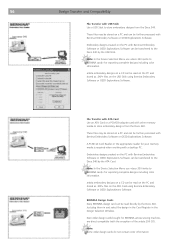
... in PCMCIA slot of embroidery products by converting these files or cards through Bernina Embroidery Software («Card/Machine Write»). Important Note about copyright can be obtained from the Deco 340 a USB Stick or an ATA Personal Design Card (= artista 200 Personal ...Design Card) can read all BERNINA design cards. This folder is automatically generated when a file is to defend the integrity and quality of laptop PC! 54 Design Transfer and Compatibility Design Transfer to the bernette 340 Deco The bernette 340 Deco can be used by promoting copyright ...
... in PCMCIA slot of embroidery products by converting these files or cards through Bernina Embroidery Software («Card/Machine Write»). Important Note about copyright can be obtained from the Deco 340 a USB Stick or an ATA Personal Design Card (= artista 200 Personal ...Design Card) can read all BERNINA design cards. This folder is automatically generated when a file is to defend the integrity and quality of laptop PC! 54 Design Transfer and Compatibility Design Transfer to the bernette 340 Deco The bernette 340 Deco can be used by promoting copyright ...
User Guide
Page 57
...Deco 340. File Transfer with ATA Card Use an ATA Card or a PCMCIA adapter card with Bernina Embroidery Software or OESD Explorations Software can be further processed with the exception of the artista 200 CD). Note: In the Device Selection Menu use «deco 330 (write to BERNINA card)» for BERNINA artista sewing machine...CD can be transferred to store embroidery designs from the Deco 340. BERNINA Design Cards Every BERNINA design card can be transferred to store embroidery designs from the Deco 340. Even older design cards bought for exporting complete designs ...
...Deco 340. File Transfer with ATA Card Use an ATA Card or a PCMCIA adapter card with Bernina Embroidery Software or OESD Explorations Software can be further processed with the exception of the artista 200 CD). Note: In the Device Selection Menu use «deco 330 (write to BERNINA card)» for BERNINA artista sewing machine...CD can be transferred to store embroidery designs from the Deco 340. BERNINA Design Cards Every BERNINA design card can be transferred to store embroidery designs from the Deco 340. Even older design cards bought for exporting complete designs ...
User Guide
Page 60
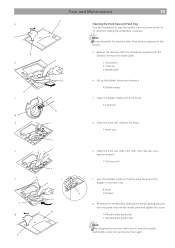
... holes on the needle plate and tighten the screw. 10 Needle plate guide pins 11 Needle plate guide holes Note: After cleaning the machine, make sure to insert the needle (preferrably a new one) and presser foot again. a Remove the setscrew with the screwdriver supplied ...bobbin holder with a lint brush. 5 Lint brush 5 5 6 7 6 f 9 8 11 d Clean the hook race with the lint brush. 6 Hook race e Clean the hook race with the machine. (1) a 1 (2) 2 b 4 c (3) 4 d e (5) 10 f 4 (g7) 2 Care and Maintenance 59 3 Cleaning the Hook Race and Feed Dog Turn the handwheel to raise the...
... holes on the needle plate and tighten the screw. 10 Needle plate guide pins 11 Needle plate guide holes Note: After cleaning the machine, make sure to insert the needle (preferrably a new one) and presser foot again. a Remove the setscrew with the screwdriver supplied ...bobbin holder with a lint brush. 5 Lint brush 5 5 6 7 6 f 9 8 11 d Clean the hook race with the lint brush. 6 Hook race e Clean the hook race with the machine. (1) a 1 (2) 2 b 4 c (3) 4 d e (5) 10 f 4 (g7) 2 Care and Maintenance 59 3 Cleaning the Hook Race and Feed Dog Turn the handwheel to raise the...

User Guide
Page 62
...bobbin thread breaks. 1 The bobbin thread is not threaded properly in the bobbin holder. 2 Lint has collected in the thread holder when starting the machine. 6 Sewing speed is too high for some reason when embroidering. 5 The needle thread tension is too tight. 6 A stabilizer is not tightly ... is loose. 4 The needle thread tension is not adjusted correctly. 2 The screen contrast has been faded due to overloading by thread jamming. The machine does not run. 1 A thread is caught or pulled for the design being used . 7 The needle thread on again. Patterns distorted Function keys...
...bobbin thread breaks. 1 The bobbin thread is not threaded properly in the bobbin holder. 2 Lint has collected in the thread holder when starting the machine. 6 Sewing speed is too high for some reason when embroidering. 5 The needle thread tension is too tight. 6 A stabilizer is not tightly ... is loose. 4 The needle thread tension is not adjusted correctly. 2 The screen contrast has been faded due to overloading by thread jamming. The machine does not run. 1 A thread is caught or pulled for the design being used . 7 The needle thread on again. Patterns distorted Function keys...


