

User Guide
Page 2
... infirm persons. Never operate the sewing computer with double insulation (except USA / Canada). Always use bent needles. 8. Do not use the BERNINA original stitch plate. A double insulated product is used by the manufacturer as contained in . 2. SAVE THESE INSTRUCTIONS! Under no ..., two systems of insulation are being used as described in terms of doubt, please contact your household waste. In case of design and production technologiy. DANGER To reduce the risk of grounding. Use only identical replacement parts. The wrong plate can cause needle breakage....
... infirm persons. Never operate the sewing computer with double insulation (except USA / Canada). Always use bent needles. 8. Do not use the BERNINA original stitch plate. A double insulated product is used by the manufacturer as contained in . 2. SAVE THESE INSTRUCTIONS! Under no ..., two systems of insulation are being used as described in terms of doubt, please contact your household waste. In case of design and production technologiy. DANGER To reduce the risk of grounding. Use only identical replacement parts. The wrong plate can cause needle breakage....
User Guide
Page 3
...embroidery designs, educational publications and useful accessories we can support you study this fascinating embroidery computer we recommend, that the Deco 340 provides. In order to the highest standards in the BERNINA sewing family and we hope you completely satisfied. P.Horisberger, Productmanager BERNINA ...International AG - 8266 Steckborn / Switzerland New features like the USB Stick Port and the Thread Cutter have a wonderful sewing experience with the large embroidery area, the concise, easy-to buy the bernette Deco 340. We are happy,...
...embroidery designs, educational publications and useful accessories we can support you study this fascinating embroidery computer we recommend, that the Deco 340 provides. In order to the highest standards in the BERNINA sewing family and we hope you completely satisfied. P.Horisberger, Productmanager BERNINA ...International AG - 8266 Steckborn / Switzerland New features like the USB Stick Port and the Thread Cutter have a wonderful sewing experience with the large embroidery area, the concise, easy-to buy the bernette Deco 340. We are happy,...
User Guide
Page 4
Contents 3 Important Safety Instructions 1 Welcome 2 Embroidery Computer Overview 4- 6 Getting Ready to Embroider 7- 20 Important Embroidery Information 21- 24 Key Operations 25- 35 Embroidery 36- 40 Lettering 41- 45 Editing and Combining Designs 46- 53 Design Transfer and Compatibility 54- 58 Care and Maintenance 59- 60 Troubleshooting 61 Index 62 Built-in Design Chart Appendix Table of Preset Colors Appendix
Contents 3 Important Safety Instructions 1 Welcome 2 Embroidery Computer Overview 4- 6 Getting Ready to Embroider 7- 20 Important Embroidery Information 21- 24 Key Operations 25- 35 Embroidery 36- 40 Lettering 41- 45 Editing and Combining Designs 46- 53 Design Transfer and Compatibility 54- 58 Care and Maintenance 59- 60 Troubleshooting 61 Index 62 Built-in Design Chart Appendix Table of Preset Colors Appendix
User Guide
Page 5
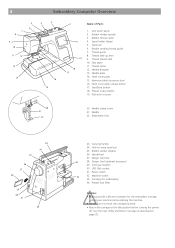
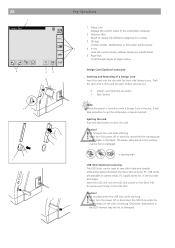
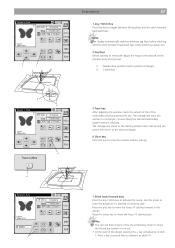
...30 31 32 23. Handwheel 27. Bobbin winder spindle 3. Spool holder (large) 5. Thread guide 8. Needle threader 13. Needle 22. Design Card slot 34 28. Card eject button 30. Thread tension dial 10. Hook cover plate 15. Hole for scissors 20 21 22 20... the machine. • Do not force to move the carriage by hand. • Return the carriage to the idle position before turning the power off. Design Card (optional accessory) 29. Thread take-up lever 9. Carrying handle 24. LCD touch panel 2. 4 Embroidery Computer Overview 5 4 3 6 7 8 9...
...30 31 32 23. Handwheel 27. Bobbin winder spindle 3. Spool holder (large) 5. Thread guide 8. Needle threader 13. Needle 22. Design Card slot 34 28. Card eject button 30. Thread tension dial 10. Hook cover plate 15. Hole for scissors 20 21 22 20... the machine. • Do not force to move the carriage by hand. • Return the carriage to the idle position before turning the power off. Design Card (optional accessory) 29. Thread take-up lever 9. Carrying handle 24. LCD touch panel 2. 4 Embroidery Computer Overview 5 4 3 6 7 8 9...
User Guide
Page 18
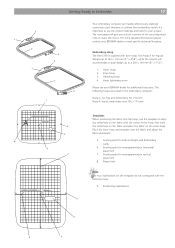
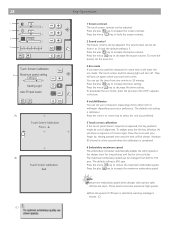
...short overview of the hoop. The next pages will accommodate a large design up to a 200 x 140 mm (8" x 51/2"). 1. Place the inner hoop and template over the fabric and adjust the fabric placement. 5. Embroidery Hoop The Deco 340 is important to use the template to Embroider 17 3 1 2 1...the fabric into the hoop, use the correct materials and tools for additional hoop sizes. For more detailed informations please contact your BERNINA dealer for your project. Positioning indentations 8 6 5 Outer hoop 2. The following hoops are preset in horizontal placement 7. Getting ...
...short overview of the hoop. The next pages will accommodate a large design up to a 200 x 140 mm (8" x 51/2"). 1. Place the inner hoop and template over the fabric and adjust the fabric placement. 5. Embroidery Hoop The Deco 340 is important to use the template to Embroider 17 3 1 2 1...the fabric into the hoop, use the correct materials and tools for additional hoop sizes. For more detailed informations please contact your BERNINA dealer for your project. Positioning indentations 8 6 5 Outer hoop 2. The following hoops are preset in horizontal placement 7. Getting ...
User Guide
Page 27
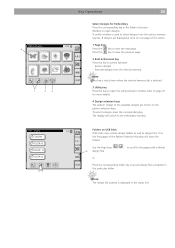
...screen will be lost or damaged. = warning sign USB Stick (Optional accessory) The USB Sticks can be used to save stitch data and transfer embroidery designs between the Deco 340 and your PC. USB Sticks are available at camera shops, PC supply stores etc. Insert the USB Stick into the slot with... a Design Card in the USB memory may be lost or damaged. Otherwise, data stored in the slot, it clicks and the eject button will take ...
...screen will be lost or damaged. = warning sign USB Stick (Optional accessory) The USB Sticks can be used to save stitch data and transfer embroidery designs between the Deco 340 and your PC. USB Sticks are available at camera shops, PC supply stores etc. Insert the USB Stick into the slot with... a Design Card in the USB memory may be lost or damaged. Otherwise, data stored in the slot, it clicks and the eject button will take ...
User Guide
Page 29
...;ltsettingis shown. (C) Note Note Reduce the embroidery speed when designs with narrow satin stit will be set from0to reduce the maximum embroidery speed...
...;ltsettingis shown. (C) Note Note Reduce the embroidery speed when designs with narrow satin stit will be set from0to reduce the maximum embroidery speed...
User Guide
Page 30
...;Stickorthe ATA Design Card will delete all designs in gyoumayatanytime...
...;Stickorthe ATA Design Card will delete all designs in gyoumayatanytime...
User Guide
Page 33
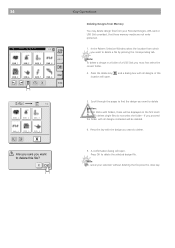
...and combine the embroidery designs from various sources. letter monogramming available. Every BERNINA embroidery card can be used. For details see page 46- 53. For details of the five tabs to select the desired category. 1 Open designs from the optionally available Design Cards. Use this selection... when the embroidery computer is a choice of the Deco 340 Read how to open embroidery designs from the optional Design Cards with alphabets through this category 4 Open Designs on USB Stick Use this category to access the Personal Designs which you to the 3 next page («Built...
...and combine the embroidery designs from various sources. letter monogramming available. Every BERNINA embroidery card can be used. For details see page 46- 53. For details of the five tabs to select the desired category. 1 Open designs from the optionally available Design Cards. Use this selection... when the embroidery computer is a choice of the Deco 340 Read how to open embroidery designs from the optional Design Cards with alphabets through this category 4 Open Designs on USB Stick Use this category to access the Personal Designs which you to the 3 next page («Built...
User Guide
Page 34
... key to view the next page. Personal designs from the various memory sources. 8 designs are displayed at once on one page of the available designs are shown on USB Stick USB Sticks may contain design folders as well as design files. To select a design, press the corresponding key. A similar window... shown when the internal memory tab is displayed in designs - Note: The design file location is selected. 3 Utility key Press this key to access design files contained in /Personal key Press this particular folder. Use the Page keys 5 design files to scroll to the pages with indiviual or...
... key to view the next page. Personal designs from the various memory sources. 8 designs are displayed at once on one page of the available designs are shown on USB Stick USB Sticks may contain design folders as well as design files. To select a design, press the corresponding key. A similar window... shown when the internal memory tab is displayed in designs - Note: The design file location is selected. 3 Utility key Press this key to access design files contained in /Personal key Press this particular folder. Use the Page keys 5 design files to scroll to the pages with indiviual or...
User Guide
Page 35
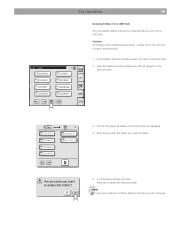
...the delete key location will be displayed on the first scroll pages. Note To cancel your Personal Designs, ATA card or USB Stick provided, that these will open . Note: To delete a design in this 1/2 EMB_1 EMB_2 EMB_3 EMB_4 EMB_5 EMB_6 3. To delete single files do not select the...the file press the close key. Press OK to delete. 5. A confirmation dialog will be deleted. 4. Scroll through the pages to find the design you must first select the correct folder. 2. and a dialog box with folders, these memory media are not write protected. 1. C EMB_5 EMB_6 ...
...the delete key location will be displayed on the first scroll pages. Note To cancel your Personal Designs, ATA card or USB Stick provided, that these will open . Note: To delete a design in this 1/2 EMB_1 EMB_2 EMB_3 EMB_4 EMB_5 EMB_6 3. To delete single files do not select the...the file press the close key. Press OK to delete. 5. A confirmation dialog will be deleted. 4. Scroll through the pages to find the design you must first select the correct folder. 2. and a dialog box with folders, these memory media are not write protected. 1. C EMB_5 EMB_6 ...
User Guide
Page 36
In the Pattern Selection Window select the tab for the USB Stick. 2. FOLDR1AB FOLDR2CD FOLDR3EF FOLDR4GH 1/4 FOLDR5IJ My Design 3. On the first pages all its contained files at once from USB Stick You may delete folders with all folders on the USB will open . ... FOLDR8OP Deleting Folders from a USB Stick. Press the delete key and a dialog box with the folder you want to delete the selected folder. Caution: All designs will open . A confirmation dialog will be deleted permanently - Press OK to delete. 5. Press the key with all...
In the Pattern Selection Window select the tab for the USB Stick. 2. FOLDR1AB FOLDR2CD FOLDR3EF FOLDR4GH 1/4 FOLDR5IJ My Design 3. On the first pages all its contained files at once from USB Stick You may delete folders with all folders on the USB will open . ... FOLDR8OP Deleting Folders from a USB Stick. Press the delete key and a dialog box with the folder you want to delete the selected folder. Caution: All designs will open . A confirmation dialog will be deleted permanently - Press OK to delete. 5. Press the key with all...
User Guide
Page 37
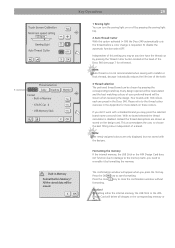
.... 36 Embroidery 1 2 3 4 5 6 A Lem on Yellow 031 0 7 9 B 8 C Embroidery Window Use the functions on the embroidery window to select parts of a design for thread cutting. Further there are not suitable for stitching. In the picture the colour area will be temporarily disabled if you press this key...embroidery window and return to be used and its size 5 Image key Each time you press this function when sewing a part of the Deco 340 is enabled in the utility menu. 9 Status of each color section will be highlighted together with specialty threads such as well. •...
.... 36 Embroidery 1 2 3 4 5 6 A Lem on Yellow 031 0 7 9 B 8 C Embroidery Window Use the functions on the embroidery window to select parts of a design for thread cutting. Further there are not suitable for stitching. In the picture the colour area will be temporarily disabled if you press this key...embroidery window and return to be used and its size 5 Image key Each time you press this function when sewing a part of the Deco 340 is enabled in the utility menu. 9 Status of each color section will be highlighted together with specialty threads such as well. •...
User Guide
Page 38
...5 Trace outline X 6 7 5 Trace key After adjusting the position check the extents of the of the embroidery area by pressing this mode to trace the design as it is stitched out step by step. Press + key a second time to advance to stitch 10. Needle drop position (center position of the...1 Embroidery 37 1 Jog / Stitch Key Press this key to toggle between jog keys before stitching and the stitch forward / backward keys while stitching a design out. 2 Jog Keys Before starting position after tracing and the screen will return to the previous display. 6 Close key Press this key to close the...
...5 Trace outline X 6 7 5 Trace key After adjusting the position check the extents of the of the embroidery area by pressing this mode to trace the design as it is stitched out step by step. Press + key a second time to advance to stitch 10. Needle drop position (center position of the...1 Embroidery 37 1 Jog / Stitch Key Press this key to toggle between jog keys before stitching and the stitch forward / backward keys while stitching a design out. 2 Jog Keys Before starting position after tracing and the screen will return to the previous display. 6 Close key Press this key to close the...
User Guide
Page 47
... selecting the hoop size. Press the close X key to cancel the selection and return to open . Built-in designs, letters as well as designs from USB Sticks or Design Cards can be merged on the Deco 340 into one of 64'000 stitches and • max. 104 colour sections Open Editing Window From the Pattern...
... selecting the hoop size. Press the close X key to cancel the selection and return to open . Built-in designs, letters as well as designs from USB Sticks or Design Cards can be merged on the Deco 340 into one of 64'000 stitches and • max. 104 colour sections Open Editing Window From the Pattern...
User Guide
Page 48
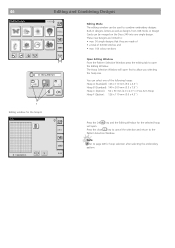
...indicates it is selected. A.B.C Alternate Edit Entry Procedure Starting from the Embroidery Window (with a design already selected) you may press the Edit tab to Edit To select a design, press the tab for modification. Even if you enter the Editing Mode like this, you may... add further design elements and save the new combination as one design. Editing and Combining Designs 47 Edit Selecting a Design to open . B: 140x200mm The selected pattern will open the current design for the location of the desired A.B.C design B: 140x200mm X Edit The Pattern Selection...
...indicates it is selected. A.B.C Alternate Edit Entry Procedure Starting from the Embroidery Window (with a design already selected) you may press the Edit tab to Edit To select a design, press the tab for modification. Even if you enter the Editing Mode like this, you may... add further design elements and save the new combination as one design. Editing and Combining Designs 47 Edit Selecting a Design to open . B: 140x200mm The selected pattern will open the current design for the location of the desired A.B.C design B: 140x200mm X Edit The Pattern Selection...
User Guide
Page 49
... the OK will not move when you can select the appropriate hoop. Press this key to cancel editing and the screen will fit the current design are shown for the selected hoop Press the close X key to return to the default setting (Hoop B). key and the Editing Window for selection Note... the Position keys to the last Pattern Selection Window. 3 Hoop selection key In the Editing Window, you press the Position keys since the design position is different. Note: The Position keys look exactly the same as the Jog keys but the function is just moved relatively to open . Select ...
... the OK will not move when you can select the appropriate hoop. Press this key to cancel editing and the screen will fit the current design are shown for the selected hoop Press the close X key to return to the default setting (Hoop B). key and the Editing Window for selection Note... the Position keys to the last Pattern Selection Window. 3 Hoop selection key In the Editing Window, you press the Position keys since the design position is different. Note: The Position keys look exactly the same as the Jog keys but the function is just moved relatively to open . Select ...
User Guide
Page 50
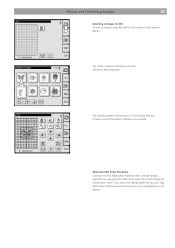
... rotation When you press the plus or minus key. key to flip patterns from 90% to 120% of the original size. 1 B: 140x200mm Editing and Combining Designs 49 1 Resize Key Press this key to open . • Press the plus key to rotate the pattern in steps of 1º clockwise. • Press the...
... rotation When you press the plus or minus key. key to flip patterns from 90% to 120% of the original size. 1 B: 140x200mm Editing and Combining Designs 49 1 Resize Key Press this key to open . • Press the plus key to rotate the pattern in steps of 1º clockwise. • Press the...
User Guide
Page 51
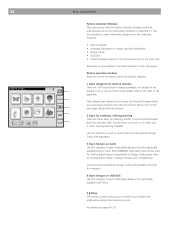
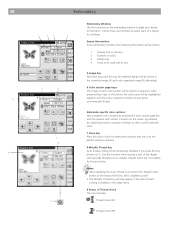
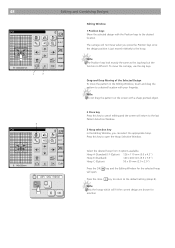
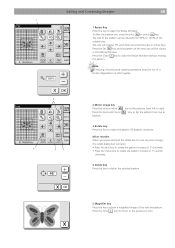
Select «S» (Upper case letter in designs. 2. Press the Editing tab. 3 Select the hoop B. 4. Press the letter case key to select lower case letters. Press the Lettering tab. Select design #4 from the built-in Gothic style). 6. Gothic S ABCD IJKL QR S T YZ AB L MS AB AB B E F G H A.B.C MNO P U V WX A A Aa AA Edit Gothic B a bc d ij kl qrs t yz AB L MS AB AB B e f g h A.B.C mn o p uvwx A A Aa AA Edit 5. 50 Editing and Combining Designs Editing and Combining Designs Example: Combine the built-in design #4 and text «Sky» 1.
Select «S» (Upper case letter in designs. 2. Press the Editing tab. 3 Select the hoop B. 4. Press the letter case key to select lower case letters. Press the Lettering tab. Select design #4 from the built-in Gothic style). 6. Gothic S ABCD IJKL QR S T YZ AB L MS AB AB B E F G H A.B.C MNO P U V WX A A Aa AA Edit Gothic B a bc d ij kl qrs t yz AB L MS AB AB B e f g h A.B.C mn o p uvwx A A Aa AA Edit 5. 50 Editing and Combining Designs Editing and Combining Designs Example: Combine the built-in design #4 and text «Sky» 1.
User Guide
Page 52
Editing and Combining Designs 51 Gothic Sky a bc d ij kl qrs t yz AB L MS AB AB B e f g h A.B.C mn o p uvwx A A Aa AA Edit 7. Position the letters by dragging or with by using the position keys. 10. Select «k» and «y». 8. Start the machine to the Embroidery Window. Press the OK key and the screen will change to embroider. Press the OK key. 9.
Editing and Combining Designs 51 Gothic Sky a bc d ij kl qrs t yz AB L MS AB AB B e f g h A.B.C mn o p uvwx A A Aa AA Edit 7. Position the letters by dragging or with by using the position keys. 10. Select «k» and «y». 8. Start the machine to the Embroidery Window. Press the OK key and the screen will change to embroider. Press the OK key. 9.


