
User Guide
Page 70
...153; sew over the first rows - Stitch Over the Hole ™ sew the first rows to prevent distortion ™ use of the fabric, the hoop is not being being moved too quickly moved smoothly. • if there are knots on the wrong side of the slide-on bottom, move the... darning hoop smoothly by a quarter turn - 90° 2. Manual Darning Stitch: Neddle: Thread: Feed dog: Presser foot: Straight stitch No. 1 size and type suitable for a soft finish ™ turn work by a half turn -180° 1 ...
...153; sew over the first rows - Stitch Over the Hole ™ sew the first rows to prevent distortion ™ use of the fabric, the hoop is not being being moved too quickly moved smoothly. • if there are knots on the wrong side of the slide-on bottom, move the... darning hoop smoothly by a quarter turn - 90° 2. Manual Darning Stitch: Neddle: Thread: Feed dog: Presser foot: Straight stitch No. 1 size and type suitable for a soft finish ™ turn work by a half turn -180° 1 ...
User Guide
Page 72
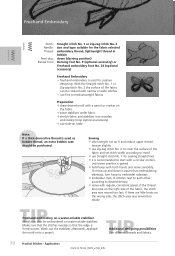
Freehand Embroidery Stitch: Needle: Thread: Feed dog: Presser foot: Straight stitch No. 1 or Zig-zag stitch No. 2 size and type suitable for the fabric selected embroidery thread, lightweight thread in bobbin down is firmly woven. Make sure that the stitches ... foot No. 24 (optional accessory) Freehand Embroidery • freehand embroidery is used as bobbin thread, an extra bobbin case should be purchased. turn hoop to embroider sideways ™ embroider rows of stitches next to each other according to desired density ™ move smoothly. TIP Additional designing possibilities Use...
Freehand Embroidery Stitch: Needle: Thread: Feed dog: Presser foot: Straight stitch No. 1 or Zig-zag stitch No. 2 size and type suitable for the fabric selected embroidery thread, lightweight thread in bobbin down is firmly woven. Make sure that the stitches ... foot No. 24 (optional accessory) Freehand Embroidery • freehand embroidery is used as bobbin thread, an extra bobbin case should be purchased. turn hoop to embroider sideways ™ embroider rows of stitches next to each other according to desired density ™ move smoothly. TIP Additional designing possibilities Use...

User Guide
Page 150
...more slowly and/or reduce the upper thread tension slightly. Freehand Quilting Stitch: Needle: Thread: Feed dog: Presser foot: Quilting straight stitch No. 325 size and type suitable for the fabric selected monofiliament, cotton or decorative down (darning position) Darning foot No. 9 or Quilting foot No. 29 (optional ... form the design of stitching are forming on the wrong side, the work is being moved too slowly • place fabric in a hoop for all freehand quilt work is being moved too quickly • if knots are rounded without any sharp corners; move the fabric smoothly and...
...more slowly and/or reduce the upper thread tension slightly. Freehand Quilting Stitch: Needle: Thread: Feed dog: Presser foot: Quilting straight stitch No. 325 size and type suitable for the fabric selected monofiliament, cotton or decorative down (darning position) Darning foot No. 9 or Quilting foot No. 29 (optional ... form the design of stitching are forming on the wrong side, the work is being moved too slowly • place fabric in a hoop for all freehand quilt work is being moved too quickly • if knots are rounded without any sharp corners; move the fabric smoothly and...

User Guide
Page 211
...display the first stitch of the attached hoop may be read in the embroidery computer • if only the hoop should be read next with 4 stops • lower left • upper right • lower right • upper left ™ acknowledge each hoop size is displayed with «OK»... • attached hoop is displayed • if no hoop or a too small hoop is attached, an error message will be moved until the needle is visible on the «...
...display the first stitch of the attached hoop may be read in the embroidery computer • if only the hoop should be read next with 4 stops • lower left • upper right • lower right • upper left ™ acknowledge each hoop size is displayed with «OK»... • attached hoop is displayed • if no hoop or a too small hoop is attached, an error message will be moved until the needle is visible on the «...

User Guide
Page 212
... lenght knob the motif can be scrolled to view ™ touch symbol a third time • reverts motif back to original size Show Grid ™ touch symbol • a large cross hair indicates the hoop center ™ touch symbol again • because the grid now visible the motif can be changed • for embroidery...
... lenght knob the motif can be scrolled to view ™ touch symbol a third time • reverts motif back to original size Show Grid ™ touch symbol • a large cross hair indicates the hoop center ™ touch symbol again • because the grid now visible the motif can be changed • for embroidery...

User Guide
Page 215
...rethread ™ touch «OK» and the message will close • the hoop moves back to the previous position ™ touch the Quick Reverse button • the embroidery computer continues to embroider Motif Size • display of the motif width and height in millimeters (mm) Embroidery Time &#...the right number indicates the total stitch count of the active motif/motif combination • display of the embroidery time of the attached embroidery hoop with stitch field dimensions in the lower bar • stitch time on both bars counts down as embroidery progresses To Screen Edit 1 ...
...rethread ™ touch «OK» and the message will close • the hoop moves back to the previous position ™ touch the Quick Reverse button • the embroidery computer continues to embroider Motif Size • display of the motif width and height in millimeters (mm) Embroidery Time &#...the right number indicates the total stitch count of the active motif/motif combination • display of the embroidery time of the attached embroidery hoop with stitch field dimensions in the lower bar • stitch time on both bars counts down as embroidery progresses To Screen Edit 1 ...

User Guide
Page 229
... appropriate knob • stitch width scrolls right/left • stitch length scrolls up/down ™ by touching symbol a third time, reverts motif back to original size Embroidering Motif To change to the Embroidery menu (Ready) touch «OK» in screen Edit 1 or press the external Quick Reverse button on head... frame ™ embroider motif • for more information on Starting to Embroider see pages 204-205 TIP Hoop Relocater • this function makes threading easier when the needle is very close to the left edge of the...
... appropriate knob • stitch width scrolls right/left • stitch length scrolls up/down ™ by touching symbol a third time, reverts motif back to original size Embroidering Motif To change to the Embroidery menu (Ready) touch «OK» in screen Edit 1 or press the external Quick Reverse button on head... frame ™ embroider motif • for more information on Starting to Embroider see pages 204-205 TIP Hoop Relocater • this function makes threading easier when the needle is very close to the left edge of the...

User Guide
Page 231
... motif can be checked before embroidering. Check The function «Check» reads the attached hoop size and stitching area: ™ touch symbol • the hoop size is read causing the hoop to move ™ «Check» then confirms placement by moving hoop to reflect stitching area of selected motif ™ «Check» moves...
... motif can be checked before embroidering. Check The function «Check» reads the attached hoop size and stitching area: ™ touch symbol • the hoop size is read causing the hoop to move ™ «Check» then confirms placement by moving hoop to reflect stitching area of selected motif ™ «Check» moves...

User Guide
Page 234
... Areas for more information on screen. Motifs Selecting the Most Appropriate Hoop for Adjusted Motif Size The most appropriate hoop should be chosen for the motif size: ™ touch «Select Hoop» • a special screen appears with possible choices of hoops • by selecting a hoop (Small, Middle, Large Oval or Mega) the motif is shown in...
... Areas for more information on screen. Motifs Selecting the Most Appropriate Hoop for Adjusted Motif Size The most appropriate hoop should be chosen for the motif size: ™ touch «Select Hoop» • a special screen appears with possible choices of hoops • by selecting a hoop (Small, Middle, Large Oval or Mega) the motif is shown in...

User Guide
Page 237
... 1 and the activated motif will be automatically deleted Selecting the Most Appropriate Hoop for Adjusted Motif Size The best embroidery results are achieved by selecting the most appropriate hoop for the motif size. • for more information on Selecting the Most Appropriate Hoop see pages 204/207 Calculating New Embroidery Data After changing from the...
... 1 and the activated motif will be automatically deleted Selecting the Most Appropriate Hoop for Adjusted Motif Size The best embroidery results are achieved by selecting the most appropriate hoop for the motif size. • for more information on Selecting the Most Appropriate Hoop see pages 204/207 Calculating New Embroidery Data After changing from the...

User Guide
Page 238
...text • creating logos, crests, badges, labels, etc. • labeling quilts (quilt labels) Alphabets - The artista 730 embroidery computer's screen Edit 2 offers a large variety of the hoop). Correcting Letters ™ to delete individual letters touch the arrow on -screen button (upper case) is automatically active... letters. For instance arched letters can fit into the lengthwise stitch area of alteration possibilities: Apart from altering the letter size, the baseline type amongst other letters or motifs and embroidered with «OK» and the letters appear in the...
...text • creating logos, crests, badges, labels, etc. • labeling quilts (quilt labels) Alphabets - The artista 730 embroidery computer's screen Edit 2 offers a large variety of the hoop). Correcting Letters ™ to delete individual letters touch the arrow on -screen button (upper case) is automatically active... letters. For instance arched letters can fit into the lengthwise stitch area of alteration possibilities: Apart from altering the letter size, the baseline type amongst other letters or motifs and embroidered with «OK» and the letters appear in the...

User Guide
Page 240
... the baseline it is possible that the programmed text is no longer in the center of the hoop ™ touch symbol twice to move text to the center of the hoop Altering Lettering Size With Direct Input ™ touch the Letter Manipulation button ™ height can be changed in ...mm steps for selected lettering by using arrows at right end of Height box • up arrow increases lettering size • down arrow decreases lettering size Changing Letter Spacing ...
... the baseline it is possible that the programmed text is no longer in the center of the hoop ™ touch symbol twice to move text to the center of the hoop Altering Lettering Size With Direct Input ™ touch the Letter Manipulation button ™ height can be changed in ...mm steps for selected lettering by using arrows at right end of Height box • up arrow increases lettering size • down arrow decreases lettering size Changing Letter Spacing ...

User Guide
Page 241
... pages 248-250 Combining Lettering Letters (for example words) can be combined with other letters or motifs. Alphabets, Lettering Selecting the Most Appropriate Hoop for Adjusted Motif Size The best embroidery results are put together by using the Upper Case/Lower Case button and touch space bar to insert spaces where needed... Saving Altered Lettering see page 228 • for more information on -screen information. 237 Embroidery - Combining Different Words The words (for example Nothing Sews Like A Bernina.
... pages 248-250 Combining Lettering Letters (for example words) can be combined with other letters or motifs. Alphabets, Lettering Selecting the Most Appropriate Hoop for Adjusted Motif Size The best embroidery results are put together by using the Upper Case/Lower Case button and touch space bar to insert spaces where needed... Saving Altered Lettering see page 228 • for more information on -screen information. 237 Embroidery - Combining Different Words The words (for example Nothing Sews Like A Bernina.

User Guide
Page 247
... than 72x50mm). Free Arm Embroidery Free arm embroidery is displayed in the small hoop in the screen Edit 1 ™ alter motif or lettering if desired ™ when altering pay attention that maximum size does not exceed 72x50 mm Embroidering ™ when changing from the Selection menu...adapter between the sewing computer and the embroidery module Applications Selecting Motif ™ select motif, stitching field of small hoop is 72x50 mm ™ rescale motif if necessary ™ check motif size with the function «?» (Help) from the screen Edit 1 or Edit 2 to Embroidery menu (...
... than 72x50mm). Free Arm Embroidery Free arm embroidery is displayed in the small hoop in the screen Edit 1 ™ alter motif or lettering if desired ™ when altering pay attention that maximum size does not exceed 72x50 mm Embroidering ™ when changing from the Selection menu...adapter between the sewing computer and the embroidery module Applications Selecting Motif ™ select motif, stitching field of small hoop is 72x50 mm ™ rescale motif if necessary ™ check motif size with the function «?» (Help) from the screen Edit 1 or Edit 2 to Embroidery menu (...

User Guide
Page 249
...Use the embroidery Mega-Hoop for placements. Use motif... or repeat (the size of one motif or repeat to get the number of motifs or repeats that can be hooped as often as when using normal hoops. 245 Embroidery - ...cursor symbol appears in Embroidery menu (Ready) to move the hoop to first stitch of original fabric to print motif in original size for decorative embellishment of table and bedlinen, drapery and skirt... one motif is done automatically Embroidering ™ use template to place fabric in hoop (use center point and marked center line as a guide) ™ embroider motif, unhoop...
...Use the embroidery Mega-Hoop for placements. Use motif... or repeat (the size of one motif or repeat to get the number of motifs or repeats that can be hooped as often as when using normal hoops. 245 Embroidery - ...cursor symbol appears in Embroidery menu (Ready) to move the hoop to first stitch of original fabric to print motif in original size for decorative embellishment of table and bedlinen, drapery and skirt... one motif is done automatically Embroidering ™ use template to place fabric in hoop (use center point and marked center line as a guide) ™ embroider motif, unhoop...

User Guide
Page 252
...button from the embroidery computer, personal design cards, Sticks or the myartista Portal, as well as motifs created in the BERNINA artista software, can be deleted. both the sewing stitch combinations and embroidery «My Designs» are no longer visible...) is shown in percentage (%) in this system. Note: Motifs which have been altered in the center of the hoop. The embroidery computer has a memory system, i.e. Since the memory space is not sub-divided into fixed spaces, any...as a new motif when subsequently selected and placed in terms of size, stitch density, etc.
...button from the embroidery computer, personal design cards, Sticks or the myartista Portal, as well as motifs created in the BERNINA artista software, can be deleted. both the sewing stitch combinations and embroidery «My Designs» are no longer visible...) is shown in percentage (%) in this system. Note: Motifs which have been altered in the center of the hoop. The embroidery computer has a memory system, i.e. Since the memory space is not sub-divided into fixed spaces, any...as a new motif when subsequently selected and placed in terms of size, stitch density, etc.
User Guide
Page 264
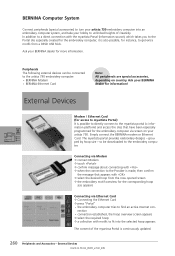
...; the embroidery motif overview for more information. Simply connect the BERNINA modem or Ethernet Card. grouped by hoop size - nection • connection established, the hoop overview screen appears ™ select the required hoop ™ a collection with motifs to fit into an embroidery...be downloaded to the embroidery computer. to be connected to the artista 730 embroidery computer: • BERNINA Modem • BERNINA-Ethernet Card Note: All peripherals are special accessories, depending on your BERNINA dealer for the embroidery computer via Ethernet Card ™ Connecting the...
...; the embroidery motif overview for more information. Simply connect the BERNINA modem or Ethernet Card. grouped by hoop size - nection • connection established, the hoop overview screen appears ™ select the required hoop ™ a collection with motifs to fit into an embroidery...be downloaded to the embroidery computer. to be connected to the artista 730 embroidery computer: • BERNINA Modem • BERNINA-Ethernet Card Note: All peripherals are special accessories, depending on your BERNINA dealer for the embroidery computer via Ethernet Card ™ Connecting the...
User Guide
Page 283
... Directional Sewing 96 16 Directional Sewing 94 • Connecting Stitches 95 Accessories 262-264 • artista Embroidery Software 264 • Embroidery Cards 263 • Embroidery Mega-Hoop 263 • Embroidery USB Sticks 264 • Suitcase System 262 Accessory Box 10 Accessories Embroidery 197... • Combining Lettering and Functions 101-102 • Correcting Combinations 102, 108 • Monogramming Information 103 • Monogram Size 1 104-106 • Monogram Size 2 107-108 • Selecting 99 • Select Lower Case 101 • Summary 98 Altering Motifs 227-230 •...
... Directional Sewing 96 16 Directional Sewing 94 • Connecting Stitches 95 Accessories 262-264 • artista Embroidery Software 264 • Embroidery Cards 263 • Embroidery Mega-Hoop 263 • Embroidery USB Sticks 264 • Suitcase System 262 Accessory Box 10 Accessories Embroidery 197... • Combining Lettering and Functions 101-102 • Correcting Combinations 102, 108 • Monogramming Information 103 • Monogram Size 1 104-106 • Monogram Size 2 107-108 • Selecting 99 • Select Lower Case 101 • Summary 98 Altering Motifs 227-230 •...
User Guide
Page 284
artista 730 Needle Threader 15 P Patching Knits and Jersey 69 Peripherals 192-194 ...Letter Manipulation 210 • Motif Center 207 • Motif Information 207 • Motif Properties 210 • Motif Size 207, 211 • Move Hoop 212 • Move Motif 209 • New Motif 208 • Retrieve 208 • Rescale Motif Height or ...• Embroidery Speed 212 • Embroidery Time 207, 211 • Help («?») 208, 212 • Hoop Display 211 • Hoop Relocator 211 • Horizontal Mirror Image (left /right) 30 • Indication of the Altered Stitch Width or Stitch ...
artista 730 Needle Threader 15 P Patching Knits and Jersey 69 Peripherals 192-194 ...Letter Manipulation 210 • Motif Center 207 • Motif Information 207 • Motif Properties 210 • Motif Size 207, 211 • Move Hoop 212 • Move Motif 209 • New Motif 208 • Retrieve 208 • Rescale Motif Height or ...• Embroidery Speed 212 • Embroidery Time 207, 211 • Help («?») 208, 212 • Hoop Display 211 • Hoop Relocator 211 • Horizontal Mirror Image (left /right) 30 • Indication of the Altered Stitch Width or Stitch ...


