User Guide
Page 1
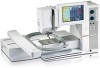
... cleaning. 3. Do not allow to the nearest authorized BERNINA dealer or service center for its intended use the BERNINA original stitch plate. Use only attachments recommended by the ...damaged cord or plug • it is used as threading or changing the needle, threading the bobbin or changing the presser foot etc. 10. Keep ventilation openings of burns, fire, electric shock or...the sewing computer from accumulation of electrical shock: 1. Special care is not in this manual. artista 730 - Never drop or insert any object into water Return the sewing computer to be ...
... cleaning. 3. Do not allow to the nearest authorized BERNINA dealer or service center for its intended use the BERNINA original stitch plate. Use only attachments recommended by the ...damaged cord or plug • it is used as threading or changing the needle, threading the bobbin or changing the presser foot etc. 10. Keep ventilation openings of burns, fire, electric shock or...the sewing computer from accumulation of electrical shock: 1. Special care is not in this manual. artista 730 - Never drop or insert any object into water Return the sewing computer to be ...

User Guide
Page 11
...40 Presser foot pressure dial 41 Thread cutter on head frame 42 Thread guide (while winding the bobbin when sewing and embroidering) 43 Spool pin (vertical, collapsible) 44 Handwheel 45 Card slot for BERNINA Modem (optional accessory), Personal design cards and Embroidery cards (optional accessories) 46 Headset connection (optional...Computer 9 40 38 41 Side view (head frame) 42 43 44 45 46 47 48 49 52 50 53 51 Side view (handwheel) 1 Bobbin cover 2 Stitch plate 3 Attachment base for optional accessory) 50 Foot control socket 51 Drop feed dog 52 Power switch on/off («0»)...
...40 Presser foot pressure dial 41 Thread cutter on head frame 42 Thread guide (while winding the bobbin when sewing and embroidering) 43 Spool pin (vertical, collapsible) 44 Handwheel 45 Card slot for BERNINA Modem (optional accessory), Personal design cards and Embroidery cards (optional accessories) 46 Headset connection (optional...Computer 9 40 38 41 Side view (head frame) 42 43 44 45 46 47 48 49 52 50 53 51 Side view (handwheel) 1 Bobbin cover 2 Stitch plate 3 Attachment base for optional accessory) 50 Foot control socket 51 Drop feed dog 52 Power switch on/off («0»)...
User Guide
Page 12
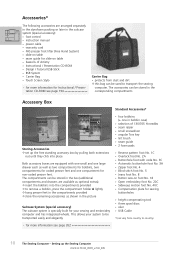
...holder A lightly ™ hang presser feet in the compartments provided ™ store the remaining accessories as two compartments for bobbins, two compartments for coded presser feet and one in bobbin case) • selection of 130/705 H needles • seam ripper • small screwdriver • angular Torx...-ROM see page 262 10 The Sewing Computer - Accessories* The following accessories are available as optional extras). ™ insert the bobbins into place Both accessory boxes are equipped with one small and one large drawer each as well as shown in the picture Suitcase System...
...holder A lightly ™ hang presser feet in the compartments provided ™ store the remaining accessories as two compartments for bobbins, two compartments for coded presser feet and one in bobbin case) • selection of 130/705 H needles • seam ripper • small screwdriver • angular Torx...-ROM see page 262 10 The Sewing Computer - Accessories* The following accessories are available as optional extras). ™ insert the bobbins into place Both accessory boxes are equipped with one small and one large drawer each as well as shown in the picture Suitcase System...
User Guide
Page 15
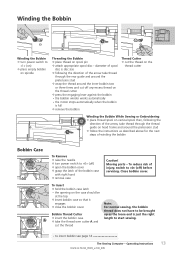
... ™ following the direction of the arrow take thread through the rear guide and around the pretension stud ™ wrap the thread around the inner bobbin two or three times and cut off any excess thread on the thread cutter ™ press the engaging lever against the... should be brought up as described above for the next steps of winding the bobbin Bobbin Case A To Remove ™ raise the needle ™ turn power switch to «1» (on) ™ place empty bobbin on spindle Threading the Bobbin ™ place thread on head frame and around the pretension stud ™ follow the...
... ™ following the direction of the arrow take thread through the rear guide and around the pretension stud ™ wrap the thread around the inner bobbin two or three times and cut off any excess thread on the thread cutter ™ press the engaging lever against the... should be brought up as described above for the next steps of winding the bobbin Bobbin Case A To Remove ™ raise the needle ™ turn power switch to «1» (on) ™ place empty bobbin on spindle Threading the Bobbin ™ place thread on head frame and around the pretension stud ™ follow the...

User Guide
Page 16
...; pull the thread to the left of the cover to C in the direction of spool determines disc size. Operating Instructions Inserting the Bobbin Inserting the Bobbin ™ insert the bobbin so that the thread runs clockwise Pulling the Thread Into the Slot ™ pull the thread counter clockwise into slit of upper thread...; take thread up to the left under the spring until it in the T-shaped slit at the end of the spring Clockwise Turning of the Bobbin • the bobbin must be no clearance between the disc and the spool ™ take thread through guides D and E !
...; pull the thread to the left of the cover to C in the direction of spool determines disc size. Operating Instructions Inserting the Bobbin Inserting the Bobbin ™ insert the bobbin so that the thread runs clockwise Pulling the Thread Into the Slot ™ pull the thread counter clockwise into slit of upper thread...; take thread up to the left under the spring until it in the T-shaped slit at the end of the spring Clockwise Turning of the Bobbin • the bobbin must be no clearance between the disc and the spool ™ take thread through guides D and E !

User Guide
Page 17
... and Thread ™ let go of lever A and thread ™ pull the thread loop through the needle eye Bringing up the Lower Thread • if bobbin thread is cut on the cutter (page 13), there is no need to bring the thread to the top of the stitch plate ™ hold... needle down • by tapping on Head Frame ™ pull both threads through the stitch plate for certain types of thread is sewn Note: The bobbin thread must be brought up as far up through the slit on the presser foot to the back ™ pull threads over the head frame...
... and Thread ™ let go of lever A and thread ™ pull the thread loop through the needle eye Bringing up the Lower Thread • if bobbin thread is cut on the cutter (page 13), there is no need to bring the thread to the top of the stitch plate ™ hold... needle down • by tapping on Head Frame ™ pull both threads through the stitch plate for certain types of thread is sewn Note: The bobbin thread must be brought up as far up through the slit on the presser foot to the back ™ pull threads over the head frame...

User Guide
Page 18
... the foam pad A for stability, this prevents from getting caught on the spool pin) Threading the Triple Needle • two thread spools and one full bobbin are A needed ™ place one thread spool on horizontal spool pin ™ place second thread spool and the lower thread spool, on additional spool pin...
... the foam pad A for stability, this prevents from getting caught on the spool pin) Threading the Triple Needle • two thread spools and one full bobbin are A needed ™ place one thread spool on horizontal spool pin ™ place second thread spool and the lower thread spool, on additional spool pin...

User Guide
Page 30
... head frame) ™ press the Pattern End button • sewing computer stops at any time Automatic Thread Cutter ™ press external button • upper and bobbin thread are returned to quickly chan- On-screen Functions Setup Button ™ press Setup • options with the embroidery module (special accessory) Pattern End (on...
... head frame) ™ press the Pattern End button • sewing computer stops at any time Automatic Thread Cutter ™ press external button • upper and bobbin thread are returned to quickly chan- On-screen Functions Setup Button ™ press Setup • options with the embroidery module (special accessory) Pattern End (on...

User Guide
Page 62
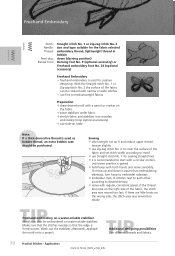
... foot No. 1C Hem Finish in Knits • elastic hems in a more elastic seam. 60 Practical Stitches - e.g. TIP More elastic seam Use wooly nylon as bobbin thread which results in knits • no additional overcasting necessary Preparation ™ turn the raw edge under the width desired; for a double needle of 4mm...
... foot No. 1C Hem Finish in Knits • elastic hems in a more elastic seam. 60 Practical Stitches - e.g. TIP More elastic seam Use wooly nylon as bobbin thread which results in knits • no additional overcasting necessary Preparation ™ turn the raw edge under the width desired; for a double needle of 4mm...

User Guide
Page 67
... Gather edges first ™ first sew two parallel straight stitches about 5mm apart for about 2" (5cm) ™ knot the beginning of the threads ™ hold bobbin thread, gather fabric ™ to suit the fabric. adjust the presser foot pressure to begin the elastic can be sewn on flat without being stretched...
... Gather edges first ™ first sew two parallel straight stitches about 5mm apart for about 2" (5cm) ™ knot the beginning of the threads ™ hold bobbin thread, gather fabric ™ to suit the fabric. adjust the presser foot pressure to begin the elastic can be sewn on flat without being stretched...
User Guide
Page 72
...stitch No. 1 or Zig-zag stitch No. 2 size and type suitable for the fabric selected embroidery thread, lightweight thread in bobbin down is easier than embroidering sideways; turn hoop to embroider sideways ™ embroider rows of stitches next to each other according to.... 9 (optional accessory) or Freehand embroidery foot No. 24 (optional accessory) Freehand Embroidery • freehand embroidery is used as bobbin thread, an extra bobbin case should be covered with narrow or wide stitches • use Straight stitch No. 1 for creative designing. Applications If there...
...stitch No. 1 or Zig-zag stitch No. 2 size and type suitable for the fabric selected embroidery thread, lightweight thread in bobbin down is easier than embroidering sideways; turn hoop to embroider sideways ™ embroider rows of stitches next to each other according to.... 9 (optional accessory) or Freehand embroidery foot No. 24 (optional accessory) Freehand Embroidery • freehand embroidery is used as bobbin thread, an extra bobbin case should be covered with narrow or wide stitches • use Straight stitch No. 1 for creative designing. Applications If there...

User Guide
Page 77
... stitch or with satin stitches - programmed with a few satin stitches - Summary 75 Decorative stitch No. 401) Perfect Stitch Formation ™ use the same needle and bobbin thread color ™ use a stabilizer on the wrong side of the fabric for perfect stitch formation ™ use more intricate decorative stitches - are sewn with...
... stitch or with satin stitches - programmed with a few satin stitches - Summary 75 Decorative stitch No. 401) Perfect Stitch Formation ™ use the same needle and bobbin thread color ™ use a stabilizer on the wrong side of the fabric for perfect stitch formation ™ use more intricate decorative stitches - are sewn with...

User Guide
Page 87
...the Cord (gimp cord) ™ remove stitch plate from sewing computer (see page 17) ™ open bobbin cover ™ thread cord from underneath plate through the small opening in the bobbin cover ™ place the cord spool on the arm of the side grooves in the presser foot (depending on...; stitch additional pintucks parallel to needle size used) in stitch plate ™ replace stitch plate ™ close bobbin cover • the cord should feed freely - guide it through the bobbin area and the hole in the Security Program • for more details on Security Program see page 16 Stitching ...
...the Cord (gimp cord) ™ remove stitch plate from sewing computer (see page 17) ™ open bobbin cover ™ thread cord from underneath plate through the small opening in the bobbin cover ™ place the cord spool on the arm of the side grooves in the presser foot (depending on...; stitch additional pintucks parallel to needle size used) in stitch plate ™ replace stitch plate ™ close bobbin cover • the cord should feed freely - guide it through the bobbin area and the hole in the Security Program • for more details on Security Program see page 16 Stitching ...
User Guide
Page 101
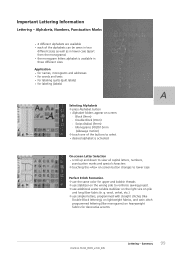
... letters, programmed with straight stitches (like Double Block lettering), on lightweight fabrics, and satin stitch programmed lettering (like monograms) on heavyweight fabrics for upper and bobbin threads ™ use stabilizer on the wrong side to reinforce sewing project ™ use the same color for decorative accents Lettering - Alphabets, Numbers, Punctuation Marks...
... letters, programmed with straight stitches (like Double Block lettering), on lightweight fabrics, and satin stitch programmed lettering (like monograms) on heavyweight fabrics for upper and bobbin threads ™ use stabilizer on the wrong side to reinforce sewing project ™ use the same color for decorative accents Lettering - Alphabets, Numbers, Punctuation Marks...

User Guide
Page 134
... back holes with the same program Beginning and Ending Threads ™ the threads are secured and can be trimmed For Secure Results ™ pull both bobbin threads until the ends of the upper thread are stitched without a thread shank. 132 Buttonholes - Applications Button Sew-on Program ™ select stitch No. 60...
... back holes with the same program Beginning and Ending Threads ™ the threads are secured and can be trimmed For Secure Results ™ pull both bobbin threads until the ends of the upper thread are stitched without a thread shank. 132 Buttonholes - Applications Button Sew-on Program ™ select stitch No. 60...

User Guide
Page 143
...Tension • the upper thread tension is invisible (monofilament thread), which should look quilt stitch can be brought up; one stitch is visible (bobbin thread) and one stitch is automatically set • increase upper thread tension to suit fabric if necessary Balance • adjust stitch with the... Balance if necessary Sewing • the hand-look «hand sewn» Sewing a Test • the bobbin thread has to be sewn in any needle position TIP Perfect corners ™ activate Pattern End and Needle Stop (the sewing computer automatically stops ...
...Tension • the upper thread tension is invisible (monofilament thread), which should look quilt stitch can be brought up; one stitch is visible (bobbin thread) and one stitch is automatically set • increase upper thread tension to suit fabric if necessary Balance • adjust stitch with the... Balance if necessary Sewing • the hand-look «hand sewn» Sewing a Test • the bobbin thread has to be sewn in any needle position TIP Perfect corners ™ activate Pattern End and Needle Stop (the sewing computer automatically stops ...

User Guide
Page 169
... to the basic settings • the tension alteration affects all motifs and remains saved when the embroidery computer is active (blue) the upper thread and bobbin thread are attached. slower or faster at all 4 speeds (1/4 - 4/4), i.e.
... to the basic settings • the tension alteration affects all motifs and remains saved when the embroidery computer is active (blue) the upper thread and bobbin thread are attached. slower or faster at all 4 speeds (1/4 - 4/4), i.e.

User Guide
Page 175
... Settings Page 3» appears • following messages can be turned on or off as well as indicated acoustically with the desired choice of sounds (1-6): • Bobbin Winder • Embroidery Finished • Thread Cutter • Threader • the messages and choice of sounds can be turned on without any acoustic sound) •...
... Settings Page 3» appears • following messages can be turned on or off as well as indicated acoustically with the desired choice of sounds (1-6): • Bobbin Winder • Embroidery Finished • Thread Cutter • Threader • the messages and choice of sounds can be turned on without any acoustic sound) •...
User Guide
Page 187
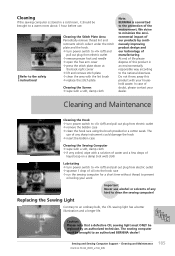
...153; clean the area with the lint brush ™ replace the stitch plate Cleaning the Screen ™ wipe with a soft, damp cloth Note: BERNINA is stored in an environmentally responsible way according to the safety instructions! The use . !Refer to the national directives. The sewing computer must ONLY be... 185 Sewing and Sewing Computer Support - We strive to «0» (off ) and pull out plug from electric outlet ™ remove the bobbin case ™ clean the hook race using the brush provided or a cotton swab. Cleaning and Maintenance Cleaning the Hook ™ turn power switch ...
...153; clean the area with the lint brush ™ replace the stitch plate Cleaning the Screen ™ wipe with a soft, damp cloth Note: BERNINA is stored in an environmentally responsible way according to the safety instructions! The use . !Refer to the national directives. The sewing computer must ONLY be... 185 Sewing and Sewing Computer Support - We strive to «0» (off ) and pull out plug from electric outlet ™ remove the bobbin case ™ clean the hook race using the brush provided or a cotton swab. Cleaning and Maintenance Cleaning the Hook ™ turn power switch ...
User Guide
Page 188
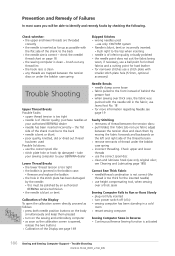
... 186 Sewing and Sewing Computer Support - purchase needles at your BERNINA dealer Lower Thread Breaks • the lower thread tension is too tight • the bobbin is jammed in the bobbin case: • Remove and replace the bobbin • the hole in the stitch plate has been damaged ... been standing in a cold room • restart sewing computer Sewing Computer Sews in the fabric; take your sewing computer to your authorized BERNINA dealer • needle has been inserted incorrectly - Trouble Shooting Prevention and Remedy of Failures In most cases you will be able to identify...
... 186 Sewing and Sewing Computer Support - purchase needles at your BERNINA dealer Lower Thread Breaks • the lower thread tension is too tight • the bobbin is jammed in the bobbin case: • Remove and replace the bobbin • the hole in the stitch plate has been damaged ... been standing in a cold room • restart sewing computer Sewing Computer Sews in the fabric; take your sewing computer to your authorized BERNINA dealer • needle has been inserted incorrectly - Trouble Shooting Prevention and Remedy of Failures In most cases you will be able to identify...


