
User Guide
Page 2
... electrical or mechanical adjustment. 4. SAVE THESE INSTRUCTIONS! Do not throw away this sewing computer is used as contained in this manual. 2. Use only attachments/accessory recommended by continuously improving product design and our technology of doubt, please contact your household waste.... double insulation (except USA and Canada). This sewing computer is committed to the original parts in the product. Environmental Protection BERNINA is provided with your dealer. Do not pull or push the fabric while stitching. Please note the advice on the sewing...
... electrical or mechanical adjustment. 4. SAVE THESE INSTRUCTIONS! Do not throw away this sewing computer is used as contained in this manual. 2. Use only attachments/accessory recommended by continuously improving product design and our technology of doubt, please contact your household waste.... double insulation (except USA and Canada). This sewing computer is committed to the original parts in the product. Environmental Protection BERNINA is provided with your dealer. Do not pull or push the fabric while stitching. Please note the advice on the sewing...
User Guide
Page 25
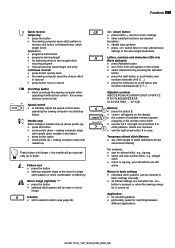
... the left ) */** █ press the button █ selected stitch pattern will be reverted to basic settings manually █ all stitch patterns █ particularly useful for switching when in the straight stitch securing program █ manual securing (seam begin and end) continous reverse: █ press button quickly twice █ the sewing computer sews...
... the left ) */** █ press the button █ selected stitch pattern will be reverted to basic settings manually █ all stitch patterns █ particularly useful for switching when in the straight stitch securing program █ manual securing (seam begin and end) continous reverse: █ press button quickly twice █ the sewing computer sews...

User Guide
Page 37
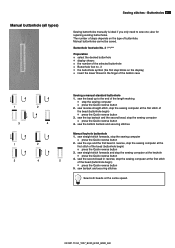
... beads (spacing between fabric and bottom of slide foot up to the thick part of the height compensating plates for automatic and manual buttonholes Any balance alterations to front. If a buttonhole is sewn Test sewing █ always sew a test sample on the ...█ reprogram the buttonhole length after changing the stitch length Balance for buttonholes (available as optional accessory). Buttonholes 37 Marking the length of manual buttonholes █ mark the buttonhole length in the desired position █ use Buttonhole foot/sole no. 3 */**/*** Marking the length of automatic...
... beads (spacing between fabric and bottom of slide foot up to the thick part of the height compensating plates for automatic and manual buttonholes Any balance alterations to front. If a buttonhole is sewn Test sewing █ always sew a test sample on the ...█ reprogram the buttonhole length after changing the stitch length Balance for buttonholes (available as optional accessory). Buttonholes 37 Marking the length of manual buttonholes █ mark the buttonhole length in the desired position █ use Buttonhole foot/sole no. 3 */**/*** Marking the length of automatic...
User Guide
Page 41
...█ Buttonhole foot no. 3 █ the buttonhole symbol (the first step blinks on the type of the bobbin case 1 3 1 3 2 4 2 4 5 Sewing a manual standard buttonhole 1. sew straight-stitch forwards and stop the sewing computer at the keyhole █ press the Quick reverse button 4. sew the bead up to... the first stitch of the length marking █ stop the sewing computer █ press the Quick reverse button 2. Buttonholes 41 Sewing buttonholes manually is ideal if you only need to the end of the bead (buttonhole begin ) █ press the Quick reverse button 3. sew the...
...█ Buttonhole foot no. 3 █ the buttonhole symbol (the first step blinks on the type of the bobbin case 1 3 1 3 2 4 2 4 5 Sewing a manual standard buttonhole 1. sew straight-stitch forwards and stop the sewing computer at the keyhole █ press the Quick reverse button 4. sew the bead up to... the first stitch of the length marking █ stop the sewing computer █ press the Quick reverse button 2. Buttonholes 41 Sewing buttonholes manually is ideal if you only need to the end of the bead (buttonhole begin ) █ press the Quick reverse button 3. sew the...

User Guide
Page 47
...-on program Buttonhole █ 4-steps █ 5-steps █ Automatic █ Balance █ Buttonhole type █ Cutting open █ Important information █ In long-term █ Manual █ Presser feet █ Programming █ Stabilizers C Carrying handle Change █ Letter size in alphabets Index 47 5-7 24 28 28 42 9, 25, 28 28 6 39...
...-on program Buttonhole █ 4-steps █ 5-steps █ Automatic █ Balance █ Buttonhole type █ Cutting open █ Important information █ In long-term █ Manual █ Presser feet █ Programming █ Stabilizers C Carrying handle Change █ Letter size in alphabets Index 47 5-7 24 28 28 42 9, 25, 28 28 6 39...

User Guide
Page 48
... compensation tool I Inserting a bobbin L LED sewing light Lettering size Long Term Memory Lubricating M Main power switch Maintenance and troubleshooting █ Cleaning █ Maintenance █ Troubleshooting Manual threading █ Double and triple needles █ Lower thread █ Upper thread Memory █ Modifications █ Opening █ Stitch combinations Mirror-image function █ Left...
... compensation tool I Inserting a bobbin L LED sewing light Lettering size Long Term Memory Lubricating M Main power switch Maintenance and troubleshooting █ Cleaning █ Maintenance █ Troubleshooting Manual threading █ Double and triple needles █ Lower thread █ Upper thread Memory █ Modifications █ Opening █ Stitch combinations Mirror-image function █ Left...


