
User Guide
Page 2
...by or near children and infirm persons. Do not allow the sewing computer to the nearest authorized BERNINA dealer for grounded be left unattended when plugged in this manual. 2. Never operate the sewing computer with optical instruments. Never drop or insert any objects into ...and knowledge, unless they do not play with the sewing computer. 3. To disconnect, turn power switch to persons: 1. Environmental Protection BERNINA is not intended for their safety. We strive to the national directive. Use only genuine replacement parts. Always unplug the sewing computer from...
...by or near children and infirm persons. Do not allow the sewing computer to the nearest authorized BERNINA dealer for grounded be left unattended when plugged in this manual. 2. Never operate the sewing computer with optical instruments. Never drop or insert any objects into ...and knowledge, unless they do not play with the sewing computer. 3. To disconnect, turn power switch to persons: 1. Environmental Protection BERNINA is not intended for their safety. We strive to the national directive. Use only genuine replacement parts. Always unplug the sewing computer from...
User Guide
Page 25
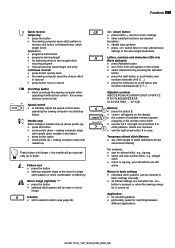
... (right/left) */** █ press the button █ selected stitch pattern will be reverted to basic settings manually █ all stitch patterns █ particularly useful for switching when in the straight stitch securing program █ manual securing (seam begin and end) continous reverse: █ press button quickly twice █ the sewing computer sews...
... (right/left) */** █ press the button █ selected stitch pattern will be reverted to basic settings manually █ all stitch patterns █ particularly useful for switching when in the straight stitch securing program █ manual securing (seam begin and end) continous reverse: █ press button quickly twice █ the sewing computer sews...

User Guide
Page 37
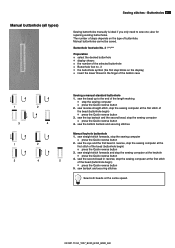
...all subsequent buttonholes █ use of the height compensating plates for buttonholes (available as optional accessory). Buttonholes 37 Marking the length of manual buttonholes █ mark the buttonhole length in the desired position █ use Buttonhole foot/sole no . 3A Marking the length of...the stitches) █ reprogram the buttonhole length after sewing the first buttonhole, the length for automatic and manual buttonholes Any balance alterations to the manual and auto-length buttonholes affect both buttonhole beads (spacing between fabric and bottom of slide foot up to ...
...all subsequent buttonholes █ use of the height compensating plates for buttonholes (available as optional accessory). Buttonholes 37 Marking the length of manual buttonholes █ mark the buttonhole length in the desired position █ use Buttonhole foot/sole no . 3A Marking the length of...the stitches) █ reprogram the buttonhole length after sewing the first buttonhole, the length for automatic and manual buttonholes Any balance alterations to the manual and auto-length buttonholes affect both buttonhole beads (spacing between fabric and bottom of slide foot up to ...
User Guide
Page 41
...the second bead, stop the sewing computer at the first stitch of the bobbin case 1 3 1 3 2 4 2 4 5 Sewing a manual standard buttonhole 1. Manual buttonhole (all types) Sewing stitches - also for repairing existing buttonholes. The number of steps depends on the display) █ insert the lower... begin ) █ press the Quick reverse button 5. sew bartack and securing stitches Sew both beads at the first stitch of buttonhole. Manual buttonholes cannot be saved. Buttonhole foot/sole No. 3 */**/*** Preparation █ select the desired buttonhole █ display shows: █ ...
...the second bead, stop the sewing computer at the first stitch of the bobbin case 1 3 1 3 2 4 2 4 5 Sewing a manual standard buttonhole 1. Manual buttonhole (all types) Sewing stitches - also for repairing existing buttonholes. The number of steps depends on the display) █ insert the lower... begin ) █ press the Quick reverse button 5. sew bartack and securing stitches Sew both beads at the first stitch of buttonhole. Manual buttonholes cannot be saved. Buttonhole foot/sole No. 3 */**/*** Preparation █ select the desired buttonhole █ display shows: █ ...

User Guide
Page 47
...-on program Buttonhole █ 4-steps █ 5-steps █ Automatic █ Balance █ Buttonhole type █ Cutting open █ Important information █ In long-term █ Manual █ Presser feet █ Programming █ Stabilizers C Carrying handle Change █ Letter size in alphabets Index 47 5-7 24 28 28 42 9, 25, 28 28 6 39...
...-on program Buttonhole █ 4-steps █ 5-steps █ Automatic █ Balance █ Buttonhole type █ Cutting open █ Important information █ In long-term █ Manual █ Presser feet █ Programming █ Stabilizers C Carrying handle Change █ Letter size in alphabets Index 47 5-7 24 28 28 42 9, 25, 28 28 6 39...

User Guide
Page 48
... compensation tool I Inserting a bobbin L LED sewing light Lettering size Long Term Memory Lubricating M Main power switch Maintenance and troubleshooting █ Cleaning █ Maintenance █ Troubleshooting Manual threading █ Double and triple needles █ Lower thread █ Upper thread Memory █ Modifications █ Opening █ Stitch combinations Mirror-image function █ Left...
... compensation tool I Inserting a bobbin L LED sewing light Lettering size Long Term Memory Lubricating M Main power switch Maintenance and troubleshooting █ Cleaning █ Maintenance █ Troubleshooting Manual threading █ Double and triple needles █ Lower thread █ Upper thread Memory █ Modifications █ Opening █ Stitch combinations Mirror-image function █ Left...


