

Manual
Page 3
... MAINTAINING THE MACHINE-NEEDLE PLATE 27. STRAIGHT STITCHING REVERSE STITCHING REMOVING FABRIC THREAD CUTTER 17. CONTENTS INSTRUCTION BOOK MODELS 320.330 Page Title 1. SELECTION AND FITTING OF 24. COLOUR CODING 25. STRETCH OVERLOCK AND OVERLOCK {Not lot Models 3201 26.... SHOOTING GUIDE 16. ZIG-ZAG STITCHING It BUTTONHOLING 19. BLIND HEM STITCH 23. UPPER THREADING 10. OVERSEWING EDGES 22. THREAD TENSION 11. BOBBIN THREAD TENSION. 9. CONNECTING MACHINE TO POWER SUPPLY FOOT CONTROL NEEDLE LIGHT 6. STRAIGHT STRETCH STITCH NEEDLE (Not for Modal 3201 13. INTRODUCTION 2....
... MAINTAINING THE MACHINE-NEEDLE PLATE 27. STRAIGHT STITCHING REVERSE STITCHING REMOVING FABRIC THREAD CUTTER 17. CONTENTS INSTRUCTION BOOK MODELS 320.330 Page Title 1. SELECTION AND FITTING OF 24. COLOUR CODING 25. STRETCH OVERLOCK AND OVERLOCK {Not lot Models 3201 26.... SHOOTING GUIDE 16. ZIG-ZAG STITCHING It BUTTONHOLING 19. BLIND HEM STITCH 23. UPPER THREADING 10. OVERSEWING EDGES 22. THREAD TENSION 11. BOBBIN THREAD TENSION. 9. CONNECTING MACHINE TO POWER SUPPLY FOOT CONTROL NEEDLE LIGHT 6. STRAIGHT STRETCH STITCH NEEDLE (Not for Modal 3201 13. INTRODUCTION 2....

Manual
Page 4
PART NAMES 1 Fete plate 2 Tension dial 3 Throodtoko.up lover Thread regulator 5 Twooep presser fool lifter 6 Needle clomp screw 7 Presser bar thread cutter B Needle plate 4 Hook covet 10 Reverse stitching button 11 Stitch length dial 12 Ponern selector dial 13 Carrying handle 14 Spool holder pins 15 Hoed wheel 16 Bobbin winder cover 17 Bobbin winder 18 Socket 19 Bobbin winder thread guide 20 Accessory box 71 Bobbin winder thread cutter 22 Presser loot pressure control Iinside lace plate) 23 Drop feed control ;inside hook cover) 24 Power switch 25 Hot -bed extension table and accessory box
PART NAMES 1 Fete plate 2 Tension dial 3 Throodtoko.up lover Thread regulator 5 Twooep presser fool lifter 6 Needle clomp screw 7 Presser bar thread cutter B Needle plate 4 Hook covet 10 Reverse stitching button 11 Stitch length dial 12 Ponern selector dial 13 Carrying handle 14 Spool holder pins 15 Hoed wheel 16 Bobbin winder cover 17 Bobbin winder 18 Socket 19 Bobbin winder thread guide 20 Accessory box 71 Bobbin winder thread cutter 22 Presser loot pressure control Iinside lace plate) 23 Drop feed control ;inside hook cover) 24 Power switch 25 Hot -bed extension table and accessory box
Manual
Page 5
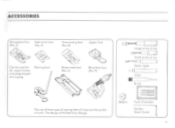
ACCESSORIES All purpose foal, Sohn stitch fool (No. 3) No. 4} OverC0SImg fool (No el Zipper fool Can be used lot all usual >filches including straight and oafag Darning loot Button hole fool (No.5) Blind hem foot (No 91 The use of these speciol sewing feel will improve roe quality al stitch The design of the feet may change Large screwdriver Small screw dove, Seam ripper C-11 Oiler I D Bobbin Brush I tL_.a=1 Pack of needle,. ()wilier/ Seem Guide
ACCESSORIES All purpose foal, Sohn stitch fool (No. 3) No. 4} OverC0SImg fool (No el Zipper fool Can be used lot all usual >filches including straight and oafag Darning loot Button hole fool (No.5) Blind hem foot (No 91 The use of these speciol sewing feel will improve roe quality al stitch The design of the feet may change Large screwdriver Small screw dove, Seam ripper C-11 Oiler I D Bobbin Brush I tL_.a=1 Pack of needle,. ()wilier/ Seem Guide
Manual
Page 8
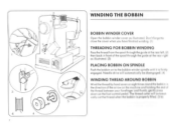
...thread cutter will outomoticolly be disengaged. (4 WINDING THREAD AROUND BOBBIN Wind the thread by hand sevenor eight timesround the bobbin in front of the spool through the guide of the thread between your forefinger and thumb, gently press down on to the bobbin winder spindle until it is properly filled. (5/6) Don't ...forget lo close the cover when you hove finished winding. (1) THREADING FOR BOBBIN WINDING Dossthe thread from the spool through the guideat therearleft (21 then bock in the direction of the arrow on the machine end ...
...thread cutter will outomoticolly be disengaged. (4 WINDING THREAD AROUND BOBBIN Wind the thread by hand sevenor eight timesround the bobbin in front of the spool through the guide of the thread between your forefinger and thumb, gently press down on to the bobbin winder spindle until it is properly filled. (5/6) Don't ...forget lo close the cover when you hove finished winding. (1) THREADING FOR BOBBIN WINDING Dossthe thread from the spool through the guideat therearleft (21 then bock in the direction of the arrow on the machine end ...

Manual
Page 9
...making sure the tinge' "A" is located inside the section 14) Leave about 10cm (4")ofthreadfrom the bobbin case andalways ensure that the needle's raised to its highest position when removing or inserting the bobbin. IIis usually only necessary to adjust the top thread tension when some altetation is tooTight, if ... swung, the tension is desired. See pages 9/10. 2 %CC:le t t, r II 8 () INSERTING BOBBIN AND CASE INTO MACHINE INSERTING BOBBIN INTO CASE Open hook cover as case by the end of the thread.If the bobbin does not move when it lolls to the ground or moves down a few Inches looprox...
...making sure the tinge' "A" is located inside the section 14) Leave about 10cm (4")ofthreadfrom the bobbin case andalways ensure that the needle's raised to its highest position when removing or inserting the bobbin. IIis usually only necessary to adjust the top thread tension when some altetation is tooTight, if ... swung, the tension is desired. See pages 9/10. 2 %CC:le t t, r II 8 () INSERTING BOBBIN AND CASE INTO MACHINE INSERTING BOBBIN INTO CASE Open hook cover as case by the end of the thread.If the bobbin does not move when it lolls to the ground or moves down a few Inches looprox...
Manual
Page 15
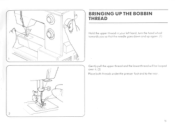
BRINGING UP THE BOBBIN THREAD Hold the upper thread in your left hand. turn the hood wheel towards you o rho the needle goes down and up again ill 1 Gently pull the upper thread and the lower thread will be looped over d. (2) Place bark threods uncle, the presser ;ow and to the rear 2 '. 13
BRINGING UP THE BOBBIN THREAD Hold the upper thread in your left hand. turn the hood wheel towards you o rho the needle goes down and up again ill 1 Gently pull the upper thread and the lower thread will be looped over d. (2) Place bark threods uncle, the presser ;ow and to the rear 2 '. 13
Manual
Page 27
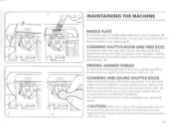
...the socket. Unplug themotbine when not in the fallowing manner Turn the hondwheel until the needle bar reaches its lop position. usinga nonsIncupinstruawn, I Remove bobbin case. (see page 8). CMG rn ➢0C 9 cnoueo.l a 4 MAINTAINING THE MACHINE NEEDLE PLATE To remove snap-on needle plate open ...hook cover and prise off From thebottom-fromleft corner - Remove the bobbin case and clean every pod with o brush. 'Urn the hondwheel slowly towards you to thoroughly remove the dust from the supply by your ...
...the socket. Unplug themotbine when not in the fallowing manner Turn the hondwheel until the needle bar reaches its lop position. usinga nonsIncupinstruawn, I Remove bobbin case. (see page 8). CMG rn ➢0C 9 cnoueo.l a 4 MAINTAINING THE MACHINE NEEDLE PLATE To remove snap-on needle plate open ...hook cover and prise off From thebottom-fromleft corner - Remove the bobbin case and clean every pod with o brush. 'Urn the hondwheel slowly towards you to thoroughly remove the dust from the supply by your ...


