Instruction Manual
Page 5
... • Slide Disassembly/Reassembly • Magazine Disassembly/Reassembly • Magazine Grip Extension Disassembly DIAGRAM & PARTS LIST LIGHT AND LASER HOUSING INSTALLATION • LaserMax Installation • LaserMax Operation • Battery Installation • Aligning The Laser • Cleaning • Spare Parts 32-35 32-33 34 35-37 37 38 - 49 38-41 41...
... • Slide Disassembly/Reassembly • Magazine Disassembly/Reassembly • Magazine Grip Extension Disassembly DIAGRAM & PARTS LIST LIGHT AND LASER HOUSING INSTALLATION • LaserMax Installation • LaserMax Operation • Battery Installation • Aligning The Laser • Cleaning • Spare Parts 32-35 32-33 34 35-37 37 38 - 49 38-41 41...
Instruction Manual
Page 54
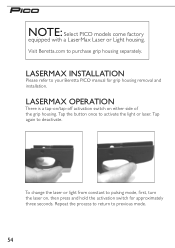
... the button once to deactivate. . Repeat the process to return to your Beretta PICO manual for approximately three seconds. LASERMAX INSTALLATION Please refer to previous mode. 54 To change the laser or light from constant to purchase grip housing separately. LASERMAX OPERATION There is a tap-on/tap-off ...activation switch on , then press and hold the activation switch for grip housing removal and installation. Visit Beretta.com to pulsing mode, first, turn the laser on either side of the grip housing. NOTE: Select PICO models come factory equipped with a LaserMax...
... the button once to deactivate. . Repeat the process to return to your Beretta PICO manual for approximately three seconds. LASERMAX INSTALLATION Please refer to previous mode. 54 To change the laser or light from constant to purchase grip housing separately. LASERMAX OPERATION There is a tap-on/tap-off ...activation switch on , then press and hold the activation switch for grip housing removal and installation. Visit Beretta.com to pulsing mode, first, turn the laser on either side of the grip housing. NOTE: Select PICO models come factory equipped with a LaserMax...

Instruction Manual
Page 55
TIP: Battery cover tab must line up with the grip housing tab. 55 LASER: Remove battery cover with Phillips head screwdriver (not included). Only remove the screw labeled "BATTERY." Insert 1/3N battery and reinstall battery cover. Insert CR2 Lithium battery and reinstall battery cover. TIP: Battery cover notch must line up with grip housing notch. BATTERY INSTALLATION LIGHT: Remove battery cover with Phillips head screwdriver (not included).
TIP: Battery cover tab must line up with the grip housing tab. 55 LASER: Remove battery cover with Phillips head screwdriver (not included). Only remove the screw labeled "BATTERY." Insert 1/3N battery and reinstall battery cover. Insert CR2 Lithium battery and reinstall battery cover. TIP: Battery cover notch must line up with grip housing notch. BATTERY INSTALLATION LIGHT: Remove battery cover with Phillips head screwdriver (not included).

Instruction Manual
Page 56
If not, unload it following the "UNLOADING" instructions in a safe diretion, turn windage screw clockwise for right, counterclockwise for up. While pointing the muzzle in this manual (pages 22-23). Turn elevation screw clockwise (as viewed from above firearm) for down, counterclockwise for left. NOTE: You may experience a one-time shift in alignment after firing the first few rounds. Windage Elevation Windage Elevation 56 ALIGNING THE LASER WARNING: Make sure the pistol is unloaded. Recheck alignment and adjust if necessary.
If not, unload it following the "UNLOADING" instructions in a safe diretion, turn windage screw clockwise for right, counterclockwise for up. While pointing the muzzle in this manual (pages 22-23). Turn elevation screw clockwise (as viewed from above firearm) for down, counterclockwise for left. NOTE: You may experience a one-time shift in alignment after firing the first few rounds. Windage Elevation Windage Elevation 56 ALIGNING THE LASER WARNING: Make sure the pistol is unloaded. Recheck alignment and adjust if necessary.
Instruction Manual
Page 57
...Be sure to remove this manual (pages 22-23). CLEANING WARNING: Make sure the pistol is recommended that the laser or light lens be cleaned along with your laser or light lens could become clouded with isopropyl alcohol. Over time, your firearm after each use. For best ...the "UNLOADING" instructions in a small circular pattern removing any residue. Confirm laser or light is off. If not, unload it is unloaded. SPARE PARTS LMS-AT50 Adjustment tool (for laser) LMS-2x13N 1/3N battery (2 pack for laser) LMS-CR2 CR2 battery (for light) For patent information, please visit:...
...Be sure to remove this manual (pages 22-23). CLEANING WARNING: Make sure the pistol is recommended that the laser or light lens be cleaned along with your laser or light lens could become clouded with isopropyl alcohol. Over time, your firearm after each use. For best ...the "UNLOADING" instructions in a small circular pattern removing any residue. Confirm laser or light is off. If not, unload it is unloaded. SPARE PARTS LMS-AT50 Adjustment tool (for laser) LMS-2x13N 1/3N battery (2 pack for laser) LMS-CR2 CR2 battery (for light) For patent information, please visit:...
Instruction Manual
Page 58
... eyes. IF YOU EXPERIENCE AN ISSUE WITH YOUR PICO, PLEASE DO NOT RETURN IT TO THE STORE. Check current applicable laws and follow them accordingly. For firearm function issues, contact Beretta: 1-800-237-3882 For light/laser function issues, contact LaserMax: 1-800-527-3703 DANGER Laser radiation is emitted from the front aperture of...
... eyes. IF YOU EXPERIENCE AN ISSUE WITH YOUR PICO, PLEASE DO NOT RETURN IT TO THE STORE. Check current applicable laws and follow them accordingly. For firearm function issues, contact Beretta: 1-800-237-3882 For light/laser function issues, contact LaserMax: 1-800-527-3703 DANGER Laser radiation is emitted from the front aperture of...