Operating Instructions
Page 3
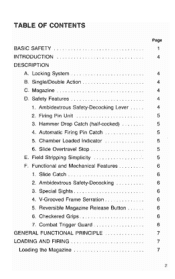
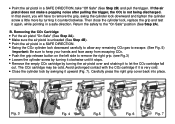
Magazine D. Firing Pin Unit 3. Automatic Firing Pin Catch 5. Functional and Mechanical Features 1. Slide Catch 2. Locking System B. Special Sights 4. Hammer Drop Catch (half-cocked) 4. Checkered Grips 7. Safety Features 1. Slide Overtravel Stop E. TABLE OF CONTENTS BASIC SAFETY INTRODUCTION DESCRIPTION A. V-Grooved Frame Serration 5. Reversible Magazine Release Button 6. Single/Double Action C. Ambidextrous Safety-Decocking ...
Magazine D. Firing Pin Unit 3. Automatic Firing Pin Catch 5. Functional and Mechanical Features 1. Slide Catch 2. Locking System B. Special Sights 4. Hammer Drop Catch (half-cocked) 4. Checkered Grips 7. Safety Features 1. Slide Overtravel Stop E. TABLE OF CONTENTS BASIC SAFETY INTRODUCTION DESCRIPTION A. V-Grooved Frame Serration 5. Reversible Magazine Release Button 6. Single/Double Action C. Ambidextrous Safety-Decocking ...
Operating Instructions
Page 7
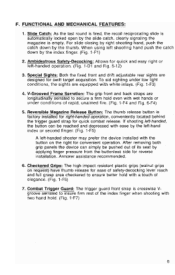
... is factory installed for right-handed operation, conveniently located behind the trigger guard strap for quick combat release. After removing both grip panels the device can be pushed out of safety-decocking lever reach and full grasp area checkered to secure a firm hold even... with two hand hold with a touch of elegance. (Fig. 1-F6) 7. Armorer assistance recommended, 6. Checkered Grips: The high impact resistant plastic grips (walnut grips on the right for swift target acquisition. For slide closing by right shooting hand, push the catch down by applying finger ...
... is factory installed for right-handed operation, conveniently located behind the trigger guard strap for quick combat release. After removing both grip panels the device can be pushed out of safety-decocking lever reach and full grasp area checkered to secure a firm hold even... with two hand hold with a touch of elegance. (Fig. 1-F6) 7. Armorer assistance recommended, 6. Checkered Grips: The high impact resistant plastic grips (walnut grips on the right for swift target acquisition. For slide closing by right shooting hand, push the catch down by applying finger ...
Operating Instructions
Page 9
... is now CHAMBER LOADED, DECOCKED, SAFETY ENGAGED. NOTE: When brass of the rotation during loading or unloading. • Push the loaded magazine into the pistol grip well to solid stop in one continuous, firm hand stroke to insure positive catch engagement, verfied by downward thumb pressure rotation to fire. LOADING THE...
... is now CHAMBER LOADED, DECOCKED, SAFETY ENGAGED. NOTE: When brass of the rotation during loading or unloading. • Push the loaded magazine into the pistol grip well to solid stop in one continuous, firm hand stroke to insure positive catch engagement, verfied by downward thumb pressure rotation to fire. LOADING THE...
Operating Instructions
Page 10
... allows for simplicity and speed in the magazine. By inserting a fully loaded magazine the pistol will remain closed over a cartridge directly inserted into the pistol grip insuring catch engagement. • If the shooter, during firing, exchanges magazine before the pistol is fired empty and the exchanged magazine is now chamber loaded...
... allows for simplicity and speed in the magazine. By inserting a fully loaded magazine the pistol will remain closed over a cartridge directly inserted into the pistol grip insuring catch engagement. • If the shooter, during firing, exchanges magazine before the pistol is fired empty and the exchanged magazine is now chamber loaded...
Operating Instructions
Page 19
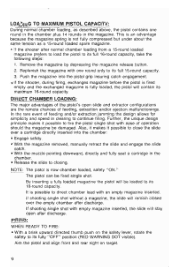
...of Magazine (empty) Weight of trigger pull hammer fall. Slide Catch Automatically secures the slide open when recoiled or manually retracted over empty magazine Grips Black plastic or walnut Rifling 6 grooves right hand, pitch 250mm (about 1 turn in 10 in .) Weight of Pistol 960 g. approx.../single action Safety Slide mounted manual ambidextrous safety-decocking lever with white post Note: Optional Trijicon 3-Dot Night Sights Barrel Length 125mm (4.92 in.) Sight Radius 158mm (6.22 in.) Overall Length 217mm (8.54 in.) Overall Height 140mm (5.51 in.) Overall Width 38mm (1.50...
...of Magazine (empty) Weight of trigger pull hammer fall. Slide Catch Automatically secures the slide open when recoiled or manually retracted over empty magazine Grips Black plastic or walnut Rifling 6 grooves right hand, pitch 250mm (about 1 turn in 10 in .) Weight of Pistol 960 g. approx.../single action Safety Slide mounted manual ambidextrous safety-decocking lever with white post Note: Optional Trijicon 3-Dot Night Sights Barrel Length 125mm (4.92 in.) Sight Radius 158mm (6.22 in.) Overall Length 217mm (8.54 in.) Overall Height 140mm (5.51 in.) Overall Width 38mm (1.50...

Operating Instructions
Page 23
Beretta USA. Retaining Pin 5 Slide (Factory Fitting Required) 6 Extractor 7 Extractor Pin 8 Extractor Spring 9 ...Button 30 Disassembling Latch Release Button Spring 31 Hammer Release Lever 32 Ejector 33 Hammer Release Lever Pin MODEL 92 FS Part # Nomenclature 34 35 36 37 38 39 40 41 42 43 46 47 48/49P 48/49W...Sear Sear Spring Sear Pin Magazine Release Button Magazine Release Button Spring Hammer Spring Cap Pin Grips (Plastic) Pair Grips (Wood) Pair Grip Screw Grip Bush Magazine Box' Magazine Follower Magazine Bottom Magazine Spring Magazine Lock Plate Firing Pin Catch ...
Beretta USA. Retaining Pin 5 Slide (Factory Fitting Required) 6 Extractor 7 Extractor Pin 8 Extractor Spring 9 ...Button 30 Disassembling Latch Release Button Spring 31 Hammer Release Lever 32 Ejector 33 Hammer Release Lever Pin MODEL 92 FS Part # Nomenclature 34 35 36 37 38 39 40 41 42 43 46 47 48/49P 48/49W...Sear Sear Spring Sear Pin Magazine Release Button Magazine Release Button Spring Hammer Spring Cap Pin Grips (Plastic) Pair Grips (Wood) Pair Grip Screw Grip Bush Magazine Box' Magazine Follower Magazine Bottom Magazine Spring Magazine Lock Plate Firing Pin Catch ...
Owners Manual
Page 3
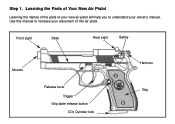
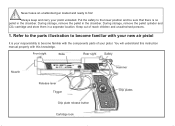
Front sight Slide Rear sight Safety Muzzle Release lever Trigger Grip plate release button CO2 Cylinder lock Hammer Grip Use this manual to understand your enjoyment of your new air pistol will help you to increase your owner's manual. Step 1. Learning the Parts of Your New Air Pistol Learning the names of the parts of this air pistol.
Front sight Slide Rear sight Safety Muzzle Release lever Trigger Grip plate release button CO2 Cylinder lock Hammer Grip Use this manual to understand your enjoyment of your new air pistol will help you to increase your owner's manual. Step 1. Learning the Parts of Your New Air Pistol Learning the names of the parts of this air pistol.
Owners Manual
Page 5
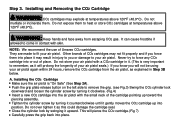
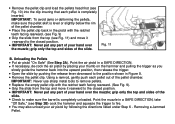
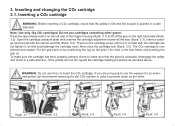
... not be using your air pistol. Step 3. Do not mutilate or incinerate them to you will pierce the CO2 cartridge.(Fig 7) Carefully press the grip back into or out of Umarex CO2 cartridges. Installing the CO2 Cartridge Make sure the air pistol is very important to remember, as explained in...are made to your air pistol again within 24 hours, remove the CO2 cartridge from escaping CO2 gas. Push the grip plate release button on the left side to remove the grip. (see Fig.3) Swing the CO2 cylinder lock downward and loosen the cylinder screw by turning it counterclockwise until it ...
... not be using your air pistol. Step 3. Do not mutilate or incinerate them to you will pierce the CO2 cartridge.(Fig 7) Carefully press the grip back into or out of Umarex CO2 cartridges. Installing the CO2 Cartridge Make sure the air pistol is very important to remember, as explained in...are made to your air pistol again within 24 hours, remove the CO2 cartridge from escaping CO2 gas. Push the grip plate release button on the left side to remove the grip. (see Fig.3) Swing the CO2 cylinder lock downward and loosen the cylinder screw by turning it counterclockwise until it ...
Owners Manual
Page 6
...screw by turning the air pistol over and shaking it is very cold. Avoid prolonged contact with the CO2 cartridge if it to remove the grip, swing the cylinder lock downward and tighten the cylinder screw a little more by swinging it counterclockwise. Return the safety to keep your hands ...and face away from escaping CO2. The CO2 cartridge may be cold. Carefully press the right grip cover back into place. Swing the CO2 cylinder lock downward carefully to allow any remaining CO2 gas to escape. (See Fig. 5) Important: Be ...
...screw by turning the air pistol over and shaking it is very cold. Avoid prolonged contact with the CO2 cartridge if it to remove the grip, swing the cylinder lock downward and tighten the cylinder screw a little more by swinging it counterclockwise. Return the safety to keep your hands ...and face away from escaping CO2. The CO2 cartridge may be cold. Carefully press the right grip cover back into place. Swing the CO2 cylinder lock downward carefully to allow any remaining CO2 gas to escape. (See Fig. 5) Important: Be ...
Owners Manual
Page 8
...any part of your hand over the muzzle; Point the air pistol in Figure 8. Open the slide by pushing the release lever downward to fire. grip only the top and sides of the pellet chamber. Point the muzzle in the pistol with the ratchet teeth facing rearward. (See Fig. 9). .... 10) into the upward position, then release the trigger. IMPORTANT: To avoid jams or deforming the pellets, make sure the barrel is completely inserted. Grip the slide from the top (see Fig. 11) and move it rearward to remove pellets. Unloading the Pellets Put air pistol "On Safe" (See...
...any part of your hand over the muzzle; Point the air pistol in Figure 8. Open the slide by pushing the release lever downward to fire. grip only the top and sides of the pellet chamber. Point the muzzle in the pistol with the ratchet teeth facing rearward. (See Fig. 9). .... 10) into the upward position, then release the trigger. IMPORTANT: To avoid jams or deforming the pellets, make sure the barrel is completely inserted. Grip the slide from the top (see Fig. 11) and move it rearward to remove pellets. Unloading the Pellets Put air pistol "On Safe" (See...
Instruction Manual
Page 3
... the pellet cylinder and CO2 cartridge and store them in the chamber. Front sight Slide Rear sight Safety Muzzle Release lever Trigger Grip plate release button Cartridge lock Hammer Grip plates Refer to the parts illustration to become familiar with this instruction manual properly with the components parts of reach chlidren and...
... the pellet cylinder and CO2 cartridge and store them in the chamber. Front sight Slide Rear sight Safety Muzzle Release lever Trigger Grip plate release button Cartridge lock Hammer Grip plates Refer to the parts illustration to become familiar with this instruction manual properly with the components parts of reach chlidren and...
Instruction Manual
Page 5
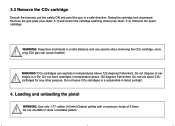
...shoot in a safe direction. Now close the cartridge lock (Illustr. 3.5). To make sure the cartridge has been properly pierced, check to lift off the grip on the left side of the trigger housing (Illustr. 3.1) to make sure that the safety in ON and the muzzle is in a safe direction! ... cartridge seal). Do not use the weapon for an extended period, we recommend removing the die CO2 cylinder in the butt frame and pressing the grip on the valve. Open the cartridge pressure plate and unscrew the cartridge adjustment screw all the way (Illustr. 3.3). Note: Use only 12g CO2 cartridges...
...shoot in a safe direction. Now close the cartridge lock (Illustr. 3.5). To make sure the cartridge has been properly pierced, check to lift off the grip on the left side of the trigger housing (Illustr. 3.1) to make sure that the safety in ON and the muzzle is in a safe direction! ... cartridge seal). Do not use the weapon for an extended period, we recommend removing the die CO2 cylinder in the butt frame and pressing the grip on the valve. Open the cartridge pressure plate and unscrew the cartridge adjustment screw all the way (Illustr. 3.3). Note: Use only 12g CO2 cartridges...
Instruction Manual
Page 6
... other unsuitable pellets. Remove the spent cartridge. WARNING: Keep face and hands in temperature above 122 degrees Fahrenheit. CO2-cartridges can cause frostbite. Remove the grip plate (see illustr. 3.1) and loosen the cartridge retaining wheel (see illustr. 3.3). Do not store cartridges in a safe distance and use BBs or other purpose. Loading...
... other unsuitable pellets. Remove the spent cartridge. WARNING: Keep face and hands in temperature above 122 degrees Fahrenheit. CO2-cartridges can cause frostbite. Remove the grip plate (see illustr. 3.1) and loosen the cartridge retaining wheel (see illustr. 3.3). Do not store cartridges in a safe distance and use BBs or other purpose. Loading...
Instruction Manual
Page 13
... not attempt to clean your pistol in the barrel. Store your pistol without first having put the safety on the cartride lock, slide rails and grip lock button after every 250 shots. Maintenance With the proper maintenance your gun if it is guaranteed form your pistole will give you years of...
... not attempt to clean your pistol in the barrel. Store your pistol without first having put the safety on the cartride lock, slide rails and grip lock button after every 250 shots. Maintenance With the proper maintenance your gun if it is guaranteed form your pistole will give you years of...

Instruction Manual
Page 17
....60.10.1 416.60.11.1 416.70.04.3 419.20.31.3 303.40.08.1 Discription Cartridge screw Cartridge lock spring Grip plates (pair), plastik Grip plates (pair), wood Grip plate screw Grip plate catch Grip plate release button Slide stop (non functional) Screw for slide stop Safety spring Dentent ball Spring Thrust piece Slide, blue...
....60.10.1 416.60.11.1 416.70.04.3 419.20.31.3 303.40.08.1 Discription Cartridge screw Cartridge lock spring Grip plates (pair), plastik Grip plates (pair), wood Grip plate screw Grip plate catch Grip plate release button Slide stop (non functional) Screw for slide stop Safety spring Dentent ball Spring Thrust piece Slide, blue...