
User Manual
Page 27
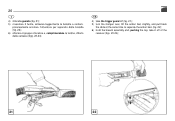
26 I 4) sfilare la guardia (fig. 21); 5) rovesciare il fucile, sollevare leggermente le bretelle e contem- GB 4) take the trigger guard off (fig. 21); 5) turn the shotgun over, lift the action bars slightly, and pull back the slide at the same time to separate the action bars (fig. 22); 6) hold the breech assembly and, pushing the top, take it off of the receiver (figs. 23-24); 21 22 poraneamente arretrare l'otturatore per separarlo dalle bretelle (fig. 22); 6) afferrare il gruppo otturatore e, comprimendone la testina, sfilarlo dalla carcassa (figg. 23-24);
26 I 4) sfilare la guardia (fig. 21); 5) rovesciare il fucile, sollevare leggermente le bretelle e contem- GB 4) take the trigger guard off (fig. 21); 5) turn the shotgun over, lift the action bars slightly, and pull back the slide at the same time to separate the action bars (fig. 22); 6) hold the breech assembly and, pushing the top, take it off of the receiver (figs. 23-24); 21 22 poraneamente arretrare l'otturatore per separarlo dalle bretelle (fig. 22); 6) afferrare il gruppo otturatore e, comprimendone la testina, sfilarlo dalla carcassa (figg. 23-24);