

SW2700PT Data Sheet
Page 1
y. Keep the moment and wneilvlenrelveetritlefat dfaedaewaawya. BenQ Monitor SW2700PT with excellent 99% Adobe RGB color space, it gives you captured and make sure the moments are perfect. With Adobe RGB wide color space Photographer Monitor SW2700PT Preserve the true colors you a wide color range and spectacular colors display.
y. Keep the moment and wneilvlenrelveetritlefat dfaedaewaawya. BenQ Monitor SW2700PT with excellent 99% Adobe RGB color space, it gives you captured and make sure the moments are perfect. With Adobe RGB wide color space Photographer Monitor SW2700PT Preserve the true colors you a wide color range and spectacular colors display.

SW2700PT Data Sheet
Page 2
... names and trademarks of blue and green, resulting in a more than one billion colors guaranteed with the silkiest and smoothest gradations. BenQ SW2700PT Monitor for Extreme Color-Accuracy Enjoy the smoothest shading and color transitions in natural gradations on a 10-bit display panel, allowing you to...tune and maintain the color performance of perfect color accuracy and true-to-life image quality.With that in mind, the BenQ SW Photographer Monitor offers unparalleled technology that allows you to revive the creative vision and preserve that special moment. This material may vary by...
... names and trademarks of blue and green, resulting in a more than one billion colors guaranteed with the silkiest and smoothest gradations. BenQ SW2700PT Monitor for Extreme Color-Accuracy Enjoy the smoothest shading and color transitions in natural gradations on a 10-bit display panel, allowing you to...tune and maintain the color performance of perfect color accuracy and true-to-life image quality.With that in mind, the BenQ SW Photographer Monitor offers unparalleled technology that allows you to revive the creative vision and preserve that special moment. This material may vary by...

SW2700PT User Manual
Page 1
SW Series LCD Monitor User Manual
SW Series LCD Monitor User Manual
SW2700PT User Manual
Page 2
...apply to original accessories. 2 Clean the LCD monitor surface with respect to the contents hereof and specifically disclaims any warranties, merchantability or fitness for any particular purpose. Your monitor should be used. Further, BenQ Corporation reserves the right to revise this product. ...Always unplug your monitor from time to time in any form or by BenQ Corporation. The socket outlet should be installed near ...
...apply to original accessories. 2 Clean the LCD monitor surface with respect to the contents hereof and specifically disclaims any warranties, merchantability or fitness for any particular purpose. Your monitor should be used. Further, BenQ Corporation reserves the right to revise this product. ...Always unplug your monitor from time to time in any form or by BenQ Corporation. The socket outlet should be installed near ...
SW2700PT User Manual
Page 3
...in order to ensure that involve critical color judgment or image enhancement, please wait for 30 minutes after the monitor is powered on BenQ's environmental commitments and achievements. 3 BenQ ecoFACTS label lists key eco-friendly design highlights of each product, hoping to extend the display's lifetime. ...See Adjusting the backlight on page 36 for more details on . • It is recommended to set the monitor to the light condition around the monitor. Check out BenQ's CSR Website at purchase. If any of the above mentioned misuse or other risks. Servicing Do not attempt ...
...in order to ensure that involve critical color judgment or image enhancement, please wait for 30 minutes after the monitor is powered on BenQ's environmental commitments and achievements. 3 BenQ ecoFACTS label lists key eco-friendly design highlights of each product, hoping to extend the display's lifetime. ...See Adjusting the backlight on page 36 for more details on . • It is recommended to set the monitor to the light condition around the monitor. Check out BenQ's CSR Website at purchase. If any of the above mentioned misuse or other risks. Servicing Do not attempt ...
SW2700PT User Manual
Page 4
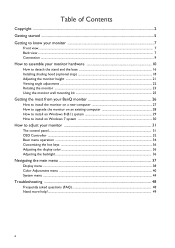
... hood (optional step 18 Adjusting the monitor height ...21 Viewing angle adjustment ...22 Rotating the monitor ...23 Using the monitor wall mounting kit 25 Getting the most from your BenQ monitor 26 How to install the monitor on a new computer 27 How to upgrade the monitor on an existing computer 28 How to... install on Windows 8 (8.1) system 29 How to install on Windows 7 system 30 How to adjust your monitor 31 The control panel...31...
... hood (optional step 18 Adjusting the monitor height ...21 Viewing angle adjustment ...22 Rotating the monitor ...23 Using the monitor wall mounting kit 25 Getting the most from your BenQ monitor 26 How to install the monitor on a new computer 27 How to upgrade the monitor on an existing computer 28 How to... install on Windows 8 (8.1) system 29 How to install on Windows 7 system 30 How to adjust your monitor 31 The control panel...31...

SW2700PT User Manual
Page 5
BenQ LCD Monitor Monitor Stand Monitor Base Quick Start Guide CD-ROM Power Cord (Picture may differ from product supplied for a replacement. Getting started When unpacking please check you have the following items. If any are missing or damaged, please contact the place of purchase for your region.) Video Cable: DVI-DL Getting started 5
BenQ LCD Monitor Monitor Stand Monitor Base Quick Start Guide CD-ROM Power Cord (Picture may differ from product supplied for a replacement. Getting started When unpacking please check you have the following items. If any are missing or damaged, please contact the place of purchase for your region.) Video Cable: DVI-DL Getting started 5

SW2700PT User Manual
Page 6
... contents and the product supplied for your product, you can purchase them separately. • Consider keeping the box and packaging in storage for protecting the monitor during transport. For cables that are not supplied with your region. Always keep the product and accessories out of reach of small children. 6 Getting started...
... contents and the product supplied for your product, you can purchase them separately. • Consider keeping the box and packaging in storage for protecting the monitor during transport. For cables that are not supplied with your region. Always keep the product and accessories out of reach of small children. 6 Getting started...

SW2700PT User Manual
Page 7
AC power input jack 4. USB port (upstream; OSD Controller socket 5. Cable management hole 8. Headphone jack 6. connecting to the PC) 11. Control buttons 2. DVI-D socket 7. DisplayPort socket 10. Kensington lock slot 4 5 6 7 8 9 10 Getting to know your monitor The illustrations in this document are for your reference only and may look different from the appearance of the product supplied for your monitor 7 HDMI socket 11 9. Front view SW24 series SW27 series 1. Power button Back view 3 12 12 3. Getting to know your region.
AC power input jack 4. USB port (upstream; OSD Controller socket 5. Cable management hole 8. Headphone jack 6. connecting to the PC) 11. Control buttons 2. DVI-D socket 7. DisplayPort socket 10. Kensington lock slot 4 5 6 7 8 9 10 Getting to know your monitor The illustrations in this document are for your reference only and may look different from the appearance of the product supplied for your monitor 7 HDMI socket 11 9. Front view SW24 series SW27 series 1. Power button Back view 3 12 12 3. Getting to know your region.

SW2700PT User Manual
Page 8
Hook (for your region. 8 Getting to USB devices) 15 15. USB port x 2 (downstream; 12 14 connecting to know your monitor Handle 13. VESA mount release button 13 16 • Above diagram may vary depending on the model. • Picture may differ from product supplied for shading hood 13 installation) 14. SD card slot 16. 12.
Hook (for your region. 8 Getting to USB devices) 15 15. USB port x 2 (downstream; 12 14 connecting to know your monitor Handle 13. VESA mount release button 13 16 • Above diagram may vary depending on the model. • Picture may differ from product supplied for shading hood 13 installation) 14. SD card slot 16. 12.

SW2700PT User Manual
Page 9
For cables that are for your reference only. Colorimeter USB peripherals SD card OSD Controller Headphone PC/Notebook Getting to know your monitor 9 For detailed connection methods, see page 12 - 14. Connection The following connection illustrations are not supplied with your product, you can purchase them separately.
For cables that are for your reference only. Colorimeter USB peripherals SD card OSD Controller Headphone PC/Notebook Getting to know your monitor 9 For detailed connection methods, see page 12 - 14. Connection The following connection illustrations are not supplied with your product, you can purchase them separately.
SW2700PT User Manual
Page 10
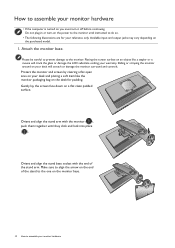
... they click and lock into place ( ). Please be careful to prevent damage to do so. • The following illustrations are for padding. Protect the monitor and screen by clearing a flat open area on the desk for your reference only. Gently lay the screen face down on the purchased model. 1. Orient ...and align the stand arm with the end of the stand to the one on the monitor base. 1 2 Open Lock Lock Open 10 How to assemble your desk will crack the glass or damage the LCD substrate voiding your desk and placing...
... they click and lock into place ( ). Please be careful to prevent damage to do so. • The following illustrations are for padding. Protect the monitor and screen by clearing a flat open area on the desk for your reference only. Gently lay the screen face down on the purchased model. 1. Orient ...and align the stand arm with the end of the stand to the one on the monitor base. 1 2 Open Lock Lock Open 10 How to assemble your desk will crack the glass or damage the LCD substrate voiding your desk and placing...

SW2700PT User Manual
Page 11
... cannot go further. How to check that they have properly engaged. Gently attempt to pull the stand and the base back apart to assemble your monitor hardware 11 Raise the thumbscrew lid ( ) and tighten the thumbscrew as illustrated. Then push the lid back. Turn the base counterclockwise until you must hold... handle and the bottom of the stand base at the same time as illustrated ( ). Carefully put down the stand and the base. Carefully lift the monitor, turn it over and place it upright on its stand on a flat even surface.
... cannot go further. How to check that they have properly engaged. Gently attempt to pull the stand and the base back apart to assemble your monitor hardware 11 Raise the thumbscrew lid ( ) and tighten the thumbscrew as illustrated. Then push the lid back. Turn the base counterclockwise until you must hold... handle and the bottom of the stand base at the same time as illustrated ( ). Carefully put down the stand and the base. Carefully lift the monitor, turn it over and place it upright on its stand on a flat even surface.

SW2700PT User Manual
Page 12
...the screen to minimize unwanted reflections from accidently falling out during use. Tighten all finger screws to the computer video socket. See Adjusting the monitor height on the monitor. Connect the PC video cable To Connect the DVI-DL Cable Connect the plug of the cable (at the end without the ferrite... the plugs from other light sources. 2. Connect the other end of the cable to the HDMI port of the HDMI cable to adjust the monitor stand height. You might want to the HDMI port on page 21 for more information. To Connect the HDMI Cable Or Connect the plug of...
...the screen to minimize unwanted reflections from accidently falling out during use. Tighten all finger screws to the computer video socket. See Adjusting the monitor height on the monitor. Connect the PC video cable To Connect the DVI-DL Cable Connect the plug of the cable (at the end without the ferrite... the plugs from other light sources. 2. Connect the other end of the cable to the HDMI port of the HDMI cable to adjust the monitor stand height. You might want to the HDMI port on page 21 for more information. To Connect the HDMI Cable Or Connect the plug of...

SW2700PT User Manual
Page 13
... socket. And place the OSD Controller properly on the product supplied for OSD Controller connection) on the rear of the monitor. Connect the headphones. How to assemble your region. 3. The video cables included in your package and the socket illustrations on the right may connect headphones ... 13 For more information on OSD Controller, see OSD Controller on the back side of the monitor. You may vary depending on your monitor base. To Connect the DP Cable Or Connect the plug of the cable to the computer video socket. Connect the other end of the DP ...
... socket. And place the OSD Controller properly on the product supplied for OSD Controller connection) on the rear of the monitor. Connect the headphones. How to assemble your region. 3. The video cables included in your package and the socket illustrations on the right may connect headphones ... 13 For more information on OSD Controller, see OSD Controller on the back side of the monitor. You may vary depending on your monitor base. To Connect the DP Cable Or Connect the plug of the cable to the computer video socket. Connect the other end of the DP ...

SW2700PT User Manual
Page 14
...the power cord into the socket labelled on the right. 6. Insert a SD, MMC, or MS memory card following the direction indicated on the monitor. Memory Stick / Memory Stick Pro - Connect the USB cable between connected USB devices and the upstream port. These downstream USB ports transmit data between... the PC and the monitor (via other end to a power outlet just yet. 14 How to the monitor. See picture on the rear of the monitor. This upstream USB port transmits data between the PC and the USB devices ...
...the power cord into the socket labelled on the right. 6. Insert a SD, MMC, or MS memory card following the direction indicated on the monitor. Memory Stick / Memory Stick Pro - Connect the USB cable between connected USB devices and the upstream port. These downstream USB ports transmit data between... the PC and the monitor (via other end to a power outlet just yet. 14 How to the monitor. See picture on the rear of the monitor. This upstream USB port transmits data between the PC and the USB devices ...

SW2700PT User Manual
Page 15
Plug the other end of the product, we recommend that you use your monitor hardware 15 How to and turn it on the monitor. Picture may differ from your BenQ monitor on the computer too, and follow the instructions in Getting the most from product supplied for your region. Turn on page 26 to install the monitor software. To extend the service life of the power cord into a power outlet and turn -on the power. 8. Organize the cables. 9. Connect-to assemble your computer's power management function. Turn on the monitor by pressing the power button on .
Plug the other end of the product, we recommend that you use your monitor hardware 15 How to and turn it on the monitor. Picture may differ from your BenQ monitor on the computer too, and follow the instructions in Getting the most from product supplied for your region. Turn on page 26 to install the monitor software. To extend the service life of the power cord into a power outlet and turn -on the power. 8. Organize the cables. 9. Connect-to assemble your computer's power management function. Turn on the monitor by pressing the power button on .

SW2700PT User Manual
Page 16
... Lock Open Lock Lock Open Open Lock Lock Lock 16 How to assemble your warranty. How to the monitor. Turn off the computer before unplugging the monitor signal cable. Prepare the monitor and area. Remove the monitor base. Raise the thumbscrew lid ( ) and release the 1 thumbscrew as illustrated ( ). Placing the...a flat clean padded surface. Lock 2 Open Lock Lock Open Turn the base clockwise until you cannot go further. Turn off the monitor and the power before laying the screen face down on the desk for padding, before unplugging the power cable. Protect the...
... Lock Open Lock Lock Open Open Lock Lock Lock 16 How to assemble your warranty. How to the monitor. Turn off the computer before unplugging the monitor signal cable. Prepare the monitor and area. Remove the monitor base. Raise the thumbscrew lid ( ) and release the 1 thumbscrew as illustrated ( ). Placing the...a flat clean padded surface. Lock 2 Open Lock Lock Open Turn the base clockwise until you cannot go further. Turn off the monitor and the power before laying the screen face down on the desk for padding, before unplugging the power cable. Protect the...

SW2700PT User Manual
Page 17
Open Lock Lock Open 3 1 2 How to assemble your monitor hardware 17 Remove the monitor stand. And then detach the base from the monitor ( and ). While pressing and holding the VESA mount release button ( ), detach the stand from the stand. 3.
Open Lock Lock Open 3 1 2 How to assemble your monitor hardware 17 Remove the monitor stand. And then detach the base from the monitor ( and ). While pressing and holding the VESA mount release button ( ), detach the stand from the stand. 3.

SW2700PT User Manual
Page 18
... hood (optional step) • To prevent glare or most of unwanted reflections from other light sources off your screen, you can fit into your monitor hardware There are well-designed and can install the shading hood. • Please be careful to prevent damage to assemble your... monitor properly. Install the left side of the monitor, and press down the hood to complete the installation carefully. Align the L shape bar on the hood with the one on the ...
... hood (optional step) • To prevent glare or most of unwanted reflections from other light sources off your screen, you can fit into your monitor hardware There are well-designed and can install the shading hood. • Please be careful to prevent damage to assemble your... monitor properly. Install the left side of the monitor, and press down the hood to complete the installation carefully. Align the L shape bar on the hood with the one on the ...


