
Safety Warning and Notice
Page 1
...; Exposed to use . If you want to vibrations or impacts in a public place or a harsh environment, contact your nearest BenQ service center for assistance. Operation 1. Avoid taking either one of children. Excessively frequent plug and unplug of the following actions for personal ...use the monitor in places such as cars, buses, trains, and other rail vehicles Near heating appliances such as radiators, heaters, fuel...
...; Exposed to use . If you want to vibrations or impacts in a public place or a harsh environment, contact your nearest BenQ service center for assistance. Operation 1. Avoid taking either one of children. Excessively frequent plug and unplug of the following actions for personal ...use the monitor in places such as cars, buses, trains, and other rail vehicles Near heating appliances such as radiators, heaters, fuel...

Safety Warning and Notice
Page 2
... the user will have the pay the repairing costs. It is unplugged before cleaning your monitor Use a monitor cleaner and a soft cloth to clean your nearest BenQ service center for warranty services have been altered by unauthorized use a power cord that the power cord... device to avoid possible dangers such as antenna, Cable TV) outside the monitor. Defects caused by BenQ. Never use or is compatible with a (multi-outlet) extension cord. Always turn off the monitor before unplugging the power cord. Full 3/29/2019 To avoid possible electric...
... the user will have the pay the repairing costs. It is unplugged before cleaning your monitor Use a monitor cleaner and a soft cloth to clean your nearest BenQ service center for warranty services have been altered by unauthorized use a power cord that the power cord... device to avoid possible dangers such as antenna, Cable TV) outside the monitor. Defects caused by BenQ. Never use or is compatible with a (multi-outlet) extension cord. Always turn off the monitor before unplugging the power cord. Full 3/29/2019 To avoid possible electric...
Resolution file
Page 1
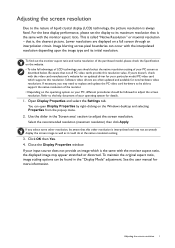
... maximum resolution that is called "Native Resolution" or maximal resolution - This is , the clearest picture. If yours doesn't, check with the monitor aspect ratio, the displayed image may need to replace and update the PC video card hardware to be able to adjust the screen resolution....right-clicking on a full screen through an interpolation circuit. Lower resolutions are often updated and available for more information. To find out the monitor aspect ratio and native resolution of the purchased model, please check the Specification on the website. • To take full advantage of ...
... maximum resolution that is called "Native Resolution" or maximal resolution - This is , the clearest picture. If yours doesn't, check with the monitor aspect ratio, the displayed image may need to replace and update the PC video card hardware to be able to adjust the screen resolution....right-clicking on a full screen through an interpolation circuit. Lower resolutions are often updated and available for more information. To find out the monitor aspect ratio and native resolution of the purchased model, please check the Specification on the website. • To take full advantage of ...

Resolution file
Page 4
Image disruption may improve this monitor with the resolution 1360x768, the default Display Mode is not, however, an error. You may occur as a result of signal frequency differences from the "DISPLAY" ...
Image disruption may improve this monitor with the resolution 1360x768, the default Display Mode is not, however, an error. You may occur as a result of signal frequency differences from the "DISPLAY" ...

User Manual
Page 1
LCD Monitor User Manual Stylish Monitor with Eye Care Technology | G Series
LCD Monitor User Manual Stylish Monitor with Eye Care Technology | G Series

User Manual
Page 4
...easily accessible. • This product should be operated from the AC supply. • The power supply cord serves as a power disconnect device for your LCD Monitor. If you are no service parts inside a carrying case. • Connect the power adapter to a proper power source. • Do not attempt to be... the unit if it to H05VV-F or H05RR-F, 3G, 0.75mm2 must be used . • Use only the power cord provided by BenQ. Do not cover the power adapter with your monitor. 0~40 C 10~90 % 0~3000 m -20~60 C 10~60 % 0~12000 m • The AC plug isolates this equipment from the type ...
...easily accessible. • This product should be operated from the AC supply. • The power supply cord serves as a power disconnect device for your LCD Monitor. If you are no service parts inside a carrying case. • Connect the power adapter to a proper power source. • Do not attempt to be... the unit if it to H05VV-F or H05RR-F, 3G, 0.75mm2 must be used . • Use only the power cord provided by BenQ. Do not cover the power adapter with your monitor. 0~40 C 10~90 % 0~3000 m -20~60 C 10~60 % 0~12000 m • The AC plug isolates this equipment from the type ...
User Manual
Page 5
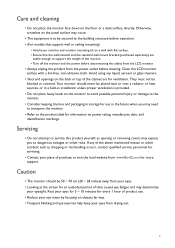
...monitor and monitor mounting kit on a wall with a lint-free, non-abrasive cloth. Your monitor should be blocked or covered. Caution • The monitor...surface may need to transport the monitor. • Refer to the product label for information ...cabinet are stable enough to the monitor. • Consider keeping the...monitor to avoid possible personal injury or damage to support the weight of the monitor. • Turn off the monitor and the power before disconnecting the cables from the LCD monitor.... Care and cleaning • Do not place the monitor face down on objects far way. • Frequent...
...monitor and monitor mounting kit on a wall with a lint-free, non-abrasive cloth. Your monitor should be blocked or covered. Caution • The monitor...surface may need to transport the monitor. • Refer to the product label for information ...cabinet are stable enough to the monitor. • Consider keeping the...monitor to avoid possible personal injury or damage to support the weight of the monitor. • Turn off the monitor and the power before disconnecting the cables from the LCD monitor.... Care and cleaning • Do not place the monitor face down on objects far way. • Frequent...

User Manual
Page 6
...27 How to attach the monitor base...27 How to detach the base ...29 Adjusting the monitor height ...30 Rotating the monitor ...31 Viewing angle adjustment ...32 Using the monitor wall mounting kit 33 Getting the most from your BenQ monitor 34 Downloading the LCD Monitor driver files from the ...Internet 34 How to install the monitor on a new computer 35...
...27 How to attach the monitor base...27 How to detach the base ...29 Adjusting the monitor height ...30 Rotating the monitor ...31 Viewing angle adjustment ...32 Using the monitor wall mounting kit 33 Getting the most from your BenQ monitor 34 Downloading the LCD Monitor driver files from the ...Internet 34 How to install the monitor on a new computer 35...
User Manual
Page 8
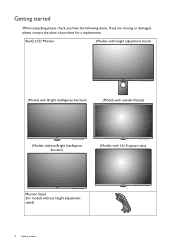
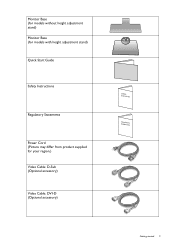
BenQ LCD Monitor (Models with height adjustment stand) (Models with Bright Intelligence function) (Models with standard bezel) (Models without Bright Intelligence function) (Models with 16:10 aspect ratio) Monitor Stand (for a replacement. Getting started When unpacking please check you have the following items. If any are missing or damaged, please contact the place of purchase for models without height adjustment stand) 8 Getting started
BenQ LCD Monitor (Models with height adjustment stand) (Models with Bright Intelligence function) (Models with standard bezel) (Models without Bright Intelligence function) (Models with 16:10 aspect ratio) Monitor Stand (for a replacement. Getting started When unpacking please check you have the following items. If any are missing or damaged, please contact the place of purchase for models without height adjustment stand) 8 Getting started
User Manual
Page 9
Monitor Base (for models without height adjustment stand) Monitor Base (for models with height adjustment stand) Quick Start Guide Safety Instructions Regulatory Statements Power Cord (Picture may differ from product supplied for your region.) Video Cable: D-Sub (Optional accessory) Video Cable: DVI-D (Optional accessory) Safety Instructions SRteagteumlaetonrtys Getting started 9
Monitor Base (for models without height adjustment stand) Monitor Base (for models with height adjustment stand) Quick Start Guide Safety Instructions Regulatory Statements Power Cord (Picture may differ from product supplied for your region.) Video Cable: D-Sub (Optional accessory) Video Cable: DVI-D (Optional accessory) Safety Instructions SRteagteumlaetonrtys Getting started 9
User Manual
Page 10
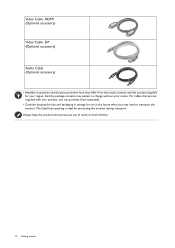
... may need to change without prior notice. The fitted foam packing is ideal for use in the future when you may subject to transport the monitor. Always keep the product and accessories out of reach of small children. 10 Getting started Video Cable: HDMI (Optional accessory) Video Cable: DP (Optional accessory... contents and the product supplied for your product, you can purchase them separately. • Consider keeping the box and packaging in storage for protecting the monitor during transport.
... may need to change without prior notice. The fitted foam packing is ideal for use in the future when you may subject to transport the monitor. Always keep the product and accessories out of reach of small children. 10 Getting started Video Cable: HDMI (Optional accessory) Video Cable: DP (Optional accessory... contents and the product supplied for your product, you can purchase them separately. • Consider keeping the box and packaging in storage for protecting the monitor during transport.
User Manual
Page 11
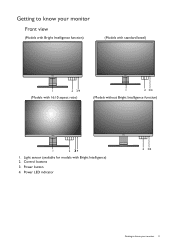
Control buttons 3. Power LED indicator 2 3/4 Getting to know your monitor Front view (Models with Bright Intelligence function) (Models with standard bezel) 1 2 3/4 (Models with Bright Intelligence) 2. Power button 4. Light sensor (available for models with 16:10 aspect ratio) 1 2 3/4 (Models without Bright Intelligence function) 1 2 34 1. Getting to know your monitor 11
Control buttons 3. Power LED indicator 2 3/4 Getting to know your monitor Front view (Models with Bright Intelligence function) (Models with standard bezel) 1 2 3/4 (Models with Bright Intelligence) 2. Power button 4. Light sensor (available for models with 16:10 aspect ratio) 1 2 3/4 (Models without Bright Intelligence function) 1 2 34 1. Getting to know your monitor 11
User Manual
Page 12
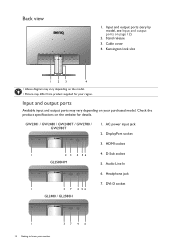
... output ports Available input and output ports may vary depending on the website for your purchased model. DVI-D socket D-SUB 1 12 Getting to know your monitor 37 4 6 Back view 1. Input and output ports (vary by model, see Input and output ports on your region. Audio Line In D-SUB LINE IN 1 3 7 4 56...
... output ports Available input and output ports may vary depending on the website for your purchased model. DVI-D socket D-SUB 1 12 Getting to know your monitor 37 4 6 Back view 1. Input and output ports (vary by model, see Input and output ports on your region. Audio Line In D-SUB LINE IN 1 3 7 4 56...
User Manual
Page 13
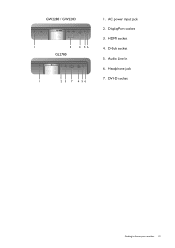
D-Sub socket 5. DisplayPort socket 3. Headphone jack 7. AC power input jack 2. Audio Line In 6. HDMI socket 4. DVI-D socket Getting to know your monitor 13 GW2280 / GW2283 D-SUB LINE IN 1 3 4 56 GL2780 1 2 3 7 4 56 1.
D-Sub socket 5. DisplayPort socket 3. Headphone jack 7. AC power input jack 2. Audio Line In 6. HDMI socket 4. DVI-D socket Getting to know your monitor 13 GW2280 / GW2283 D-SUB LINE IN 1 3 4 56 GL2780 1 2 3 7 4 56 1.
User Manual
Page 14
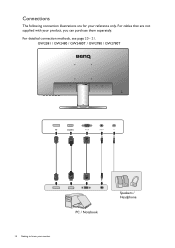
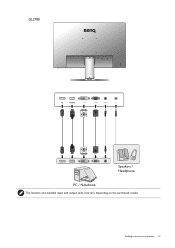
For cables that are for your reference only. GW2381 / GW2480 / GW2480T / GW2780 / GW2780T D-SUB LINE IN 14 Getting to know your monitor PC / Notebook Speakers / Headphone For detailed connection methods, see page 20 - 21. Connections The following connection illustrations are not supplied with your product, you can purchase them separately.
For cables that are for your reference only. GW2381 / GW2480 / GW2480T / GW2780 / GW2780T D-SUB LINE IN 14 Getting to know your monitor PC / Notebook Speakers / Headphone For detailed connection methods, see page 20 - 21. Connections The following connection illustrations are not supplied with your product, you can purchase them separately.
User Manual
Page 15
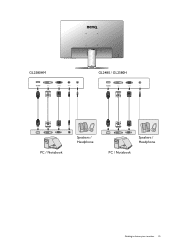
GL2580HM D-SUB LINE IN GL2480 / GL2580H PC / Notebook Speakers / Headphone Speakers / Headphone PC / Notebook Getting to know your monitor 15
GL2580HM D-SUB LINE IN GL2480 / GL2580H PC / Notebook Speakers / Headphone Speakers / Headphone PC / Notebook Getting to know your monitor 15
User Manual
Page 16
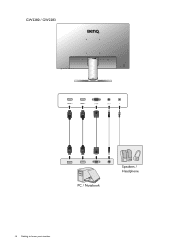
GW2280 / GW2283 D-SUB LINE IN PC / Notebook Speakers / Headphone 16 Getting to know your monitor
GW2280 / GW2283 D-SUB LINE IN PC / Notebook Speakers / Headphone 16 Getting to know your monitor
User Manual
Page 17
GL2780 Speakers / Headphone PC / Notebook The location and available input and output jacks may vary depending on the purchased model. Getting to know your monitor 17
GL2780 Speakers / Headphone PC / Notebook The location and available input and output jacks may vary depending on the purchased model. Getting to know your monitor 17
User Manual
Page 18
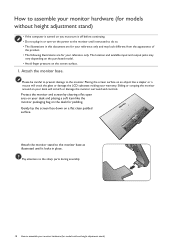
...a flat open area on your desk and placing a soft item like the monitor packaging bag on an object like a stapler or a mouse will scratch or damage the monitor surround and controls. Attach the monitor stand to the monitor base as illustrated until instructed to do so. • The illustrations in this... illustrations are for your reference only. Gently lay the screen face down on the screen surface. 1. Sliding or scraping the monitor around on the power to the monitor until it off before continuing. • Do not plug-in or turn-on your desk will crack the glass or damage...
...a flat open area on your desk and placing a soft item like the monitor packaging bag on an object like a stapler or a mouse will scratch or damage the monitor surround and controls. Attach the monitor stand to the monitor base as illustrated until instructed to do so. • The illustrations in this... illustrations are for your reference only. Gently lay the screen face down on the screen surface. 1. Sliding or scraping the monitor around on the power to the monitor until it off before continuing. • Do not plug-in or turn-on your desk will crack the glass or damage...
User Manual
Page 19
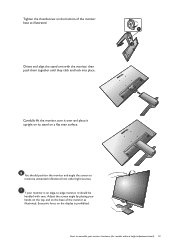
... surface. Excessive force on the display is an edge-to assemble your hands on the top and on the base of the monitor base as illustrated. You should be handled with the monitor, then push them together until they click and lock into place. 1 2 Carefully lift the... monitor, turn it over and place it should position the monitor and angle the screen to minimize unwanted reflections from other light sources. Tighten the ...
... surface. Excessive force on the display is an edge-to assemble your hands on the top and on the base of the monitor base as illustrated. You should be handled with the monitor, then push them together until they click and lock into place. 1 2 Carefully lift the... monitor, turn it over and place it should position the monitor and angle the screen to minimize unwanted reflections from other light sources. Tighten the ...


