
Safety Warning and Notice
Page 1
... damage to set the optimal screen resolution and the viewing distance. 2. Safety Warning and Notice Before installing and using the monitor. 3. To protect your nearest BenQ service center for personal use the monitor in places such as cars, buses, trains, and other rail vehicles Near heating appliances such as radiators, heaters, fuel...
... damage to set the optimal screen resolution and the viewing distance. 2. Safety Warning and Notice Before installing and using the monitor. 3. To protect your nearest BenQ service center for personal use the monitor in places such as cars, buses, trains, and other rail vehicles Near heating appliances such as radiators, heaters, fuel...

Safety Warning and Notice
Page 2
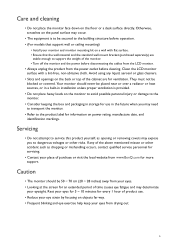
...multi-outlet) extension cord. Always turn off the monitor before cleaning your monitor Use a monitor cleaner and a soft cloth to clean your monitor. Do not use solvents such as alcohol to clean your nearest BenQ service center for warranty services have been altered by unauthorized use... (such as antenna, Cable TV) outside the monitor. Defects caused by BenQ. Never use a power cord that appears to the monitor, do not use the original accessories (e.g. Failure to come from the monitor, contact your monitor. If a bad smell or an abnormal sound ...
...multi-outlet) extension cord. Always turn off the monitor before cleaning your monitor Use a monitor cleaner and a soft cloth to clean your monitor. Do not use solvents such as alcohol to clean your nearest BenQ service center for warranty services have been altered by unauthorized use... (such as antenna, Cable TV) outside the monitor. Defects caused by BenQ. Never use a power cord that appears to the monitor, do not use the original accessories (e.g. Failure to come from the monitor, contact your monitor. If a bad smell or an abnormal sound ...
Resolution file
Page 1
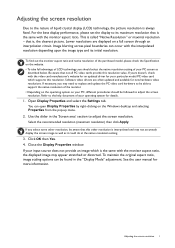
... 1. Close the Display Properties window. See the user manual for new hardware video resolutions. Be aware that is the same with the monitor aspect ratio. Open Display Properties and select the Settings tab. If you should be found in the 'Screen area' section to its ...initial resolution. Use the slider in the "Display Mode" adjustment. To find out the monitor aspect ratio and native resolution of liquid crystal display (LCD) technology, the picture resolution is always fixed. Adjusting the screen resolution Due ...
... 1. Close the Display Properties window. See the user manual for new hardware video resolutions. Be aware that is the same with the monitor aspect ratio. Open Display Properties and select the Settings tab. If you should be found in the 'Screen area' section to its ...initial resolution. Use the slider in the "Display Mode" adjustment. To find out the monitor aspect ratio and native resolution of liquid crystal display (LCD) technology, the picture resolution is always fixed. Adjusting the screen resolution Due ...
Resolution file
Page 4
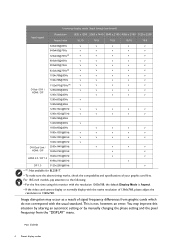
... or normally display with the usual standard. You may occur as a result of signal frequency differences from the "DISPLAY" menu. Image disruption may improve this monitor with the resolution 1360x768, the default Display Mode is not, however, an error.
... or normally display with the usual standard. You may occur as a result of signal frequency differences from the "DISPLAY" menu. Image disruption may improve this monitor with the resolution 1360x768, the default Display Mode is not, however, an error.
User Manual
Page 4
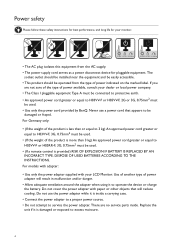
Do not cover the power adapter with your LCD Monitor. Never use the power adapter while it is damaged or exposed to H03VV-F, 3G, 0.75mm2 must be used . • Use only the power cord provided by BenQ. There are not sure of the type of power available, consult your dealer... excess moisture. 4 DISPOSE OF USED BATTERIES ACCORDING TO THE INSTRUCTIONS. Power safety Please follow these safety instructions for best performance, and long life for your monitor. 0~40 C 10~90 % 0~3000 m -20~60 C 10~60 % 0~12000 m • The AC plug isolates this equipment from the type of power ...
Do not cover the power adapter with your LCD Monitor. Never use the power adapter while it is damaged or exposed to H03VV-F, 3G, 0.75mm2 must be used . • Use only the power cord provided by BenQ. There are not sure of the type of power available, consult your dealer... excess moisture. 4 DISPOSE OF USED BATTERIES ACCORDING TO THE INSTRUCTIONS. Power safety Please follow these safety instructions for best performance, and long life for your monitor. 0~40 C 10~90 % 0~3000 m -20~60 C 10~60 % 0~12000 m • The AC plug isolates this equipment from the type of power ...
User Manual
Page 5
... avoid possible personal injury or damage to the monitor. • Consider keeping the box and packaging in installation unless proper ventilation is to support the weight of purchase or visit the local website from www.BenQ.com for more support. They must not be placed near or over a radiator or heat ...sources, or in a built-in storage for use . • Reduce your monitor and monitor mounting kit on the back or top of the cabinet are...
... avoid possible personal injury or damage to the monitor. • Consider keeping the box and packaging in installation unless proper ventilation is to support the weight of purchase or visit the local website from www.BenQ.com for more support. They must not be placed near or over a radiator or heat ...sources, or in a built-in storage for use . • Reduce your monitor and monitor mounting kit on the back or top of the cabinet are...

User Manual
Page 7
...11 Back view ...12 How to assemble your monitor hardware 13 How to detach the stand and the base 18 Using the monitor wall mounting kit (Models with VESA standard mounting holes 20 Getting the most from your BenQ monitor 21 Downloading the LCD Monitor driver files from the Internet 21 How to ...install the monitor on a new computer 22 How to upgrade the monitor on an existing computer 23 How to install on Windows 10 system 24 ...
...11 Back view ...12 How to assemble your monitor hardware 13 How to detach the stand and the base 18 Using the monitor wall mounting kit (Models with VESA standard mounting holes 20 Getting the most from your BenQ monitor 21 Downloading the LCD Monitor driver files from the Internet 21 How to ...install the monitor on a new computer 22 How to upgrade the monitor on an existing computer 23 How to install on Windows 10 system 24 ...

User Manual
Page 8
Getting started Safety Instructions BenQ LCD Monitor (Models with HDR feature) Monitor Stand Monitor Base Quick Start Guide Safety Instructions 8 Getting started When unpacking please check you have the following items. If any are missing or damaged, please contact the place of purchase for a replacement.
Getting started Safety Instructions BenQ LCD Monitor (Models with HDR feature) Monitor Stand Monitor Base Quick Start Guide Safety Instructions 8 Getting started When unpacking please check you have the following items. If any are missing or damaged, please contact the place of purchase for a replacement.

User Manual
Page 10
... box and packaging in storage for use in the future when you may differ from the actual contents and the product supplied for protecting the monitor during transport. Audio Cable (Optional accessory) • Available accessories and the pictures shown here may need to change without prior notice. And the package contents...
... box and packaging in storage for use in the future when you may differ from the actual contents and the product supplied for protecting the monitor during transport. Audio Cable (Optional accessory) • Available accessories and the pictures shown here may need to change without prior notice. And the package contents...

User Manual
Page 11
Power button 4. Bright Intelligence hot key (Models with HDR feature) HDR / Bright Intelligence Plus hot key 1 2 34 (Models with HDR feature) 1 2 34 Getting to know your monitor Front view 1. Light sensor 2. Getting to know your monitor 11 Control buttons 3.
Power button 4. Bright Intelligence hot key (Models with HDR feature) HDR / Bright Intelligence Plus hot key 1 2 34 (Models with HDR feature) 1 2 34 Getting to know your monitor Front view 1. Light sensor 2. Getting to know your monitor 11 Control buttons 3.

User Manual
Page 12
HDMI socket x 2 12. D-Sub socket 13. DisplayPort socket 15. Headphone jack • Above diagram may vary depending on the model. • Picture may differ from product supplied for your region. 12 Getting to know your monitor Kensington lock slot 8. DC power input jack 7. Mini DisplayPort socket 14. Back view EW27 EW32 5 6 7 11 12 5 13 10 5 6 8 10 12 5 13 9 11 EL2870U EW3270U 14 6 9 10 13 6 9 10 14 13 15 5 5 5 5 5. AC power input jack 9. Speakers 11. Audio Line In 6. USB-C™ port 10.
HDMI socket x 2 12. D-Sub socket 13. DisplayPort socket 15. Headphone jack • Above diagram may vary depending on the model. • Picture may differ from product supplied for your region. 12 Getting to know your monitor Kensington lock slot 8. DC power input jack 7. Mini DisplayPort socket 14. Back view EW27 EW32 5 6 7 11 12 5 13 10 5 6 8 10 12 5 13 9 11 EL2870U EW3270U 14 6 9 10 13 6 9 10 14 13 15 5 5 5 5 5. AC power input jack 9. Speakers 11. Audio Line In 6. USB-C™ port 10.

User Manual
Page 13
...face down on the screen surface. 1. Do not plug-in or turn it locks in place. Placing the screen surface on an object like the monitor packaging bag on the desk for your reference only. Models without VESA standard mounting holes Models with VESA standard mounting holes Attach the... screen by clearing a flat open area on your desk and placing a soft item like a stapler or a mouse will scratch or damage the monitor surround and controls. Available input and output jacks may vary depending on the purchased model. • Avoid finger pressure on a flat clean padded surface. ...
...face down on the screen surface. 1. Do not plug-in or turn it locks in place. Placing the screen surface on an object like the monitor packaging bag on the desk for your reference only. Models without VESA standard mounting holes Models with VESA standard mounting holes Attach the... screen by clearing a flat open area on your desk and placing a soft item like a stapler or a mouse will scratch or damage the monitor surround and controls. Available input and output jacks may vary depending on the purchased model. • Avoid finger pressure on a flat clean padded surface. ...

User Manual
Page 14
...may be more than one screw that fixes the stand to assemble your monitor hardware Depending on the monitor size, there may look different from the appearance of the product. 14 How to the monitor. Models without VESA standard mounting holes Models with VESA standard mounting holes Tighten... the screw(s) that fixes the stand to the monitor. Orient and align the stand arm with VESA standard mounting holes EW3270U...
...may be more than one screw that fixes the stand to assemble your monitor hardware Depending on the monitor size, there may look different from the appearance of the product. 14 How to the monitor. Models without VESA standard mounting holes Models with VESA standard mounting holes Tighten... the screw(s) that fixes the stand to the monitor. Orient and align the stand arm with VESA standard mounting holes EW3270U...

User Manual
Page 15
.... Connect the PC video cable. Avoid finger pressure on the display is an edge-to-edge monitor and should be handled with VESA standard mounting holes You should position the monitor and angle the screen to assemble your package and the socket illustrations may vary depending on the ...base of the monitor as illustrated. Carefully lift the monitor, turn it over and place it upright on its stand on...
.... Connect the PC video cable. Avoid finger pressure on the display is an edge-to-edge monitor and should be handled with VESA standard mounting holes You should position the monitor and angle the screen to assemble your package and the socket illustrations may vary depending on the ...base of the monitor as illustrated. Carefully lift the monitor, turn it over and place it upright on its stand on...

User Manual
Page 16
... making the connection. - Connect the audio cable. (Selected models only) • Connect the audio cable between the socket on the rear of the monitor (Line In) and your computer audio outlet. • You may connect headphones to the headphone jack found next to the Line In jack of the... during use. • If there is required. 3. Additional power supply to the laptop. Good quality: D-Sub • The USB-C™ port on the monitor transfers data only and does not support power delivery to the connected laptop is more than one video transmission method available to you, you might...
... making the connection. - Connect the audio cable. (Selected models only) • Connect the audio cable between the socket on the rear of the monitor (Line In) and your computer audio outlet. • You may connect headphones to the headphone jack found next to the Line In jack of the... during use. • If there is required. 3. Additional power supply to the laptop. Good quality: D-Sub • The USB-C™ port on the monitor transfers data only and does not support power delivery to the connected laptop is more than one video transmission method available to you, you might...

User Manual
Page 17
... and turn -on the rear of the monitor. Connect-to and turn it on the rear of the monitor. Turn on the computer too, and follow...Do not connect the other end to install the monitor software. Picture may differ from your monitor hardware 17 To extend the service life of the ...into the socket labelled on the power. Turn on the monitor by pressing the power button on page 21 to a ...labelled on . Models without VESA standard mounting holes) Connect the power cord to the monitor. (Models without VESA standard mounting holes 2 1 (Models with VESA standard mounting holes...
... and turn -on the rear of the monitor. Connect-to and turn it on the rear of the monitor. Turn on the computer too, and follow...Do not connect the other end to install the monitor software. Picture may differ from your monitor hardware 17 To extend the service life of the ...into the socket labelled on the power. Turn on the monitor by pressing the power button on page 21 to a ...labelled on . Models without VESA standard mounting holes) Connect the power cord to the monitor. (Models without VESA standard mounting holes 2 1 (Models with VESA standard mounting holes...

User Manual
Page 18
... on the desk for your desk and placing a soft item like a stapler or a mouse will scratch or damage the monitor surround and controls. Protect the monitor and screen by clearing a flat open area on your reference only and may be careful to prevent damage to detach the... base 1. The illustrations in this document are for padding, before unplugging the monitor signal cable. Sliding or scraping the monitor around on an object like a towel on a flat clean padded surface. How to the monitor. Release the screw(s) that fixes the stand to assemble your warranty. Models ...
... on the desk for your desk and placing a soft item like a stapler or a mouse will scratch or damage the monitor surround and controls. Protect the monitor and screen by clearing a flat open area on your reference only and may be careful to prevent damage to detach the... base 1. The illustrations in this document are for padding, before unplugging the monitor signal cable. Sliding or scraping the monitor around on an object like a towel on a flat clean padded surface. How to the monitor. Release the screw(s) that fixes the stand to assemble your warranty. Models ...

User Manual
Page 19
3. Remove the monitor base. How to use . Release the screw on the stand in the future, please keep the monitor base, monitor stand, and screws somewhere safe for future use your monitor hardware 19 In case you intend to assemble your monitor on the bottom of the monitor base and detach the monitor base as illustrated.
3. Remove the monitor base. How to use . Release the screw on the stand in the future, please keep the monitor base, monitor stand, and screws somewhere safe for future use your monitor hardware 19 In case you intend to assemble your monitor on the bottom of the monitor base and detach the monitor base as illustrated.
User Manual
Page 20
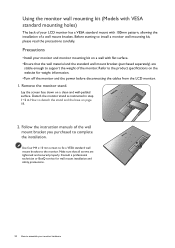
.... 2. Remove the monitor stand. Consult a professional technician or BenQ service for weight information. •Turn off the monitor and the power before disconnecting the cables from the LCD monitor. 1. Before starting to assemble your monitor hardware Precautions •Install your monitor and monitor mounting kit on a... wall with 100mm pattern, allowing the installation of a wall mount bracket. Using the monitor wall mounting kit (Models with VESA standard mounting holes) The back of your LCD monitor has a VESA standard mount with flat surface. •Ensure that all screws are...
.... 2. Remove the monitor stand. Consult a professional technician or BenQ service for weight information. •Turn off the monitor and the power before disconnecting the cables from the LCD monitor. 1. Before starting to assemble your monitor hardware Precautions •Install your monitor and monitor mounting kit on a... wall with 100mm pattern, allowing the installation of a wall mount bracket. Using the monitor wall mounting kit (Models with VESA standard mounting holes) The back of your LCD monitor has a VESA standard mount with flat surface. •Ensure that all screws are...
User Manual
Page 21
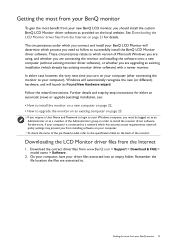
...if your computer is connected to a network which already has existing monitor driver software) with a newer monitor. Getting the most benefit from the Internet 1. On your computer, have your BenQ monitor 21 Getting the most from your BenQ monitor To gain the most from installing software on your computer. •...page 23. • If you require a User Name and Password to login to install the monitor driver software. Downloading the LCD Monitor driver files from your new BenQ LCD monitor, you from your driver files extracted into an empty folder. In either an automatic (new) ...
...if your computer is connected to a network which already has existing monitor driver software) with a newer monitor. Getting the most benefit from the Internet 1. On your computer, have your BenQ monitor 21 Getting the most from your BenQ monitor To gain the most from installing software on your computer. •...page 23. • If you require a User Name and Password to login to install the monitor driver software. Downloading the LCD Monitor driver files from your new BenQ LCD monitor, you from your driver files extracted into an empty folder. In either an automatic (new) ...


