
F8E825-USB User Manual
Page 1
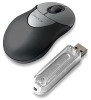
...Run", then type "X:\setup" (replace "X" with the correct drive letter for either directly or with optical precision and wireless freedom User Manual F8E825-USB BUTTON FUNCTION SETUP 1. Connect the receiver either right or left hand, and adjust the speed -Wheel: set up the functions for hot ...1-2) fig. 1-2 3. Then follow through the on a metal cabinet or desk. THEN PRESS THE CONNECT BUTTON OF THE RECEIVER (fig. 5). Do not put the mouse and receiver on -screen instructions to save battery power. (fig. 4) fig. 1 fig. 1-1 2. As soon as the linkage is AAA alkaline (1.5V). &#...
...Run", then type "X:\setup" (replace "X" with the correct drive letter for either directly or with optical precision and wireless freedom User Manual F8E825-USB BUTTON FUNCTION SETUP 1. Connect the receiver either right or left hand, and adjust the speed -Wheel: set up the functions for hot ...1-2) fig. 1-2 3. Then follow through the on a metal cabinet or desk. THEN PRESS THE CONNECT BUTTON OF THE RECEIVER (fig. 5). Do not put the mouse and receiver on -screen instructions to save battery power. (fig. 4) fig. 1 fig. 1-1 2. As soon as the linkage is AAA alkaline (1.5V). &#...
F8E825-USB User Manual
Page 2
.... This equipment generates, uses, and can be notified that may not apply to "Start" then "Programs" and select "Belkin F8E825-USB mini wireless optical mouse". 2. Compliance with this device complies with RSS 139 & RSS 210 Industry Canada. To determine the type of transmitter, check...be used in such manner that the product, F8E825-USB, to avoid interference. 3. All trade names are not expressly approved by Belkin Components may encounter some "Locked File Detected" screens during normal operation. your mouse and another operational RF device to which this declaration...
.... This equipment generates, uses, and can be notified that may not apply to "Start" then "Programs" and select "Belkin F8E825-USB mini wireless optical mouse". 2. Compliance with this device complies with RSS 139 & RSS 210 Industry Canada. To determine the type of transmitter, check...be used in such manner that the product, F8E825-USB, to avoid interference. 3. All trade names are not expressly approved by Belkin Components may encounter some "Locked File Detected" screens during normal operation. your mouse and another operational RF device to which this declaration...

F8E825veaUSB Manual
Page 1
MiniWireless Optical Mouse Navigate your notebook with optical precision and wireless freedom EN User Manual FR Manuel de l'utilisateur : DE Benutzerhandbuch NL Handleiding ES Manual de usuario IT Manuale utente www.belkin.co.uk/support 10ea_F8E825veaUSB_man.indd 1 F8E825veaUSB 15/2/05 4:35:06
MiniWireless Optical Mouse Navigate your notebook with optical precision and wireless freedom EN User Manual FR Manuel de l'utilisateur : DE Benutzerhandbuch NL Handleiding ES Manual de usuario IT Manuale utente www.belkin.co.uk/support 10ea_F8E825veaUSB_man.indd 1 F8E825veaUSB 15/2/05 4:35:06

F8E825veaUSB Manual
Page 4
CAUTION! • Be sure to open the top cap. (fig. 1) (fig. 1-1) 2 3 2. section Battery Installation 1 1. Replace the top cap and close it. Press the button to check polarity (+ or - Insert 2 AAA batteries. (fig. 1-2) 4 5 6 3. sign) and insert battery properly. • Make sure battery type is AAA alkaline (1.5V). • Remove the batteries if mouse will not be in use for a long time. • Each time you replace the batteries, repeat the mouse setup by following the "setup for linkage" (fig. 5). 4 10ea_F8E825veaUSB_man.indd 4 15/2/05 4:35:06
CAUTION! • Be sure to open the top cap. (fig. 1) (fig. 1-1) 2 3 2. section Battery Installation 1 1. Replace the top cap and close it. Press the button to check polarity (+ or - Insert 2 AAA batteries. (fig. 1-2) 4 5 6 3. sign) and insert battery properly. • Make sure battery type is AAA alkaline (1.5V). • Remove the batteries if mouse will not be in use for a long time. • Each time you replace the batteries, repeat the mouse setup by following the "setup for linkage" (fig. 5). 4 10ea_F8E825veaUSB_man.indd 4 15/2/05 4:35:06

F8E825veaUSB Manual
Page 5
Shut down the computer. 1 2. While traveling, please switch off the unit to the USB port on the PC. (fig. 2) 2 3 3. Switch on the power of the mouse. (fig. 4) CAUTION! Turn on the backside of the wireless mouse located on the PC. 5. section Hardware Installation 1. Connect the receiver either directly or with the USB extension cable to save battery power. (fig. 4) 5 10ea_F8E825veaUSB_man.indd 5 15/2/05 4:35:07 Place the receiver beside the notebook or desktop PC. (fig. 3) 4 5 6 4.
Shut down the computer. 1 2. While traveling, please switch off the unit to the USB port on the PC. (fig. 2) 2 3 3. Switch on the power of the mouse. (fig. 4) CAUTION! Turn on the backside of the wireless mouse located on the PC. 5. section Hardware Installation 1. Connect the receiver either directly or with the USB extension cable to save battery power. (fig. 4) 5 10ea_F8E825veaUSB_man.indd 5 15/2/05 4:35:07 Place the receiver beside the notebook or desktop PC. (fig. 3) 4 5 6 4.

F8E825veaUSB Manual
Page 6
... type "X:\ setup" (replace "X" with the correct drive letter for your CD-ROM drive. 2. section Driver Installation 1 1. CAUTION: 5 Some computers running Windows® 98 will show a mouse icon in the bottom right-hand corner of the driver. 6 6 10ea_F8E825veaUSB_man.indd 6 15/2/05 4:35:07 Then follow through the on- 3 screen instructions to finish...
... type "X:\ setup" (replace "X" with the correct drive letter for your CD-ROM drive. 2. section Driver Installation 1 1. CAUTION: 5 Some computers running Windows® 98 will show a mouse icon in the bottom right-hand corner of the driver. 6 6 10ea_F8E825veaUSB_man.indd 6 15/2/05 4:35:07 Then follow through the on- 3 screen instructions to finish...

F8E825veaUSB Manual
Page 7
IMPORTANT: FIRST, PRESS THE CONNECT BUTTON OF THE MOUSE; NEVER REVERSE THIS PROCEDURE. 3 4 5 3. If setup time exceeds one minute. THEN PRESS THE CONNECT BUTTON 2 OF THE RECEIVER (fig. 5). As soon as the linkage is pressed, the 6 LED inside the receiver willlight. The setup must be completed within one minute, repeat procedure. When the connect button of the mouse at the receiver. 1 2. section 7 10ea_F8E825veaUSB_man.indd 7 15/2/05 4:35:07 Aim the front point of the receiver is completed, the LED will go off. 4. ID Setup 1.
IMPORTANT: FIRST, PRESS THE CONNECT BUTTON OF THE MOUSE; NEVER REVERSE THIS PROCEDURE. 3 4 5 3. If setup time exceeds one minute. THEN PRESS THE CONNECT BUTTON 2 OF THE RECEIVER (fig. 5). As soon as the linkage is pressed, the 6 LED inside the receiver willlight. The setup must be completed within one minute, repeat procedure. When the connect button of the mouse at the receiver. 1 2. section 7 10ea_F8E825veaUSB_man.indd 7 15/2/05 4:35:07 Aim the front point of the receiver is completed, the LED will go off. 4. ID Setup 1.

F8E825veaUSB Manual
Page 8
...beginning the next. ENVIRONMENT To avoid environmental interference, which may impair the RF communication and shorten the communication distance. 2. The optical sensor of the mouse pointer 4 2. You must 6 complete the setup for hot keys and zooming -Motion: set up, press "Yes" to avoid interference. 3. ...device to store the new setup. 5 SETUP FOR MULTI-USERS When using more than one MiniWireless Optical Mouse in the same location, set up the speed of the mouse will shorten the effective operation distance, please note the following functions: -Button: set up for either right...
...beginning the next. ENVIRONMENT To avoid environmental interference, which may impair the RF communication and shorten the communication distance. 2. The optical sensor of the mouse pointer 4 2. You must 6 complete the setup for hot keys and zooming -Motion: set up, press "Yes" to avoid interference. 3. ...device to store the new setup. 5 SETUP FOR MULTI-USERS When using more than one MiniWireless Optical Mouse in the same location, set up the speed of the mouse will shorten the effective operation distance, please note the following functions: -Button: set up for either right...

F8E825veaUSB Manual
Page 9
... during the uninstall. You should then see the "uninstall" option. Then follow the on screen instructions to "Start" then "Programs" and select "Belkin F8E825veaUSB mini wireless optical mouse". 2. When using a USB port, you may need your Windows 98 installation CD. Please repeat the ID setup process. 5 TECHNICAL SPECIFICATIONS Works with Windows 98, 2000...
... during the uninstall. You should then see the "uninstall" option. Then follow the on screen instructions to "Start" then "Programs" and select "Belkin F8E825veaUSB mini wireless optical mouse". 2. When using a USB port, you may need your Windows 98 installation CD. Please repeat the ID setup process. 5 TECHNICAL SPECIFICATIONS Works with Windows 98, 2000...

F8E825veaUSB Manual
Page 44
Starparc Building • Boeing Avenue 333 1119 PH Schiphol-Rijk • The Netherlands Tel: +31 (0) 20 654 7300 Belkin Tech Support Europe: 00 800 223 55 460 Belkin SAS 5 Rue du Petit Robinson • 3ème étage 78350 Jouy en Josas • France Tel: +33 (0) 1 34 ... All rights reserved. and other countries. All trade names are trademarks of Broadcom Corporation in the U.S. and other countries. MiniWireless Optical Mouse Belkin Ltd. P74810ea 10ea_F8E825veaUSB_man.indd 44 15/2/05 4:35:13 Express Business Park • Shipton Way Rushden • NN10 6GL •...
Starparc Building • Boeing Avenue 333 1119 PH Schiphol-Rijk • The Netherlands Tel: +31 (0) 20 654 7300 Belkin Tech Support Europe: 00 800 223 55 460 Belkin SAS 5 Rue du Petit Robinson • 3ème étage 78350 Jouy en Josas • France Tel: +33 (0) 1 34 ... All rights reserved. and other countries. All trade names are trademarks of Broadcom Corporation in the U.S. and other countries. MiniWireless Optical Mouse Belkin Ltd. P74810ea 10ea_F8E825veaUSB_man.indd 44 15/2/05 4:35:13 Express Business Park • Shipton Way Rushden • NN10 6GL •...


