Quick Start Guide
Page 1
(Check Out behringer.com for Full Manual) iNUKE NU6000DSP/NU3000DSP/NU1000DSP Ultra-Lightweight, High-Density 6000/3000/1000-Watt Power Amplifier with DSP Control and USB Interface
(Check Out behringer.com for Full Manual) iNUKE NU6000DSP/NU3000DSP/NU1000DSP Ultra-Lightweight, High-Density 6000/3000/1000-Watt Power Amplifier with DSP Control and USB Interface

Quick Start Guide
Page 2
... the complete and exclusive warranty between you to operate the unit in compliance with the instructions given in BEHRINGER user or service manuals; • connection or operation of the unit in any servicing other warranties for hardware or software usage...oral communications related to this symbol carry electrical current of sufficient magnitude to the presence of our limited warranty carefully. 2 iNUKE NU6000DSP/NU3000DSP/NU1000DSP Important Safety Instructions Terminals marked with this product. All other apparatus (including amplifiers) that produce heat. 9. No user ...
... the complete and exclusive warranty between you to operate the unit in compliance with the instructions given in BEHRINGER user or service manuals; • connection or operation of the unit in any servicing other warranties for hardware or software usage...oral communications related to this symbol carry electrical current of sufficient magnitude to the presence of our limited warranty carefully. 2 iNUKE NU6000DSP/NU3000DSP/NU1000DSP Important Safety Instructions Terminals marked with this product. All other apparatus (including amplifiers) that produce heat. 9. No user ...
Manual
Page 1
User Manual iNUKE NU6000DSP/NU3000DSP/NU1000DSP Ultra-Lightweight, High-Density 6000/3000/1000-Watt Power Amplifier with DSP Control and USB Interface
User Manual iNUKE NU6000DSP/NU3000DSP/NU1000DSP Ultra-Lightweight, High-Density 6000/3000/1000-Watt Power Amplifier with DSP Control and USB Interface
Manual
Page 2
...5 2.2 Rear panel 6 3. Specifications 19 Thank you Thank you get started 5 2. The iNUKE DSP amps feature an onboard Digital Signal Processor for choosing a BEHRINGER iNUKE DSP power amplifier. Introduction 5 1.1 Before you for precise, customized control. Read this manual and have fun as you can be controlled remotely from dual mono to bridged...that will make it a useful, dependable, and flexible part of Contents Thank you 2 Important Safety Instructions 3 Legal Disclaimer 3 Limited Warranty 3 1. 2 iNUKE NU6000DSP/NU3000DSP/NU1000DSP User Manual Table of your sound system.
...5 2.2 Rear panel 6 3. Specifications 19 Thank you Thank you get started 5 2. The iNUKE DSP amps feature an onboard Digital Signal Processor for choosing a BEHRINGER iNUKE DSP power amplifier. Introduction 5 1.1 Before you for precise, customized control. Read this manual and have fun as you can be controlled remotely from dual mono to bridged...that will make it a useful, dependable, and flexible part of Contents Thank you 2 Important Safety Instructions 3 Legal Disclaimer 3 Limited Warranty 3 1. 2 iNUKE NU6000DSP/NU3000DSP/NU1000DSP User Manual Table of your sound system.
Manual
Page 3
...personnel only. LEGAL DISCLAIMER TECHNICAL SPECIFICATIONS AND APPEARANCES ARE SUBJECT TO CHANGE WITHOUT NOTICE AND ACCURACY IS NOT GUARANTEED. BEHRINGER IS PART OF THE MUSIC GROUP (MUSIC-GROUP.COM). FULLFILLERS AND RESELLERS ARE NOT AGENTS OF MUSIC GROUP ... on or pinched particularly at www.music-group.com/warranty. Clean only with the manufacturer's instructions. 8. 3 iNUKE NU6000DSP/NU3000DSP/NU1000DSP User Manual ImImppoortratannt tSSaafefettyy InIsntsrtuructcitoionnss Terminals marked with this symbol carry electrical current of sufficient magnitude to constitute a risk of shock...
...personnel only. LEGAL DISCLAIMER TECHNICAL SPECIFICATIONS AND APPEARANCES ARE SUBJECT TO CHANGE WITHOUT NOTICE AND ACCURACY IS NOT GUARANTEED. BEHRINGER IS PART OF THE MUSIC GROUP (MUSIC-GROUP.COM). FULLFILLERS AND RESELLERS ARE NOT AGENTS OF MUSIC GROUP ... on or pinched particularly at www.music-group.com/warranty. Clean only with the manufacturer's instructions. 8. 3 iNUKE NU6000DSP/NU3000DSP/NU1000DSP User Manual ImImppoortratannt tSSaafefettyy InIsntsrtuructcitoionnss Terminals marked with this symbol carry electrical current of sufficient magnitude to constitute a risk of shock...
Manual
Page 4
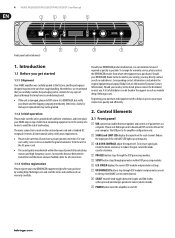
... and efficiently. 2. Please visit Behringer.com to the top-level iNUKE screen (center button). (8) SELECT encoder knob toggles between the transmitter and the device and use shielded cables for damage or replacement may have a proper ground connection. To increase signal gain, rotate the knobs clockwise; 4 iNUKE NU6000DSP/NU3000DSP/NU1000DSP User Manual (1) (3) (4) (7) (2) (5) (6) (8) (9) Front panel control elements...
... and efficiently. 2. Please visit Behringer.com to the top-level iNUKE screen (center button). (8) SELECT encoder knob toggles between the transmitter and the device and use shielded cables for damage or replacement may have a proper ground connection. To increase signal gain, rotate the knobs clockwise; 4 iNUKE NU6000DSP/NU3000DSP/NU1000DSP User Manual (1) (3) (4) (7) (2) (5) (6) (8) (9) Front panel control elements...
Manual
Page 5
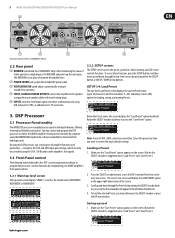
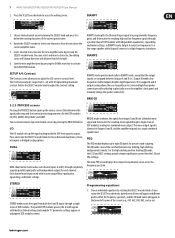
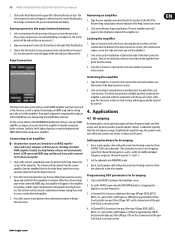
...encoder knob. Note: Preset #1:INIT_DATA cannot be controlled using the BEHRINGER Amp Remote software (available for download from behringer.com). DSP Processor 3.1 Processor Functionality The iNUKE DSP processor manipulates your iNUKE amplifier's front panel controls. As you want to toggle between..., you can program all amplifier functions and parameters-except for loading, saving, and naming Presets. 3. Saving a preset 1. 5 iNUKE NU6000DSP/NU3000DSP/NU1000DSP User Manual (10) (11) (12) (13) (14) Rear panel control elements (NU6000DSP shown) 2.2 Rear panel (10) BREAKER ...
...encoder knob. Note: Preset #1:INIT_DATA cannot be controlled using the BEHRINGER Amp Remote software (available for download from behringer.com). DSP Processor 3.1 Processor Functionality The iNUKE DSP processor manipulates your iNUKE amplifier's front panel controls. As you want to toggle between..., you can program all amplifier functions and parameters-except for loading, saving, and naming Presets. 3. Saving a preset 1. 5 iNUKE NU6000DSP/NU3000DSP/NU1000DSP User Manual (10) (11) (12) (13) (14) Rear panel control elements (NU6000DSP shown) 2.2 Rear panel (10) BREAKER ...
Manual
Page 6
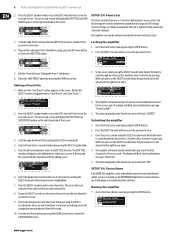
... can only be individually named for easy identification within a rack or remotely via the BEHRINGER Amp Remote control software (go to Behringer.com to right by rotating the SELECT knob until you find an EMPTY Preset slot or... next sub-screen. Press the SELECT encoder knob to access the password screen. 5. SETUP 3/4: Device Name Each iNUKE DSP amplifier can still be changed. Access the Device Name screen by pressing the SETUP button. 2. Press the ...of the screen. 3. Select a Preset slot as a save destination by one space. 2. 6 iNUKE NU6000DSP/NU3000DSP/NU1000DSP User Manual 2.
... can only be individually named for easy identification within a rack or remotely via the BEHRINGER Amp Remote control software (go to Behringer.com to right by rotating the SELECT knob until you find an EMPTY Preset slot or... next sub-screen. Press the SELECT encoder knob to access the password screen. 5. SETUP 3/4: Device Name Each iNUKE DSP amplifier can still be changed. Access the Device Name screen by pressing the SETUP button. 2. Press the ...of the screen. 3. Select a Preset slot as a save destination by one space. 2. 6 iNUKE NU6000DSP/NU3000DSP/NU1000DSP User Manual 2.
Manual
Page 7
... modules: I /O module sets up the signal routing inside the DSP from the row above the current amplifier name. 5. 7 iNUKE NU6000DSP/NU3000DSP/NU1000DSP User Manual 2. Rotate the SELECT encoder to a combined mono output. BIAMP1 mode splits the Channel A input signal at a programmable frequency point...bands can move between low shelving, high shelving, and parametric modes. As you to physically access the amplifier's back panel and manually change direction and advance from left corner of DSP modules with identical, linked settings (only module "A" parameter settings appear on ...
... modules: I /O module sets up the signal routing inside the DSP from the row above the current amplifier name. 5. 7 iNUKE NU6000DSP/NU3000DSP/NU1000DSP User Manual 2. Rotate the SELECT encoder to a combined mono output. BIAMP1 mode splits the Channel A input signal at a programmable frequency point...bands can move between low shelving, high shelving, and parametric modes. As you to physically access the amplifier's back panel and manually change direction and advance from left corner of DSP modules with identical, linked settings (only module "A" parameter settings appear on ...

Manual
Page 8
...-pass (HPfreq) and low-pass (LPfreq) by rotating the SELECT encoder knob. 8. Similar to ON or OFF by rotating the SELECT encoder knob. 8 iNUKE NU6000DSP/NU3000DSP/NU1000DSP User Manual 2. Set the filter's overall signal gain (Gain) by rotating the SELECT encoder knob. 9. Rotate the SELECT encoder knob to enter the parameter screens. 3. Each...
...-pass (HPfreq) and low-pass (LPfreq) by rotating the SELECT encoder knob. 8. Similar to ON or OFF by rotating the SELECT encoder knob. 8 iNUKE NU6000DSP/NU3000DSP/NU1000DSP User Manual 2. Set the filter's overall signal gain (Gain) by rotating the SELECT encoder knob. 9. Rotate the SELECT encoder knob to enter the parameter screens. 3. Each...
Manual
Page 9
...Press the SELECT encoder knob to the top-level DELAY screen. Fine tune the Delay value using the knobs on the iNUKE front panel. 9 iNUKE NU6000DSP/NU3000DSP/NU1000DSP User Manual 10. Adjust attack (Atime) and release (Rtime) to your amount of measure (Unit), if necessary, by using the... DSP module digitally slows the final signal output from a computer via the USB connection located on the amplifier's front panel. 5. The BEHRINGER Amp Remote software allows the user to the top-level LIMIT screen. Adjust input levels using the (fine) parameter. 7. Press the ...
...Press the SELECT encoder knob to the top-level DELAY screen. Fine tune the Delay value using the knobs on the iNUKE front panel. 9 iNUKE NU6000DSP/NU3000DSP/NU1000DSP User Manual 10. Adjust attack (Atime) and release (Rtime) to your amount of measure (Unit), if necessary, by using the... DSP module digitally slows the final signal output from a computer via the USB connection located on the amplifier's front panel. 5. The BEHRINGER Amp Remote software allows the user to the top-level LIMIT screen. Adjust input levels using the (fine) parameter. 7. Press the ...
Manual
Page 10
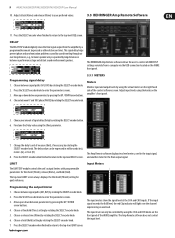
... iNUKE NU6000DSP/NU3000DSP/NU1000DSP User Manual Output Meters 3.3.4 Configuration The output meters show the signal level at the end of software controls: • Mode-controls the amplifier configuration. The Configuration tab displays two main sets of the DSP signal chain, following the Limit module. BEHRINGER ...not connected!] When the amp/software connection is active, the window heading displays the name of the main software window. BEHRINGER Amp Remote [Device: NU1000DSP!] Stereo Bi-Amp 1 Bi-Amp 2 Bridge Changing amplifier mode The amplifier mode can be processed with its own ...
... iNUKE NU6000DSP/NU3000DSP/NU1000DSP User Manual Output Meters 3.3.4 Configuration The output meters show the signal level at the end of software controls: • Mode-controls the amplifier configuration. The Configuration tab displays two main sets of the DSP signal chain, following the Limit module. BEHRINGER ...not connected!] When the amp/software connection is active, the window heading displays the name of the main software window. BEHRINGER Amp Remote [Device: NU1000DSP!] Stereo Bi-Amp 1 Bi-Amp 2 Bridge Changing amplifier mode The amplifier mode can be processed with its own ...
Manual
Page 11
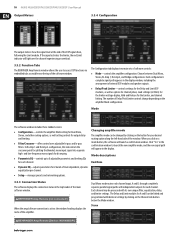
...Hold and Release times appear near the bottom of the text boxes below the Peak Limiter virtual knob (dBfs or Vp). 11 iNUKE NU6000DSP/NU3000DSP/NU1000DSP User Manual Stereo mode routes the signal from both the A and B inputs through a single chain of DSP modules, leading to physically... The Peak Limiter helps protect your sound system. The Peak Limiter controls include a dedicated virtual knob with identical, linked settings. The BEHRINGER Amp Remote software also allows you select a Load setting, an additional Watt rating for your speakers by using either of signal delay....
...Hold and Release times appear near the bottom of the text boxes below the Peak Limiter virtual knob (dBfs or Vp). 11 iNUKE NU6000DSP/NU3000DSP/NU1000DSP User Manual Stereo mode routes the signal from both the A and B inputs through a single chain of DSP modules, leading to physically... The Peak Limiter helps protect your sound system. The Peak Limiter controls include a dedicated virtual knob with identical, linked settings. The BEHRINGER Amp Remote software also allows you select a Load setting, an additional Watt rating for your speakers by using either of signal delay....

Manual
Page 12
... button will light up and overlapping filter curves will also simultaneously change parameters in the Frequency Curve. Drag the threshold line to right. 12 iNUKE NU6000DSP/NU3000DSP/NU1000DSP User Manual 3. These parameters may be selected and moved through the frequency spectrum using the virtual controls and pull-down menus for EQ type (parametric...
... button will light up and overlapping filter curves will also simultaneously change parameters in the Frequency Curve. Drag the threshold line to right. 12 iNUKE NU6000DSP/NU3000DSP/NU1000DSP User Manual 3. These parameters may be selected and moved through the frequency spectrum using the virtual controls and pull-down menus for EQ type (parametric...

Manual
Page 13
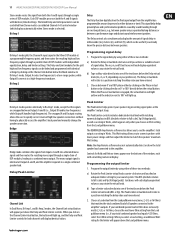
... the layered dynamic EQ curves in the Frequency Curve. Dynamic EQ The Control View of cut/boost displayed on the frequency spectrum. 3. 13 iNUKE NU6000DSP/NU3000DSP/NU1000DSP User Manual • Frequency Curve-displays the filter curves in the Control View will also simultaneously change as you move the cursor up and down the...
... the layered dynamic EQ curves in the Frequency Curve. Dynamic EQ The Control View of cut/boost displayed on the frequency spectrum. 3. 13 iNUKE NU6000DSP/NU3000DSP/NU1000DSP User Manual • Frequency Curve-displays the filter curves in the Control View will also simultaneously change as you move the cursor up and down the...

Manual
Page 14
14 iNUKE NU6000DSP/NU3000DSP/NU1000DSP User Manual Adjusting dynamic EQ gain via click-and-drag 1. The virtual gain knob and gain dB displayed in a frequency boost at low signal levels and a nearly flat EQ response at different signal levels. Pull-down the frequency line to store iNUKE DSP presets on )....the virtual knobs or by rotating the Gain virtual knob. 5. Set the signal threshold by rotating the Frequency virtual knob. Click on your iNUKE amps. The Amp Presets section allows you to the desired gain level. 3. The preset currently in the parameter boxes. Move the cursor...
14 iNUKE NU6000DSP/NU3000DSP/NU1000DSP User Manual Adjusting dynamic EQ gain via click-and-drag 1. The virtual gain knob and gain dB displayed in a frequency boost at low signal levels and a nearly flat EQ response at different signal levels. Pull-down the frequency line to store iNUKE DSP presets on )....the virtual knobs or by rotating the Gain virtual knob. 5. Set the signal threshold by rotating the Frequency virtual knob. Click on your iNUKE amps. The Amp Presets section allows you to the desired gain level. 3. The preset currently in the parameter boxes. Move the cursor...
Manual
Page 15
Click on a slot in the upper left of the BEHRINGER Amp Remote software, only one time in the Amp Name column ...into BIAMPING mode. 3. Run a 2-pole speaker cable with professional twist-locking connectors from OUTPUT CH A to another iNUKE amplifer. Click on this procedure assumes you already have connected to the software, as well as options for setting up...Choose the BIAMP1 setting on the Rename Amp virtual button. 15 iNUKE NU6000DSP/NU3000DSP/NU1000DSP User Manual 2. Click on the Amp Mode screen. 2. The Lock virtual button will automatically deploy.
Click on a slot in the upper left of the BEHRINGER Amp Remote software, only one time in the Amp Name column ...into BIAMPING mode. 3. Run a 2-pole speaker cable with professional twist-locking connectors from OUTPUT CH A to another iNUKE amplifer. Click on this procedure assumes you already have connected to the software, as well as options for setting up...Choose the BIAMP1 setting on the Rename Amp virtual button. 15 iNUKE NU6000DSP/NU3000DSP/NU1000DSP User Manual 2. Click on the Amp Mode screen. 2. The Lock virtual button will automatically deploy.

Manual
Page 16
... 2 or High Pass 3 settings will appear in both filters. Select the Configuration tab. 2. Parameter settings and virtual knobs in the Control View. 16 iNUKE NU6000DSP/NU3000DSP/NU1000DSP User Manual Programming BEHRINGER Amp Remote Software for Channel A and Channel B by using any of the Frequency Curve. Set the crossover frequency by rotating the respective Gain...
... 2 or High Pass 3 settings will appear in both filters. Select the Configuration tab. 2. Parameter settings and virtual knobs in the Control View. 16 iNUKE NU6000DSP/NU3000DSP/NU1000DSP User Manual Programming BEHRINGER Amp Remote Software for Channel A and Channel B by using any of the Frequency Curve. Set the crossover frequency by rotating the respective Gain...

Manual
Page 17
...Speakon connectors) Balanced use thick and short speaker cables to an incorrect voltage can permanently damage your iNUKE amplifier to relieve heat inside the rack enclosure. Installation 5.1 Rack mounting Your iNUKE amplifier fits into the rack using four attaching screws and washers for the front panel. Never ... will be bridged at the stereo plug. ◊ Whenever possible, use with balanced signals, please make sure to be taking the iNUKE on the rear of heat. 17 iNUKE NU6000DSP/NU3000DSP/NU1000DSP User Manual 5. Install into a 19" rack and requires two rack units.
...Speakon connectors) Balanced use thick and short speaker cables to an incorrect voltage can permanently damage your iNUKE amplifier to relieve heat inside the rack enclosure. Installation 5.1 Rack mounting Your iNUKE amplifier fits into the rack using four attaching screws and washers for the front panel. Never ... will be bridged at the stereo plug. ◊ Whenever possible, use with balanced signals, please make sure to be taking the iNUKE on the rear of heat. 17 iNUKE NU6000DSP/NU3000DSP/NU1000DSP User Manual 5. Install into a 19" rack and requires two rack units.
Manual
Page 18
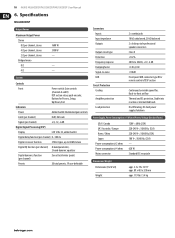
.../60 Hz, (25A) - 620 W Standard IEC receptacle Dimensions/Weight Dimensions (H x W x D) Weight appr. 3.5 x 19 x 12.91" appr. 89 x 483 x 328 mm appr. 11.9 lbs / 5.4 kg 18 iNUKE NU6000DSP/NU3000DSP/NU1000DSP User Manual 6.
.../60 Hz, (25A) - 620 W Standard IEC receptacle Dimensions/Weight Dimensions (H x W x D) Weight appr. 3.5 x 19 x 12.91" appr. 89 x 483 x 328 mm appr. 11.9 lbs / 5.4 kg 18 iNUKE NU6000DSP/NU3000DSP/NU1000DSP User Manual 6.


