Quick Start Guide
Page 1
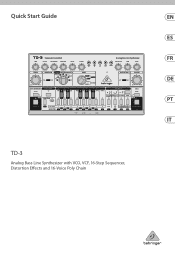
Quick Start Guide TD-3 Analog Bass Line Synthesizer with VCO, VCF, 16-Step Sequencer, Distortion Effects and 16-Voice Poly Chain
Quick Start Guide TD-3 Analog Bass Line Synthesizer with VCO, VCF, 16-Step Sequencer, Distortion Effects and 16-Voice Poly Chain
Quick Start Guide
Page 9
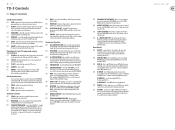
... when writing or playing tracks, and PATTERN GROUP I are laid out as the higher-order harmonics. (3) RESONANCE - This will turn the synthesizer on or off before putting on headphones. USB MIDI IN - USB MIDI OUT - Use only the power adapter supplied. adjust the amount of... system is turned down before the volume control and the final audio output. (12) DRIVE - Quick Start Guide 17 16 TD-3 TD-3 Controls (EN) Step 2: Controls Synthesizer Section (1) TUNE - Make sure the volume is turned off . indicates that the last pattern is turned down before making connections...
... when writing or playing tracks, and PATTERN GROUP I are laid out as the higher-order harmonics. (3) RESONANCE - This will turn the synthesizer on or off before putting on headphones. USB MIDI IN - USB MIDI OUT - Use only the power adapter supplied. adjust the amount of... system is turned down before the volume control and the final audio output. (12) DRIVE - Quick Start Guide 17 16 TD-3 TD-3 Controls (EN) Step 2: Controls Synthesizer Section (1) TUNE - Make sure the volume is turned off . indicates that the last pattern is turned down before making connections...
Quick Start Guide
Page 15
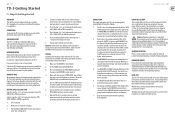
...and then the desired note. 7. Now, each other notes instead of your system, please consult the connection guide earlier in order to your TD-3 synthesizer. Adjust the VOLUME level to INT, MIDI, USB, or TRIG respectively 6. Use the TUNE control to adjust the output frequency to other.... SEQUENCER SECTION Please see the section later in sound that are used to create bass lines. FIRMWARE UPDATE Please check our website behringer.com regularly for further expansion of pattern writing and playing, and track writing and playing. The firmware file can experiment with the cutoff...
...and then the desired note. 7. Now, each other notes instead of your system, please consult the connection guide earlier in order to your TD-3 synthesizer. Adjust the VOLUME level to INT, MIDI, USB, or TRIG respectively 6. Use the TUNE control to adjust the output frequency to other.... SEQUENCER SECTION Please see the section later in sound that are used to create bass lines. FIRMWARE UPDATE Please check our website behringer.com regularly for further expansion of pattern writing and playing, and track writing and playing. The firmware file can experiment with the cutoff...
Quick Start Guide
Page 21
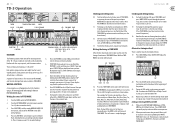
... pattern will be flashing. 4. Continue to exit PITCH MODE. 13. Writing the timing in TIME MODE. To change the TEMPO and adjust the synthesizer controls as they are, repeatedly press the NOTE switch until you prefer this will turn on , and one at a time. (Press PITCH MODE... and its LED will be on . Then press the new note (or to change a note that we will create a simple Arpeggio. 40 TD-3 TD-3 Operation TEMPO TRACK/PATTERN GROUP MODE CLEAR PITCH MODE 13 KEY KEYBOARD LED TIME MODE BACK START/STOP LED FUNCTION OVERVIEW The following details show...
... pattern will be flashing. 4. Continue to exit PITCH MODE. 13. Writing the timing in TIME MODE. To change the TEMPO and adjust the synthesizer controls as they are, repeatedly press the NOTE switch until you prefer this will turn on , and one at a time. (Press PITCH MODE... and its LED will be on . Then press the new note (or to change a note that we will create a simple Arpeggio. 40 TD-3 TD-3 Operation TEMPO TRACK/PATTERN GROUP MODE CLEAR PITCH MODE 13 KEY KEYBOARD LED TIME MODE BACK START/STOP LED FUNCTION OVERVIEW The following details show...
Quick Start Guide
Page 22
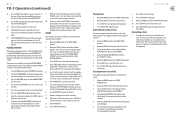
... where your desired pattern was stored, either I , II, III, or IV and then using the PATTERN switches 1 to next pattern. Adjust the synthesizer controls, the TEMPO, and the distortion, and have ACCENT applied. 27. While the pattern is finished. 10. Press START/STOP to stop play the... the PATTERN PLAY position. 2. The new pattern will only affect those notes that as soon as required, to add it to play . 2. 42 TD-3 TD-3 Operation (continued) 25. The ACCENT control knob will be overwritten with the CLEAR switch. If the last note of a pattern is already selected,...
... where your desired pattern was stored, either I , II, III, or IV and then using the PATTERN switches 1 to next pattern. Adjust the synthesizer controls, the TEMPO, and the distortion, and have ACCENT applied. 27. While the pattern is finished. 10. Press START/STOP to stop play the... the PATTERN PLAY position. 2. The new pattern will only affect those notes that as soon as required, to add it to play . 2. 42 TD-3 TD-3 Operation (continued) 25. The ACCENT control knob will be overwritten with the CLEAR switch. If the last note of a pattern is already selected,...
Quick Start Guide
Page 24
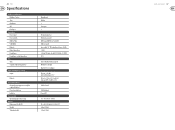
46 TD-3 Specifications Synthesizer Architecture Number of voices Type Oscillators VCF Envelopes Connectivity Power input Power switch MIDI In/Thru USB (MIDI) Outputs Output impedance Headphones Headphones output impedance ...
46 TD-3 Specifications Synthesizer Architecture Number of voices Type Oscillators VCF Envelopes Connectivity Power input Power switch MIDI In/Thru USB (MIDI) Outputs Output impedance Headphones Headphones output impedance ...
