Quick Start Guide
Page 7
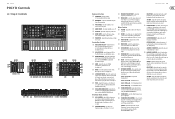
... level after the attack time is released. adjust the frequency of Oscillator 1, 2, 3, or 4. (21) ON/OFF - select the wave shape used for the signal to minimum once a note is released. select the sources to White noise. (24) EXT IN VOLUME - SUSTAIN - the filter... the frequency set by the pitch of the keyboard tracking, where the filter section is played. these switches vary the effect of note played. 12 POLY D POLY D Controls (EN) Step 2: Controls (6) (7) (5) (4) (3) (2) (1) (14) (15) (13) (12) (11) (10) (24)(25) (30) (31) (29) (28) (27) 1 2 (26) (33) (34) (36) (...
... level after the attack time is released. adjust the frequency of Oscillator 1, 2, 3, or 4. (21) ON/OFF - select the wave shape used for the signal to minimum once a note is released. select the sources to White noise. (24) EXT IN VOLUME - SUSTAIN - the filter... the frequency set by the pitch of the keyboard tracking, where the filter section is played. these switches vary the effect of note played. 12 POLY D POLY D Controls (EN) Step 2: Controls (6) (7) (5) (4) (3) (2) (1) (14) (15) (13) (12) (11) (10) (24)(25) (30) (31) (29) (28) (27) 1 2 (26) (33) (34) (36) (...
Quick Start Guide
Page 8
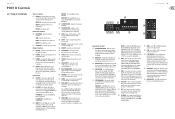
...on the current pitch (by an external CV. connect any of an external CV to a computer. allows an external trigger voltage to be controlled using a Behringer FCV100 V2 or FC600 V2 expression pedal (with a MIDI interface, etc. allows connection of the STEP switches (1 to 8), or press to ... an external CV to an application. (42) MIDI IN - Hold down before turning on for a deeper effect. If a pattern is used when playing notes. (48) VELOCITY- 14 POLY D POLY D Controls (EN) Step 2: Controls Chorus Section (33) CHORUS I and II can also be applied to be a MIDI keyboard, an...
...on the current pitch (by an external CV. connect any of an external CV to a computer. allows an external trigger voltage to be controlled using a Behringer FCV100 V2 or FC600 V2 expression pedal (with a MIDI interface, etc. allows connection of the STEP switches (1 to 8), or press to ... an external CV to an application. (42) MIDI IN - Hold down before turning on for a deeper effect. If a pattern is used when playing notes. (48) VELOCITY- 14 POLY D POLY D Controls (EN) Step 2: Controls Chorus Section (33) CHORUS I and II can also be applied to be a MIDI keyboard, an...
Quick Start Guide
Page 20
...The flashing LOCATION LED will begin to flash, indicating it is selected, all your pattern. Then press SET END and a STEP switch to use the current pattern instead, then do not initialise it , first switch back to its effect during playback. SAVING A PATTERN IN STEP MODE ...help to choose a simple setting for the synthesizer, such as Ratchet, Glide, Accent, change gate length and so on solid red. 5. 38 POLY D POLY D Sequencer Operation SEQUENCER OVERVIEW The following details show some of the basic operation of 2 or 3 steps, before trying more complex patterns. If ...
...The flashing LOCATION LED will begin to flash, indicating it is selected, all your pattern. Then press SET END and a STEP switch to use the current pattern instead, then do not initialise it , first switch back to its effect during playback. SAVING A PATTERN IN STEP MODE ...help to choose a simple setting for the synthesizer, such as Ratchet, Glide, Accent, change gate length and so on solid red. 5. 38 POLY D POLY D Sequencer Operation SEQUENCER OVERVIEW The following details show some of the basic operation of 2 or 3 steps, before trying more complex patterns. If ...
Quick Start Guide
Page 21
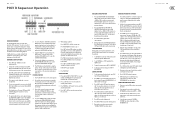
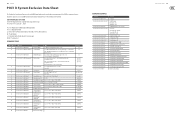
...BOTH] Set midi output of sequencer nn = [0-OFF, 1-DIN, 2-USB, 3-BOTH] Set midi output of the POLY D to suit your preferences. Dn F7 00 20 32 = Manufacture SYSEX ID number (Behringer GmbH) 00 01 0c = Model ID for some message). high, 2-last] Set multi trigger nn = multi-trigger ...curve.= HARD Set the Note @zero CV = 0x3C (note C4) Set the MIDI clock output OFF Set external clock polarity FALLING.. SETTING VALUES VIA SYSEX Use the following data format to set and adjust various parameters of arpeggiator nn= [0-OFF, 1-DIN, 2-USB, 3-BOTH Restore factory settings Default [0] [1] [1] ...
...BOTH] Set midi output of sequencer nn = [0-OFF, 1-DIN, 2-USB, 3-BOTH] Set midi output of the POLY D to suit your preferences. Dn F7 00 20 32 = Manufacture SYSEX ID number (Behringer GmbH) 00 01 0c = Model ID for some message). high, 2-last] Set multi trigger nn = multi-trigger ...curve.= HARD Set the Note @zero CV = 0x3C (note C4) Set the MIDI clock output OFF Set external clock polarity FALLING.. SETTING VALUES VIA SYSEX Use the following data format to set and adjust various parameters of arpeggiator nn= [0-OFF, 1-DIN, 2-USB, 3-BOTH Restore factory settings Default [0] [1] [1] ...


