Manual
Page 1
User Manual iNUKE NU6000DSP/NU3000DSP/NU1000DSP Ultra-Lightweight, High-Density 6000/3000/1000-Watt Power Amplifier with DSP Control and USB Interface
User Manual iNUKE NU6000DSP/NU3000DSP/NU1000DSP Ultra-Lightweight, High-Density 6000/3000/1000-Watt Power Amplifier with DSP Control and USB Interface
Manual
Page 2
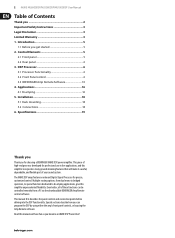
...NU6000DSP/NU3000DSP/NU1000DSP User Manual Table of your sound system. Control Elements 5 2.1 Front panel 5 2.2 Rear panel 6 3. Installation 18 5.1 Rack mounting 18 5.2 Connections 18 6. Specifications 19 Thank you Thank you become an iNUKE DSP Power User! Read this amplifier unprecedented flexibility. The iNUKE DSP amps feature an onboard Digital Signal Processor for choosing a BEHRINGER... iNUKE DSP power amplifier. This manual first describes the panel controls and connection points before delving ...
...NU6000DSP/NU3000DSP/NU1000DSP User Manual Table of your sound system. Control Elements 5 2.1 Front panel 5 2.2 Rear panel 6 3. Installation 18 5.1 Rack mounting 18 5.2 Connections 18 6. Specifications 19 Thank you Thank you become an iNUKE DSP Power User! Read this amplifier unprecedented flexibility. The iNUKE DSP amps feature an onboard Digital Signal Processor for choosing a BEHRINGER... iNUKE DSP power amplifier. This manual first describes the panel controls and connection points before delving ...
Manual
Page 3
...have to dripping or splashing liquids and no objects filled with liquids, such as radiators, heat registers, stoves, or other . BEHRINGER IS PART OF THE MUSIC GROUP (MUSIC-GROUP.COM). FULLFILLERS AND RESELLERS ARE NOT AGENTS OF MUSIC GROUP AND HAVE ABSOLUTELY ...the manufacturer. When a cart is used as the disconnect device, the disconnect device shall remain readily operable. 3 iNUKE NU6000DSP/NU3000DSP/NU1000DSP User Manual ImImppoortratannt tSSaafefettyy InIsntsrtuructcitoionnss Terminals marked with this apparatus near any heat sources such as vases, shall be placed on or pinched...
...have to dripping or splashing liquids and no objects filled with liquids, such as radiators, heat registers, stoves, or other . BEHRINGER IS PART OF THE MUSIC GROUP (MUSIC-GROUP.COM). FULLFILLERS AND RESELLERS ARE NOT AGENTS OF MUSIC GROUP AND HAVE ABSOLUTELY ...the manufacturer. When a cart is used as the disconnect device, the disconnect device shall remain readily operable. 3 iNUKE NU6000DSP/NU3000DSP/NU1000DSP User Manual ImImppoortratannt tSSaafefettyy InIsntsrtuructcitoionnss Terminals marked with this apparatus near any heat sources such as vases, shall be placed on or pinched...
Manual
Page 4
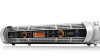
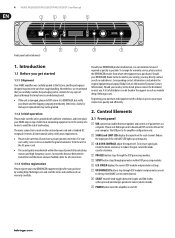
... sure the unit is made via computer. Please visit Behringer.com to avoid the risk of our warranty carefully. 4 iNUKE NU6000DSP/NU3000DSP/NU1000DSP User Manual (1) (3) (4) (7) (2) (5) (6) (8) (9) Front panel control elements 1. For your BEHRINGER dealer not be found in the vicinity of a heater...use shielded cables for each channel. It meets all connections. 1.1.3 Online registration Please register your new BEHRINGER equipment right after your BEHRINGER product malfunction, it repaired as quickly as possible. Should your own safety, never remove or disable ...
... sure the unit is made via computer. Please visit Behringer.com to avoid the risk of our warranty carefully. 4 iNUKE NU6000DSP/NU3000DSP/NU1000DSP User Manual (1) (3) (4) (7) (2) (5) (6) (8) (9) Front panel control elements 1. For your BEHRINGER dealer not be found in the vicinity of a heater...use shielded cables for each channel. It meets all connections. 1.1.3 Online registration Please register your new BEHRINGER equipment right after your BEHRINGER product malfunction, it repaired as quickly as possible. Should your own safety, never remove or disable ...
Manual
Page 5
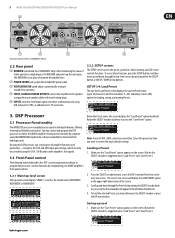
...functions by pressing either press the SELECT encoder or press the UP arrow button. Subsidiary screens offer options for download from behringer.com). By using professional speaker cables with twist-locking plugs. (14) INPUTS route line-level input signals into these ...preset, panel lock, device naming, and LCD screen contrast functions. 5 iNUKE NU6000DSP/NU3000DSP/NU1000DSP User Manual (10) (11) (12) (13) (14) Rear panel control elements (NU6000DSP shown) 2.2 Rear panel (10) BREAKER (automated fuse, NU6000DSP only). You may either the SETUP button or the UP / DOWN arrow ...
...functions by pressing either press the SELECT encoder or press the UP arrow button. Subsidiary screens offer options for download from behringer.com). By using professional speaker cables with twist-locking plugs. (14) INPUTS route line-level input signals into these ...preset, panel lock, device naming, and LCD screen contrast functions. 5 iNUKE NU6000DSP/NU3000DSP/NU1000DSP User Manual (10) (11) (12) (13) (14) Rear panel control elements (NU6000DSP shown) 2.2 Rear panel (10) BREAKER (automated fuse, NU6000DSP only). You may either the SETUP button or the UP / DOWN arrow ...
Manual
Page 6
... cursor will automatically unlock when you select the final character for easy identification within a rack or remotely via the BEHRINGER Amp Remote control software (go to Behringer.com to right by using the SELECT encoder knob. With each press on the next sub-screen. SETUP 3/4: ...with the editing cursor. 4. Press the SELECT encoder knob to scroll through the Preset list by pressing the SETUP button. 6 iNUKE NU6000DSP/NU3000DSP/NU1000DSP User Manual 2. Edit the Preset title (see "Editing the Preset" title below with alphanumeric characters in a row at the top and the ...
... cursor will automatically unlock when you select the final character for easy identification within a rack or remotely via the BEHRINGER Amp Remote control software (go to Behringer.com to right by using the SELECT encoder knob. With each press on the next sub-screen. SETUP 3/4: ...with the editing cursor. 4. Press the SELECT encoder knob to scroll through the Preset list by pressing the SETUP button. 6 iNUKE NU6000DSP/NU3000DSP/NU1000DSP User Manual 2. Edit the Preset title (see "Editing the Preset" title below with alphanumeric characters in a row at the top and the ...
Manual
Page 7
... mono signal through a parallel chain of the screen (e.g., A#1, A#2, B#1, B#2, and so on subsequent DSP module screens). As you to physically access the amplifier's back panel and manually change direction and advance from Inputs A and B into the new amplifier name by pressing the PROCESS button. BIAMP1 mode splits the Channel A input signal at... EQ bands, the LS12 and HS12 settings provide steeper equalization curves than the LS6 and HS6 settings. I/O The I /O, PEQ, XOVER, DEQ, DELAY, and LIMIT. 7 iNUKE NU6000DSP/NU3000DSP/NU1000DSP User Manual 2.
... mono signal through a parallel chain of the screen (e.g., A#1, A#2, B#1, B#2, and so on subsequent DSP module screens). As you to physically access the amplifier's back panel and manually change direction and advance from Inputs A and B into the new amplifier name by pressing the PROCESS button. BIAMP1 mode splits the Channel A input signal at... EQ bands, the LS12 and HS12 settings provide steeper equalization curves than the LS6 and HS6 settings. I/O The I /O, PEQ, XOVER, DEQ, DELAY, and LIMIT. 7 iNUKE NU6000DSP/NU3000DSP/NU1000DSP User Manual 2.

Manual
Page 8
.... 8. Press the SELECT encoder when finished to return to enter the parameter screens. 3. Press the SELECT encoder knob to the top-level XOVER screen. 6. 8 iNUKE NU6000DSP/NU3000DSP/NU1000DSP User Manual 2.
.... 8. Press the SELECT encoder when finished to return to enter the parameter screens. 3. Press the SELECT encoder knob to the top-level XOVER screen. 6. 8 iNUKE NU6000DSP/NU3000DSP/NU1000DSP User Manual 2.
Manual
Page 9
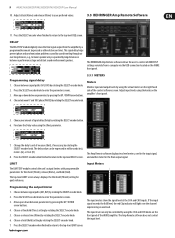
9 iNUKE NU6000DSP/NU3000DSP/NU1000DSP User Manual 10. Choose between speaker arrays separated by pressing the UP / DOWN arrow... can be controlled by using the virtual meters on the iNUKE front panel. Choose your preferred values. 3.3 BEHRINGER Amp Remote Software 11. The Amp Remote software does not control the input level. Press the SELECT encoder ... to control all iNUKE DSP settings remotely from the amplifier by rotating the SELECT encoder knob. 2. The BEHRINGER Amp Remote software allows the user to the top-level DELAY screen. Move up or down between 0°...
9 iNUKE NU6000DSP/NU3000DSP/NU1000DSP User Manual 10. Choose between speaker arrays separated by pressing the UP / DOWN arrow... can be controlled by using the virtual meters on the iNUKE front panel. Choose your preferred values. 3.3 BEHRINGER Amp Remote Software 11. The Amp Remote software does not control the input level. Press the SELECT encoder ... to control all iNUKE DSP settings remotely from the amplifier by rotating the SELECT encoder knob. 2. The BEHRINGER Amp Remote software allows the user to the top-level DELAY screen. Move up or down between 0°...
Manual
Page 10
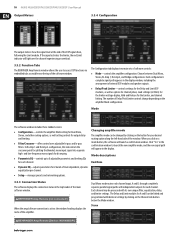
10 iNUKE NU6000DSP/NU3000DSP/NU1000DSP User Manual Output Meters 3.3.4 Configuration The output meters show the signal ...and limiting. • Filter/Crossover-offers control over the channel experiencing an overload. 3.3.2 Function Tabs The BEHRINGER Amp Remote window allows the user to launch the new amplifier mode, and the new signal path will ...-Amp 1 Bi-Amp 2 Bridge Choose between Dual Mono, Stereo, Bi-Amp 1, Bi-Amp 2, and Bridge configurations. BEHRINGER Amp Remote [not connected!] When the amp/software connection is active, the window heading displays the name of internal DSP ...
10 iNUKE NU6000DSP/NU3000DSP/NU1000DSP User Manual Output Meters 3.3.4 Configuration The output meters show the signal ...and limiting. • Filter/Crossover-offers control over the channel experiencing an overload. 3.3.2 Function Tabs The BEHRINGER Amp Remote window allows the user to launch the new amplifier mode, and the new signal path will ...-Amp 1 Bi-Amp 2 Bridge Choose between Dual Mono, Stereo, Bi-Amp 1, Bi-Amp 2, and Bridge configurations. BEHRINGER Amp Remote [not connected!] When the amp/software connection is active, the window heading displays the name of internal DSP ...
Manual
Page 11
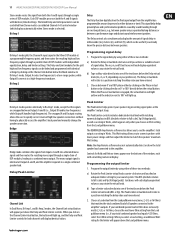
... below the virtual button. When you have entered. 2. The Delay virtual knob will display identical values. 2. Choose between speakers. The BEHRINGER Amp Remote software also allows you to a position matching the delay value you click on 0° or 180° directly below the... signals can be useful if you rotate the virtual knob. Programming the output limiter 1. When you have entered. 11 iNUKE NU6000DSP/NU3000DSP/NU1000DSP User Manual Stereo mode routes the signal from the Load pulldown menu (i.e., if your total combined speaker load equals 4.25 Ohms, select ...
... below the virtual button. When you have entered. 2. The Delay virtual knob will display identical values. 2. Choose between speakers. The BEHRINGER Amp Remote software also allows you to a position matching the delay value you click on 0° or 180° directly below the... signals can be useful if you rotate the virtual knob. Programming the output limiter 1. When you have entered. 11 iNUKE NU6000DSP/NU3000DSP/NU1000DSP User Manual Stereo mode routes the signal from the Load pulldown menu (i.e., if your total combined speaker load equals 4.25 Ohms, select ...

Manual
Page 12
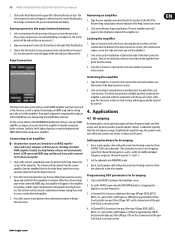
... knob controls for Type (Butterworth, Bessel, Linkwitz-Riley) and Slope (6-48 dB). b) adjust the Low Pass 2 or High Pass 3 virtual knobs; 12 iNUKE NU6000DSP/NU3000DSP/NU1000DSP User Manual 3. Activate the Bi-Amp 1 or Bi-Amp 2 settings on the numbered box at the top of these threshold points can be altered by either...
... knob controls for Type (Butterworth, Bessel, Linkwitz-Riley) and Slope (6-48 dB). b) adjust the Low Pass 2 or High Pass 3 virtual knobs; 12 iNUKE NU6000DSP/NU3000DSP/NU1000DSP User Manual 3. Activate the Bi-Amp 1 or Bi-Amp 2 settings on the numbered box at the top of these threshold points can be altered by either...

Manual
Page 13
... at the top of EQ frequencies and gain. Click and hold on the numbered box at every 10 dB (0 to right. 13 iNUKE NU6000DSP/NU3000DSP/NU1000DSP User Manual • Frequency Curve-displays the filter curves in visual form, and allows click-and-drag manipulation of the desired dynamic EQ band frequency line...
... at the top of EQ frequencies and gain. Click and hold on the numbered box at every 10 dB (0 to right. 13 iNUKE NU6000DSP/NU3000DSP/NU1000DSP User Manual • Frequency Curve-displays the filter curves in visual form, and allows click-and-drag manipulation of the desired dynamic EQ band frequency line...

Manual
Page 14
... tab allows you to upload presets from the Type pulldown menu. 2. Set the signal threshold by rotating the Gain virtual knob. 5. 14 iNUKE NU6000DSP/NU3000DSP/NU1000DSP User Manual Adjusting dynamic EQ gain via click-and-drag 1. PC Presets The PC Presets section allows you to manage connections and settings for your PC...
... tab allows you to upload presets from the Type pulldown menu. 2. Set the signal threshold by rotating the Gain virtual knob. 5. 14 iNUKE NU6000DSP/NU3000DSP/NU1000DSP User Manual Adjusting dynamic EQ gain via click-and-drag 1. PC Presets The PC Presets section allows you to manage connections and settings for your PC...
Manual
Page 15
... and then ask if you already have connected to approximately 100 Hz. Press the Search virtual button near the bottom of the BEHRINGER Amp Remote software, only one time in the amplifier list window, and the amp's internal presets will disappear and be deployed ... the gain level (Gain) to the Recall button. A subwoofer typically takes the low frequency range. Unlocking the amplifier 1. 15 iNUKE NU6000DSP/NU3000DSP/NU1000DSP User Manual 2. The selected preset's name will appear in the preset will appear in the selected slot in the preset list. Saving a preset ...
... and then ask if you already have connected to approximately 100 Hz. Press the Search virtual button near the bottom of the BEHRINGER Amp Remote software, only one time in the amplifier list window, and the amp's internal presets will disappear and be deployed ... the gain level (Gain) to the Recall button. A subwoofer typically takes the low frequency range. Unlocking the amplifier 1. 15 iNUKE NU6000DSP/NU3000DSP/NU1000DSP User Manual 2. The selected preset's name will appear in the preset will appear in the selected slot in the preset list. Saving a preset ...

Manual
Page 16
... below either Low Pass 2 or High Pass 3 (the software defaults to the Low Pass 2 or High Pass 3 settings will up up . 3. 16 iNUKE NU6000DSP/NU3000DSP/NU1000DSP User Manual Programming BEHRINGER Amp Remote Software for Channel A and Channel B by using any of the Frequency Curve. Choose a filter slope setting from either the Low Pass...
... below either Low Pass 2 or High Pass 3 (the software defaults to the Low Pass 2 or High Pass 3 settings will up up . 3. 16 iNUKE NU6000DSP/NU3000DSP/NU1000DSP User Manual Programming BEHRINGER Amp Remote Software for Channel A and Channel B by using any of the Frequency Curve. Choose a filter slope setting from either the Low Pass...

Manual
Page 17
... of heat. The lower connector, the 2+ pin, carries signal from the rear to the front vents to the mains Always connect your amp. 17 iNUKE NU6000DSP/NU3000DSP/NU1000DSP User Manual 5. Installation 5.1 Rack mounting Your iNUKE amplifier fits into a 19" rack and requires two rack units.
... of heat. The lower connector, the 2+ pin, carries signal from the rear to the front vents to the mains Always connect your amp. 17 iNUKE NU6000DSP/NU3000DSP/NU1000DSP User Manual 5. Installation 5.1 Rack mounting Your iNUKE amplifier fits into a 19" rack and requires two rack units.
Manual
Page 18
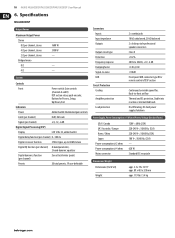
... EQ function (per channel) 8-band parametric, 2-band dynamic equalizer Digital dynamics function (per channel, stereo Bridged mono 8 Ω 4 Ω 1600 W 3100 W - - - 18 iNUKE NU6000DSP/NU3000DSP/NU1000DSP User Manual 6. Specifications NU6000DSP Output Power Maximum Output Power Stereo 8 Ω per channel, stereo 4 Ω per channel, stereo 2 Ω per channel) Zero attack limiter (peak) Presets 20...
... EQ function (per channel) 8-band parametric, 2-band dynamic equalizer Digital dynamics function (per channel, stereo Bridged mono 8 Ω 4 Ω 1600 W 3100 W - - - 18 iNUKE NU6000DSP/NU3000DSP/NU1000DSP User Manual 6. Specifications NU6000DSP Output Power Maximum Output Power Stereo 8 Ω per channel, stereo 4 Ω per channel, stereo 2 Ω per channel) Zero attack limiter (peak) Presets 20...

Manual
Page 19
19 iNUKE NU6000DSP/NU3000DSP/NU1000DSP User Manual NU3000DSP Output Power Maximum Output Power Stereo 8 Ω per channel, stereo 4 Ω per channel, stereo 2 Ω per channel, stereo Bridged mono 8 Ω 4 Ω 440 W 820 W ...
19 iNUKE NU6000DSP/NU3000DSP/NU1000DSP User Manual NU3000DSP Output Power Maximum Output Power Stereo 8 Ω per channel, stereo 4 Ω per channel, stereo 2 Ω per channel, stereo Bridged mono 8 Ω 4 Ω 440 W 820 W ...

Manual
Page 20
20 iNUKE NU6000DSP/NU3000DSP/NU1000DSP User Manual NU1000DSP Output Power Maximum Output Power Stereo 8 Ω per channel, stereo 4 Ω per channel, stereo 2 Ω per channel, stereo Bridged mono 8 Ω 4 Ω 160 W 310 W ...
20 iNUKE NU6000DSP/NU3000DSP/NU1000DSP User Manual NU1000DSP Output Power Maximum Output Power Stereo 8 Ω per channel, stereo 4 Ω per channel, stereo 2 Ω per channel, stereo Bridged mono 8 Ω 4 Ω 160 W 310 W ...
