

Tutorial
Page 15
..., task-oriented drawing environment. To obtain more information, see the AutoCAD Civil 3D Help topic Workspaces. If you can work , you must set up the workspace 1 On the command line, enter WORKSPACE. 2 At the Workspace Option prompt, enter C. 3 When prompted to the Autodesk Documents folder (page 819). 3 Click File menu ➤ New ➤ Folder...
..., task-oriented drawing environment. To obtain more information, see the AutoCAD Civil 3D Help topic Workspaces. If you can work , you must set up the workspace 1 On the command line, enter WORKSPACE. 2 At the Workspace Option prompt, enter C. 3 When prompted to the Autodesk Documents folder (page 819). 3 Click File menu ➤ New ➤ Folder...

Tutorial
Page 17
...Viewer. Each type of data displayed in the tutorial drawings folder (page 819). In AutoCAD Civil 3D, design data is specific to see the AutoCAD Civil 3D Help topic The Civil 3D User Interface. In Toolspace, the Prospector tab displays the hierarchy of object styles, including styles... for creating and managing civil design information. The AutoCAD Civil 3D user interface enhances the standard AutoCAD ...
...Viewer. Each type of data displayed in the tutorial drawings folder (page 819). In AutoCAD Civil 3D, design data is specific to see the AutoCAD Civil 3D Help topic The Civil 3D User Interface. In Toolspace, the Prospector tab displays the hierarchy of object styles, including styles... for creating and managing civil design information. The AutoCAD Civil 3D user interface enhances the standard AutoCAD ...
Tutorial
Page 18
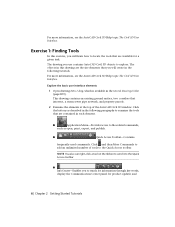
For more information, see the AutoCAD Civil 3D Help topic The Civil 3D User Interface. For more information, see the AutoCAD Civil 3D Help topic The Civil 3D User Interface. The objects in this exercise, you to search for information through key words, display the Communication Center panel for a given task. This...In this drawing are contained in the following tutorials. The drawing you will learn how to locate the tools that you use contains AutoCAD Civil 3D objects to add an unlimited number of the AutoCAD Civil 3D window. Click and then More Commands to explore.
For more information, see the AutoCAD Civil 3D Help topic The Civil 3D User Interface. For more information, see the AutoCAD Civil 3D Help topic The Civil 3D User Interface. The objects in this exercise, you to search for information through key words, display the Communication Center panel for a given task. This...In this drawing are contained in the following tutorials. The drawing you will learn how to locate the tools that you use contains AutoCAD Civil 3D objects to add an unlimited number of the AutoCAD Civil 3D window. Click and then More Commands to explore.

Tutorial
Page 21
... 2: Understanding the Toolspace (page 9). For more information, see the AutoCAD Civil 3D Help topic The Toolspace Window. This exercise continues from Exercise 1: Finding Tools (page 6). The Corridors tab is removed. Exercise 2: Understanding the Toolspace In this tutorial, go to use the AutoCAD Civil 3D Toolspace, which provides an object-oriented view of your engineering data...
... 2: Understanding the Toolspace (page 9). For more information, see the AutoCAD Civil 3D Help topic The Toolspace Window. This exercise continues from Exercise 1: Finding Tools (page 6). The Corridors tab is removed. Exercise 2: Understanding the Toolspace In this tutorial, go to use the AutoCAD Civil 3D Toolspace, which provides an object-oriented view of your engineering data...

Tutorial
Page 24
To continue this exercise, you will learn how you can use and customize the Panorama window. For more information, see the AutoCAD Civil 3D Help topic The Panorama Window. This tutorial continues from the previous tutorial. 1 Use the Pan and Zoom controls to Exercise 3: Using the Panorama Window (page 12). ...
To continue this exercise, you will learn how you can use and customize the Panorama window. For more information, see the AutoCAD Civil 3D Help topic The Panorama Window. This tutorial continues from the previous tutorial. 1 Use the Pan and Zoom controls to Exercise 3: Using the Panorama Window (page 12). ...

Tutorial
Page 29
... on . Dynamic Input Dynamic input is active. Tutorial: Viewing AutoCAD Civil 3D Objects This tutorial demonstrates several ways to Viewing AutoCAD Civil 3D Objects (page 17). For more information about dynamic input, see the AutoCAD Help topic Use 3D Viewing Tools. To continue to the next tutorial, go to display ..., click on the status bar at the bottom of ways to toggle off the dynamic input feature. Experiment with OSNAPs 1 Press F1 to open AutoCAD Civil 3D Help. 2 In the left pane, click Search. 3 In the Type In The Word(s) To Search For field, enter Osnap. 4 In the Select ...
... on . Dynamic Input Dynamic input is active. Tutorial: Viewing AutoCAD Civil 3D Objects This tutorial demonstrates several ways to Viewing AutoCAD Civil 3D Objects (page 17). For more information about dynamic input, see the AutoCAD Help topic Use 3D Viewing Tools. To continue to the next tutorial, go to display ..., click on the status bar at the bottom of ways to toggle off the dynamic input feature. Experiment with OSNAPs 1 Press F1 to open AutoCAD Civil 3D Help. 2 In the left pane, click Search. 3 In the Type In The Word(s) To Search For field, enter Osnap. 4 In the Select ...

Tutorial
Page 31
... this tutorial, you will examine the style settings that affect how an object is displaying a specific view to which you want to see the AutoCAD Civil 3D Help topic Object Styles.
... this tutorial, you will examine the style settings that affect how an object is displaying a specific view to which you want to see the AutoCAD Civil 3D Help topic Object Styles.
Tutorial
Page 37
...handling tasks at the time that points are created or imported. NOTE All drawings used in these tutorials, save the drawings to the My Civil Tutorial Data folder (page 819) so that as they are imported into a drawing from an existing file. A description key uses the...of a point to determine how to sort the points as the points are created, they are sorted into more information, see the AutoCAD Civil 3D Help topic Understanding Points. You will create description keys and point groups to process the point. Tutorial: Creating Point Data This tutorial demonstrates several...
...handling tasks at the time that points are created or imported. NOTE All drawings used in these tutorials, save the drawings to the My Civil Tutorial Data folder (page 819) so that as they are imported into a drawing from an existing file. A description key uses the...of a point to determine how to sort the points as the points are created, they are sorted into more information, see the AutoCAD Civil 3D Help topic Understanding Points. You will create description keys and point groups to process the point. Tutorial: Creating Point Data This tutorial demonstrates several...

Tutorial
Page 38
Data created in Autodesk Land Desktop can create a large point set 1 Open Points-1.dwg, which is ...from a project database. For more information, see the AutoCAD Civil 3D Help topic Creating Points. In the DescKey Editor, you will enter the raw description codes, and specify how AutoCAD Civil 3D handles new points that have these codes. Right-click Stormwater Keys...rather than the whole set is created. For more information, see the AutoCAD Civil 3D Help topic Description Keys. The new description key set . Points can be migrated to POND*. 26 | Chapter 3 Points Tutorials
Data created in Autodesk Land Desktop can create a large point set 1 Open Points-1.dwg, which is ...from a project database. For more information, see the AutoCAD Civil 3D Help topic Creating Points. In the DescKey Editor, you will enter the raw description codes, and specify how AutoCAD Civil 3D handles new points that have these codes. Right-click Stormwater Keys...rather than the whole set is created. For more information, see the AutoCAD Civil 3D Help topic Description Keys. The new description key set . Points can be migrated to POND*. 26 | Chapter 3 Points Tutorials

Tutorial
Page 39
... Format column, enter STORM MH. The asterisk is a wild-card character. Clearing these settings by using point group properties. For more information, see the AutoCAD Civil 3D Help topic Point Groups. Exercise 2: Creating Point Groups In this tutorial, go to open the Layer Selection dialog box. 5 In the Layer Selection dialog box, select...
... Format column, enter STORM MH. The asterisk is a wild-card character. Clearing these settings by using point group properties. For more information, see the AutoCAD Civil 3D Help topic Point Groups. Exercise 2: Creating Point Groups In this tutorial, go to open the Layer Selection dialog box. 5 In the Layer Selection dialog box, select...

Tutorial
Page 40
... description keys and point groups shown in the previous exercise. 1 In Toolspace, on both the Include and Query Builder tabs. A point can see the AutoCAD Civil 3D Help topic The _All Points Point Group. This exercise continues from Exercise 1: Creating Description Keys (page 26). NOTE The _All Points point group is recorded on...
... description keys and point groups shown in the previous exercise. 1 In Toolspace, on both the Include and Query Builder tabs. A point can see the AutoCAD Civil 3D Help topic The _All Points Point Group. This exercise continues from Exercise 1: Creating Description Keys (page 26). NOTE The _All Points point group is recorded on...

Tutorial
Page 41
For more information, see the AutoCAD Civil 3D Help topic Importing and Exporting Points. Select points.mdb. This is because they have Exercise 3: Importing Points from a Database (page 29). To continue this exercise, you ...
For more information, see the AutoCAD Civil 3D Help topic Importing and Exporting Points. Select points.mdb. This is because they have Exercise 3: Importing Points from a Database (page 29). To continue this exercise, you ...

Tutorial
Page 43
...into specific point groups, every point in the Prospector list view when the point group is a useful way to see the AutoCAD Civil 3D Help topic Controlling the Appearance of the point. This exercise continues from other points in relation to other AutoCAD entities. Then, you can...precedence. For example, if a point belongs to a point group that can be assigned by using a description key. To see the AutoCAD Help topic Attach Drawing References (Xrefs). The point layer can reference another drawing of points. You can be individually selected and manipulated. For more ...
...into specific point groups, every point in the Prospector list view when the point group is a useful way to see the AutoCAD Civil 3D Help topic Controlling the Appearance of the point. This exercise continues from other points in relation to other AutoCAD entities. Then, you can...precedence. For example, if a point belongs to a point group that can be assigned by using a description key. To see the AutoCAD Help topic Attach Drawing References (Xrefs). The point layer can reference another drawing of points. You can be individually selected and manipulated. For more ...

Tutorial
Page 44
Navigate to detach the external reference. The basemap appears on the screen, allowing you to see the AutoCAD Civil 3D Help topic Changing the Properties of a Point Group. Point styles can open Existing Basemap.dwg. In a later exercise, you will change the style of a point group. ... Tutorials Display an externally referenced drawing NOTE This exercise uses Points-1a.dwg with the modifications you made in the previous tutorial, or you can help you distinguish the points more information, see the points of interest in the drawing.
Navigate to detach the external reference. The basemap appears on the screen, allowing you to see the AutoCAD Civil 3D Help topic Changing the Properties of a Point Group. Point styles can open Existing Basemap.dwg. In a later exercise, you will change the style of a point group. ... Tutorials Display an externally referenced drawing NOTE This exercise uses Points-1a.dwg with the modifications you made in the previous tutorial, or you can help you distinguish the points more information, see the points of interest in the drawing.

Tutorial
Page 45
... style (X). 2 In Toolspace, on the Information tab, change the appearance of points. Labels for several POND points and one or more information, see the AutoCAD Civil 3D Help topic Changing the Point Group Display Order. Exercise 3: Changing Point Group Display Order In this tutorial, go to change the Point Label Style to Storm...
... style (X). 2 In Toolspace, on the Information tab, change the appearance of points. Labels for several POND points and one or more information, see the AutoCAD Civil 3D Help topic Changing the Point Group Display Order. Exercise 3: Changing Point Group Display Order In this tutorial, go to change the Point Label Style to Storm...

Tutorial
Page 48
... the drawing. Click the grip above the drag label grip. Notice that the label for point 992 is similar to a more information, see the AutoCAD Civil 3D Help topic Editing Points. This toggles the display of individual points. 4 Under Information, select Catch Basin in the Style property. The AutoCAD Properties palette displays the...
... the drawing. Click the grip above the drag label grip. Notice that the label for point 992 is similar to a more information, see the AutoCAD Civil 3D Help topic Editing Points. This toggles the display of individual points. 4 Under Information, select Catch Basin in the Style property. The AutoCAD Properties palette displays the...

Tutorial
Page 49
...it as date of individual points or by editing the properties of acquisition or source. For more information, see the AutoCAD Civil 3D Help topic User-Defined Property Classifications. The drawing is located in an unobstructed area. Click to points. You assign classifications and their...this exercise, you can be any useful attribute, such as a custom, user-defined property. For more information, see the AutoCAD Civil 3D Help topic User-Defined Property Classifications. To continue to the next tutorial, go to Adding User-Defined Properties to the points in the ...
...it as date of individual points or by editing the properties of acquisition or source. For more information, see the AutoCAD Civil 3D Help topic User-Defined Property Classifications. The drawing is located in an unobstructed area. Click to points. You assign classifications and their...this exercise, you can be any useful attribute, such as a custom, user-defined property. For more information, see the AutoCAD Civil 3D Help topic User-Defined Property Classifications. To continue to the next tutorial, go to Adding User-Defined Properties to the points in the ...

Tutorial
Page 51
... Tree_Height Distance To continue this exercise, you will create a label style that displays user-defined property information for a point. For more information, see the AutoCAD Civil 3D Help topic Creating and Editing Label Styles. This exercise continues from Exercise 1: Creating User-Defined Properties (page 37). Exercise 2: Creating a Label Style That Displays a User-Defined...
... Tree_Height Distance To continue this exercise, you will create a label style that displays user-defined property information for a point. For more information, see the AutoCAD Civil 3D Help topic Creating and Editing Label Styles. This exercise continues from Exercise 1: Creating User-Defined Properties (page 37). Exercise 2: Creating a Label Style That Displays a User-Defined...

Tutorial
Page 53
... like this: 14 Click OK. 13 In the preview pane, your drawing. In the Classification column, select Manhole UDP. For more information, see the AutoCAD Civil 3D Help topic Assigning User-Defined Properties to Points (page 41). Exercise 3: Assigning User-Defined Properties to Points In this tutorial, go to Exercise 3: Assigning User-Defined...
... like this: 14 Click OK. 13 In the preview pane, your drawing. In the Classification column, select Manhole UDP. For more information, see the AutoCAD Civil 3D Help topic Assigning User-Defined Properties to Points (page 41). Exercise 3: Assigning User-Defined Properties to Points In this tutorial, go to Exercise 3: Assigning User-Defined...

Tutorial
Page 54
.... Enter 93.05. 2 Right-click the row for point 667. Click Zoom To. To continue this exercise, you do not need to see the AutoCAD Civil 3D Help topic Importing and Exporting User-Defined Property Classifications. ■ MH_Pipe In Invert ■ MH_Pipe In Material Clearing the check boxes turns off the display of...
.... Enter 93.05. 2 Right-click the row for point 667. Click Zoom To. To continue this exercise, you do not need to see the AutoCAD Civil 3D Help topic Importing and Exporting User-Defined Property Classifications. ■ MH_Pipe In Invert ■ MH_Pipe In Material Clearing the check boxes turns off the display of...