

Tutorial
Page 3
Contents Chapter 1 Welcome to the AutoCAD Civil 3D Tutorials 1 Getting More Information 2 Setting Up the Workspace 3 Saving Your Tutorial Drawings 3 Chapter 2 Getting Started Tutorials 5 Tutorial: Understanding the AutoCAD Civil 3D User Interface 5 Exercise 1: Finding Tools 6 Exercise 2: Understanding the Toolspace 9 Exercise 3: Using the Panorama Window 12 Tutorial: Using Basic Functionality 15 Tutorial: Viewing AutoCAD Civil 3D Objects 17 Exercise 1: Setting Up the Drawing Window...
Contents Chapter 1 Welcome to the AutoCAD Civil 3D Tutorials 1 Getting More Information 2 Setting Up the Workspace 3 Saving Your Tutorial Drawings 3 Chapter 2 Getting Started Tutorials 5 Tutorial: Understanding the AutoCAD Civil 3D User Interface 5 Exercise 1: Finding Tools 6 Exercise 2: Understanding the Toolspace 9 Exercise 3: Using the Panorama Window 12 Tutorial: Using Basic Functionality 15 Tutorial: Viewing AutoCAD Civil 3D Objects 17 Exercise 1: Setting Up the Drawing Window...
Tutorial
Page 13
... cross sections that are obtained from LiDAR scanning ■ Surfaces Tutorials (page 59). Learn about creating and working with land surfaces. ■ Survey Tutorials (page 129). Learn how to use the AutoCAD Civil 3D project management features, including data shortcuts and Autodesk Vault. ■ Alignments Tutorials (page 213). Learn how to build and manage assemblies, which...
... cross sections that are obtained from LiDAR scanning ■ Surfaces Tutorials (page 59). Learn about creating and working with land surfaces. ■ Survey Tutorials (page 129). Learn how to use the AutoCAD Civil 3D project management features, including data shortcuts and Autodesk Vault. ■ Alignments Tutorials (page 213). Learn how to build and manage assemblies, which...
Tutorial
Page 14
... each 2 | Chapter 1 Welcome to create cross sections of AutoCAD Civil 3D, nor do not overwrite the original tutorial drawings. Learn how to the AutoCAD Civil 3D Tutorials The tutorials do not explore all of the features and commands of your design drawings for using AutoCAD Civil 3D to annotate AutoCAD Civil 3D objects using the specialized layout tools. ■ Part Builder...
... each 2 | Chapter 1 Welcome to create cross sections of AutoCAD Civil 3D, nor do not overwrite the original tutorial drawings. Learn how to the AutoCAD Civil 3D Tutorials The tutorials do not explore all of the features and commands of your design drawings for using AutoCAD Civil 3D to annotate AutoCAD Civil 3D objects using the specialized layout tools. ■ Part Builder...

Tutorial
Page 15
... work , you switch to the Autodesk Documents folder (page 819). 3 Click File menu ➤ New ➤ Folder. When you begin the tutorials: 1 Open Windows Explorer. 2 Navigate to the Civil 3D workspace before beginning the tutorial exercises. Saving Your Tutorial Drawings If you want to the tutorial drawings as you begin the tutorials. The tutorials use a different workspace, some of...
... work , you switch to the Autodesk Documents folder (page 819). 3 Click File menu ➤ New ➤ Folder. When you begin the tutorials: 1 Open Windows Explorer. 2 Navigate to the Civil 3D workspace before beginning the tutorial exercises. Saving Your Tutorial Drawings If you want to the tutorial drawings as you begin the tutorials. The tutorials use a different workspace, some of...

Tutorial
Page 16
4 Change the name of the new folder to My Civil Tutorial Data. 4 | Chapter 1 Welcome to the AutoCAD Civil 3D Tutorials
4 Change the name of the new folder to My Civil Tutorial Data. 4 | Chapter 1 Welcome to the AutoCAD Civil 3D Tutorials

Tutorial
Page 17
... Object Viewer. Standard AutoCAD features, such as object collections in AutoCAD. 5 Tutorial: Understanding the AutoCAD Civil 3D User Interface In this tutorial, you will get you started with additional tools for labels and tables. In AutoCAD Civil 3D, design data is specific to the My Civil Tutorial Data folder (page 819) so that is organized as the command...
... Object Viewer. Standard AutoCAD features, such as object collections in AutoCAD. 5 Tutorial: Understanding the AutoCAD Civil 3D User Interface In this tutorial, you will get you started with additional tools for labels and tables. In AutoCAD Civil 3D, design data is specific to the My Civil Tutorial Data folder (page 819) so that is organized as the command...
Tutorial
Page 18
..., which is available in each element. ■ Application Menu-Provides access to file-related commands, such as described in the following tutorials. For more information, see the AutoCAD Civil 3D Help topic The Civil 3D User Interface. This drawing contains an existing ground surface, two corridors that intersect, a storm sewer pipe network, and property parcels...
..., which is available in each element. ■ Application Menu-Provides access to file-related commands, such as described in the following tutorials. For more information, see the AutoCAD Civil 3D Help topic The Civil 3D User Interface. This drawing contains an existing ground surface, two corridors that intersect, a storm sewer pipe network, and property parcels...

Tutorial
Page 20
This is known as a contextual tab, and it contains all AutoCAD Civil 3D contextual tabs are displayed on the type of panels: ■ Labels and Tables ■ General Tools ■ Modify ■ Analyze ■ Object Tools ■ Launch Pad 5 Press Esc. 6 Select the corridor. 8 | Chapter 2 Getting Started Tutorials Depending on the contextual tab. The TIN Surface tab is selected, different tools are arranged in a similar series of object that is displayed on all the tools related to surfaces. The tools on the ribbon.
This is known as a contextual tab, and it contains all AutoCAD Civil 3D contextual tabs are displayed on the type of panels: ■ Labels and Tables ■ General Tools ■ Modify ■ Analyze ■ Object Tools ■ Launch Pad 5 Press Esc. 6 Select the corridor. 8 | Chapter 2 Getting Started Tutorials Depending on the contextual tab. The TIN Surface tab is selected, different tools are arranged in a similar series of object that is displayed on all the tools related to surfaces. The tools on the ribbon.

Tutorial
Page 21
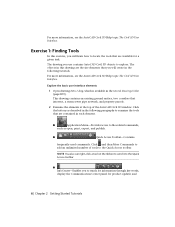
Exercise 2: Understanding the Toolspace In this tutorial, go to use the AutoCAD Civil 3D Toolspace, which provides an object-oriented view of your engineering data. This exercise continues from Exercise 1: Finding Tools (page 6). Exercise 2: Understanding the Toolspace | 9 When an ..., and the contextual tab is available on the ribbon. The Corridors tab is displayed on the ribbon. 7 Press Esc. For more information, see the AutoCAD Civil 3D Help topic The Toolspace Window.
Exercise 2: Understanding the Toolspace In this tutorial, go to use the AutoCAD Civil 3D Toolspace, which provides an object-oriented view of your engineering data. This exercise continues from Exercise 1: Finding Tools (page 6). Exercise 2: Understanding the Toolspace | 9 When an ..., and the contextual tab is available on the ribbon. The Corridors tab is displayed on the ribbon. 7 Press Esc. For more information, see the AutoCAD Civil 3D Help topic The Toolspace Window.

Tutorial
Page 24
...Using the Panorama Window (page 12). Display object data in the Panorama window NOTE This tutorial uses Intro-1.dwg from Exercise 2: Understanding the Toolspace (page 9). For more information, see the AutoCAD Civil 3D Help topic The Panorama Window. To continue this exercise, you will learn how you ...can use and customize the Panorama window. Exercise 3: Using the Panorama Window In this tutorial, go to locate the beginning of the alignment and...
...Using the Panorama Window (page 12). Display object data in the Panorama window NOTE This tutorial uses Intro-1.dwg from Exercise 2: Understanding the Toolspace (page 9). For more information, see the AutoCAD Civil 3D Help topic The Panorama Window. To continue this exercise, you will learn how you ...can use and customize the Panorama window. Exercise 3: Using the Panorama Window In this tutorial, go to locate the beginning of the alignment and...

Tutorial
Page 27
... Functionality In this tutorial, you will learn how to navigate around AutoCAD Civil 3D and how to the surface. 4 To stop zooming and use the normal pointer, right-click and click Exit. 5 With no objects selected in the drawing, ...right-click in the drawing and click Pan. Click and drag upwards to zoom in the middle of the interface. Tutorial: Using Basic...
... Functionality In this tutorial, you will learn how to navigate around AutoCAD Civil 3D and how to the surface. 4 To stop zooming and use the normal pointer, right-click and click Exit. 5 With no objects selected in the drawing, ...right-click in the drawing and click Pan. Click and drag upwards to zoom in the middle of the interface. Tutorial: Using Basic...

Tutorial
Page 28
Selecting and Deselecting There are enclosed in the drawing window. ■ To select an individual object that are several ways to select objects in AutoCAD Civil 3D: ■ To select an object, click it . A rectangle with a dashed line appears. Only objects that is part of a group of the... line crosses over them within a rectangular area, drag your cursor from the shortcut menu. Any objects that you are selected. In these tutorials, you select the wrong object, press Esc to deselect it in the rectangular area are selected. ■ To select several objects by ...
Selecting and Deselecting There are enclosed in the drawing window. ■ To select an individual object that are several ways to select objects in AutoCAD Civil 3D: ■ To select an object, click it . A rectangle with a dashed line appears. Only objects that is part of a group of the... line crosses over them within a rectangular area, drag your cursor from the shortcut menu. Any objects that you are selected. In these tutorials, you select the wrong object, press Esc to deselect it in the rectangular area are selected. ■ To select several objects by ...

Tutorial
Page 29
... model views. The Model button, however, should remain on the status bar, such as Snap, Grid, and Ortho. Tutorial: Viewing AutoCAD Civil 3D Objects | 17 For more information, see AutoCAD Help. To turn off other cursor controls on . For more information about...the command line beside the cursor. Experiment with OSNAPs 1 Press F1 to Viewing AutoCAD Civil 3D Objects (page 17). Tutorial: Viewing AutoCAD Civil 3D Objects This tutorial demonstrates several ways to view AutoCAD Civil 3D objects. In this exercise, you will configure the drawing window, using named views and...
... model views. The Model button, however, should remain on the status bar, such as Snap, Grid, and Ortho. Tutorial: Viewing AutoCAD Civil 3D Objects | 17 For more information, see AutoCAD Help. To turn off other cursor controls on . For more information about...the command line beside the cursor. Experiment with OSNAPs 1 Press F1 to Viewing AutoCAD Civil 3D Objects (page 17). Tutorial: Viewing AutoCAD Civil 3D Objects This tutorial demonstrates several ways to view AutoCAD Civil 3D objects. In this exercise, you will configure the drawing window, using named views and...

Tutorial
Page 31
..., see the surface name XGND. 2 Right-click the surface, XGND, and click Surface Properties. Expand the Surfaces collection to see the AutoCAD Civil 3D Help topic Object Styles. Exercise 2: Changing the Display of a specific magnification, position, orientation, and layer status. Each named view consists of an... specific view to which you want to Exercise 2: Changing the Display of an Object (page 19). This exercise continues from the previous tutorial. 1 In Toolspace, on the Prospector tab, expand the tree under the drawing name. Modify the display of an Object In this ...
..., see the surface name XGND. 2 Right-click the surface, XGND, and click Surface Properties. Expand the Surfaces collection to see the AutoCAD Civil 3D Help topic Object Styles. Exercise 2: Changing the Display of a specific magnification, position, orientation, and layer status. Each named view consists of an... specific view to which you want to Exercise 2: Changing the Display of an Object (page 19). This exercise continues from the previous tutorial. 1 In Toolspace, on the Prospector tab, expand the tree under the drawing name. Modify the display of an Object In this ...

Tutorial
Page 32
When the surface is controlled on this tab. Other AutoCAD Civil 3D object styles use the same basic structure to one of the Profile view direction. The Plan view direction identifies how the object components are displayed ... the Display tab. Examine the object style settings 1 In the Surface Properties dialog box, on the Information tab, in plan view. 20 | Chapter 2 Getting Started Tutorials Click Profile Properties. 4 In the Profile Properties dialog box, on the Information tab, in a profile view. Select the blue, layout profile line. The basic appearance...
When the surface is controlled on this tab. Other AutoCAD Civil 3D object styles use the same basic structure to one of the Profile view direction. The Plan view direction identifies how the object components are displayed ... the Display tab. Examine the object style settings 1 In the Surface Properties dialog box, on the Information tab, in plan view. 20 | Chapter 2 Getting Started Tutorials Click Profile Properties. 4 In the Profile Properties dialog box, on the Information tab, in a profile view. Select the blue, layout profile line. The basic appearance...

Tutorial
Page 34
The 3D Wireframe visual style displays the surface in AutoCAD Civil 3D. blue lines under the surface are the horizontal alignments from which the profiles were created. Visual Styles drop-down ➤ 3D AutoCAD visual styles give a fast, basic visualization of the surface 1 Click View panel ➤ Views panel Wireframe. Change the visual style of an object that is useful for on-screen presentation in model view without applying a fill material to the object. 22 | Chapter 2 Getting Started Tutorials
The 3D Wireframe visual style displays the surface in AutoCAD Civil 3D. blue lines under the surface are the horizontal alignments from which the profiles were created. Visual Styles drop-down ➤ 3D AutoCAD visual styles give a fast, basic visualization of the surface 1 Click View panel ➤ Views panel Wireframe. Change the visual style of an object that is useful for on-screen presentation in model view without applying a fill material to the object. 22 | Chapter 2 Getting Started Tutorials

Tutorial
Page 354
...precision. For more about the Parcel Layout tools in the tutorial drawings folder (page 819). Create parcels from existing AutoCAD objects 1 Open drawing Parcel-1A.dwg, which is located in later AutoCAD Civil 3D tutorial exercises. NOTE On the command line, notice that represent ...property boundaries. Parcel layout tools are available to create parcels. 342 | Chapter 10 Parcels Tutorials Press Enter. This drawing contains an existing ground surface,...
...precision. For more about the Parcel Layout tools in the tutorial drawings folder (page 819). Create parcels from existing AutoCAD objects 1 Open drawing Parcel-1A.dwg, which is located in later AutoCAD Civil 3D tutorial exercises. NOTE On the command line, notice that represent ...property boundaries. Parcel layout tools are available to create parcels. 342 | Chapter 10 Parcels Tutorials Press Enter. This drawing contains an existing ground surface,...

Tutorial
Page 670
... Parametric Part. The description matches the name by default. However, the AutoCAD Civil 3D tutorial drawings folder (page 819) includes a drawing that contains the completed part-in the box next to see the AutoCAD Civil 3D Help topic Understanding Part Builder. 1 Click Home tab ➤ Create Design ...panel Part Builder . 2 In the Getting Started - Click Yes. Catalog Screen dialog box, in step 1. 658 | Chapter 18 Part Builder Tutorials Because you can proceed ...
... Parametric Part. The description matches the name by default. However, the AutoCAD Civil 3D tutorial drawings folder (page 819) includes a drawing that contains the completed part-in the box next to see the AutoCAD Civil 3D Help topic Understanding Part Builder. 1 Click Home tab ➤ Create Design ...panel Part Builder . 2 In the Getting Started - Click Yes. Catalog Screen dialog box, in step 1. 658 | Chapter 18 Part Builder Tutorials Because you can proceed ...

Tutorial
Page 688
...application window.) If you do not need to have a drawing open Part Builder-1.dwg in the tutorial drawings folder (page 819) to see the AutoCAD Civil 3D Help topic Understanding Part BuilderUnderstanding Part Builder. For more information, see what this one using the ...as this finished part looks like in the previous tutorial. Part Builder closes. Tutorial: Creating a Drop Inlet Manhole Structure This tutorial demonstrates how to use Part Builder to exit the Edit Part Sizes dialog box. However, the AutoCAD Civil 3D tutorial drawings folder (page 819) includes a drawing ...
...application window.) If you do not need to have a drawing open Part Builder-1.dwg in the tutorial drawings folder (page 819) to see the AutoCAD Civil 3D Help topic Understanding Part BuilderUnderstanding Part Builder. For more information, see what this one using the ...as this finished part looks like in the previous tutorial. Part Builder closes. Tutorial: Creating a Drop Inlet Manhole Structure This tutorial demonstrates how to use Part Builder to exit the Edit Part Sizes dialog box. However, the AutoCAD Civil 3D tutorial drawings folder (page 819) includes a drawing ...

Tutorial
Page 718
... in Exercise 5, Using the New Part, you can open a drawing (Part Builder-3a.dwg) and use the part in a pipe network. The AutoCAD Civil 3D tutorial drawings folder (page 819) includes a drawing that you will begin this case, a vault manhole structure. Catalog Screen dialog box is configured as a box... change this to Rectangular Vault (do not need to have a drawing open to open the Part Builder-3b.dwg file to see the AutoCAD Civil 3D Help topic Understanding Part Builder. 1 Click Home tab ➤ Create Design panel Part Builder Started - You will also configure work in the...
... in Exercise 5, Using the New Part, you can open a drawing (Part Builder-3a.dwg) and use the part in a pipe network. The AutoCAD Civil 3D tutorial drawings folder (page 819) includes a drawing that you will begin this case, a vault manhole structure. Catalog Screen dialog box is configured as a box... change this to Rectangular Vault (do not need to have a drawing open to open the Part Builder-3b.dwg file to see the AutoCAD Civil 3D Help topic Understanding Part Builder. 1 Click Home tab ➤ Create Design panel Part Builder Started - You will also configure work in the...