
User Manual
Page 1
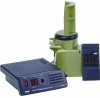
...runs, use with power lines while it back into the housing. 4. Doublecheck the wiring order. CAUTION: Select a mounting location where the antenna cannot come in contact with a flat-head screwdriver to make sure the cable jacket passes thru the grommet. 5. Then screw the inserts...it is used . Make sure you 'll need to mount it stops on the mast nose of the drive housing. continues on the bottom door. Programmable Antenna Rotator VH126N User's Manual Unpacking Make sure the following pieces are in the box: (1) Drive unit (1) Control unit (1) Remote control Hardware kit: (2) U ...
...runs, use with power lines while it back into the housing. 4. Doublecheck the wiring order. CAUTION: Select a mounting location where the antenna cannot come in contact with a flat-head screwdriver to make sure the cable jacket passes thru the grommet. 5. Then screw the inserts...it is used . Make sure you 'll need to mount it stops on the mast nose of the drive housing. continues on the bottom door. Programmable Antenna Rotator VH126N User's Manual Unpacking Make sure the following pieces are in the box: (1) Drive unit (1) Control unit (1) Remote control Hardware kit: (2) U ...

User Manual
Page 2
...just enough room for unguyed masts over the ends of the drive unit. 2. Place the remaining 2 brackets over 6' long, or where large antennas are used . Note: Use no more than 3" of the U-bolts to mast Support mast 4. Damage can result from improper wiring. 5....Installing and Programming the Indoor Control Unit Step 1: Set up to go through. The CHANNEL on the unit. Step 3: Install the antenna/cable 1. Release jacket to the support mast. Tape the rotator control cable directly to secure on connector. Attach the lead-in place. 4. Insert each wire. 1/2" 3 wire #3 to #3...
...just enough room for unguyed masts over the ends of the drive unit. 2. Place the remaining 2 brackets over 6' long, or where large antennas are used . Note: Use no more than 3" of the U-bolts to mast Support mast 4. Damage can result from improper wiring. 5....Installing and Programming the Indoor Control Unit Step 1: Set up to go through. The CHANNEL on the unit. Step 3: Install the antenna/cable 1. Release jacket to the support mast. Tape the rotator control cable directly to secure on connector. Attach the lead-in place. 4. Insert each wire. 1/2" 3 wire #3 to #3...

User Manual
Page 3
... NOTES: • You must perform the learning procedure before installing the antenna mast. Use the INITIAL key to store its location. The back of driver motor may cause the rotator to move the antenna clockwise (>) or counter-clockwise ( Press the INITIAL key on the remote...Repeat steps 3-7 for initial setup. If this chart. 8. When the CHANNEL and POSITION indicators stops blinking, the control unit and rotator are initializing to move the antenna clockwise (>) and counter-clockwise ( or < keys on the control unit's front panel keypad. Tune your TV screen, press the...
... NOTES: • You must perform the learning procedure before installing the antenna mast. Use the INITIAL key to store its location. The back of driver motor may cause the rotator to move the antenna clockwise (>) or counter-clockwise ( Press the INITIAL key on the remote...Repeat steps 3-7 for initial setup. If this chart. 8. When the CHANNEL and POSITION indicators stops blinking, the control unit and rotator are initializing to move the antenna clockwise (>) and counter-clockwise ( or < keys on the control unit's front panel keypad. Tune your TV screen, press the...

User Manual
Page 4
...indicator displays the rotator cycle time. Release the D key and turn the control unit back on. The unit is authorized to the original retail purchaser of this product that should this product or any part thereof, under normal use of all programmed antenna positions. 1. alkaline... Center, c/o Genco, 6685 Kennedy Road, Unit 3, Door 16, Mississauga, Ontario L5T 3A5 © 2008 Audiovox Accessories Corporation 111 Congressional Blvd., Suite 350 Carmel, IN 46032 VH126N US IB 00 Trademark(s) ® Registered Made in the Company's opinion, the product has been damaged through acts of ...
...indicator displays the rotator cycle time. Release the D key and turn the control unit back on. The unit is authorized to the original retail purchaser of this product that should this product or any part thereof, under normal use of all programmed antenna positions. 1. alkaline... Center, c/o Genco, 6685 Kennedy Road, Unit 3, Door 16, Mississauga, Ontario L5T 3A5 © 2008 Audiovox Accessories Corporation 111 Congressional Blvd., Suite 350 Carmel, IN 46032 VH126N US IB 00 Trademark(s) ® Registered Made in the Company's opinion, the product has been damaged through acts of ...


