

User Guide
Page 2
... trouble-free service. Disassembly Do not attempt to rain or moisture. Use a cloth lightly dampened with water for selecting the DPF 700 Digital Picture Frame. Please read the entire instruction manual supplied with a cloth or other material. 4. All manuals should be stored for use with the ...instructions and illustrations provided in a fire or electric shock). Installation Ensure that the DPF700 is designed for later use liquid cleaners or aerosol cleaners. Do not place anything heavy on an unstable cart, stand, tripod, ...
... trouble-free service. Disassembly Do not attempt to rain or moisture. Use a cloth lightly dampened with water for selecting the DPF 700 Digital Picture Frame. Please read the entire instruction manual supplied with a cloth or other material. 4. All manuals should be stored for use with the ...instructions and illustrations provided in a fire or electric shock). Installation Ensure that the DPF700 is designed for later use liquid cleaners or aerosol cleaners. Do not place anything heavy on an unstable cart, stand, tripod, ...
User Guide
Page 3
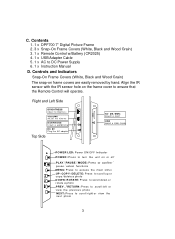
...: Press to scroll up or copy /delete a photo DO WN/R OTAT E : Press to scroll down or rotate a photo PREV./RETURN: Press to scroll left or view the previous photo NEXT: Press to turn the unit on frame covers are easily removed by hand. Right and Left... Power ON/OFF Indicator POWER: Press to scrol l rig ht or view the next photo 3 C. Align the IR sensor with the IR sensor hole on the frame cover to DC Power Supply 6. 1 x Instruction Manual D. Contents 1. 1 x DPF700 7" Digital Picture Frame 2. 3 x Snap-On Frame Covers (White, Black and Wood Grain) 3. 1 x Remote Control w/Battery (CR2025)...
...: Press to scroll up or copy /delete a photo DO WN/R OTAT E : Press to scroll down or rotate a photo PREV./RETURN: Press to scroll left or view the previous photo NEXT: Press to turn the unit on frame covers are easily removed by hand. Right and Left... Power ON/OFF Indicator POWER: Press to scrol l rig ht or view the next photo 3 C. Align the IR sensor with the IR sensor hole on the frame cover to DC Power Supply 6. 1 x Instruction Manual D. Contents 1. 1 x DPF700 7" Digital Picture Frame 2. 3 x Snap-On Frame Covers (White, Black and Wood Grain) 3. 1 x Remote Control w/Battery (CR2025)...
User Guide
Page 7
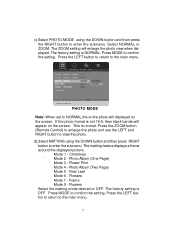
... to confirm the setting. Select NORMAL or ZOOM. Press the LEFT button to return to confirm the setting. The matting feature displays a frame around the displayed picture. Photo Album (One Page) Mode 3 - Press MODE to the main menu. The factory setting is not 16:9, then black bands will appear... on the screen. PHOTO MODE Note: When set to NORMAL,the entire photo will enlarge the photo view when displayed. Photo Album (Two Page) Mode 5 - The ...
... to confirm the setting. Select NORMAL or ZOOM. Press the LEFT button to return to confirm the setting. The matting feature displays a frame around the displayed picture. Photo Album (One Page) Mode 3 - Press MODE to the main menu. The factory setting is not 16:9, then black bands will appear... on the screen. PHOTO MODE Note: When set to NORMAL,the entire photo will enlarge the photo view when displayed. Photo Album (Two Page) Mode 5 - The ...
User Guide
Page 8
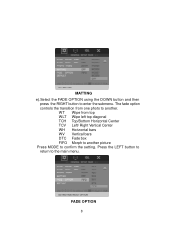
FADE OPTION 8 The fade option controls the transition from top WLT Wipe left top diagonal TCH Top/Bottom Horizontal Center TCV Left/ Right Vertical Center WH Horizontal bars WV Vertical bars DTC Fade box FIFO Morph to another picture Press MODE to another. WT Wipe from one photo to confirm the setting. Press the LEFT button to return to enter the submenu. MATTING e).Select the FADE OPTION using the DOWN button and then press the RIGHT button to the main menu.
FADE OPTION 8 The fade option controls the transition from top WLT Wipe left top diagonal TCH Top/Bottom Horizontal Center TCV Left/ Right Vertical Center WH Horizontal bars WV Vertical bars DTC Fade box FIFO Morph to another picture Press MODE to another. WT Wipe from one photo to confirm the setting. Press the LEFT button to return to enter the submenu. MATTING e).Select the FADE OPTION using the DOWN button and then press the RIGHT button to the main menu.

