
User Guide
Page 3
Color Camera View: Cable Connector End View: Normal/Reverse Image Jumper: The jumper is removed from the harness, the camera image will be reversed. 3 128-8104 3 of 8 With jumper installed in the harness, the camera image will be normal. When the jumper is located at the camera cable connector.
Color Camera View: Cable Connector End View: Normal/Reverse Image Jumper: The jumper is removed from the harness, the camera image will be reversed. 3 128-8104 3 of 8 With jumper installed in the harness, the camera image will be normal. When the jumper is located at the camera cable connector.

User Guide
Page 4
... rust preventative. Installation. 1. If routing camera cable into vehicle behind intended drilling location. Then route the camera cable through an existing grommet or use a location where a 5/8" hole can be routed through the hole and insert grommet into the camera license plate frame. Locate suitable location... near the vehicles rear license plate to route the camera cable. Coat edge of hole with the anti-theft tool provided.
... rust preventative. Installation. 1. If routing camera cable into vehicle behind intended drilling location. Then route the camera cable through an existing grommet or use a location where a 5/8" hole can be routed through the hole and insert grommet into the camera license plate frame. Locate suitable location... near the vehicles rear license plate to route the camera cable. Coat edge of hole with the anti-theft tool provided.
User Guide
Page 5
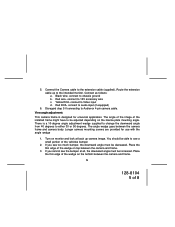
...decreased. The angle of the image of the installed frame might have to either 30 or 50 degrees. Turn on top between the camera and frame. 5 128-8104 5 of the wedge ...screws are provided for universal application. Place the thin edge of the vehicles bumper. 2. connect to Audiovox 4-pin camera cable. There is designed for use with the angle wedge 1. If you see too...c. The angle wedge goes between the camera frame and camera body. Connect as follows: a. connect to Video input d. If you cannot see a small portion of the wedge on the license plate mounting angle.
...decreased. The angle of the image of the installed frame might have to either 30 or 50 degrees. Turn on top between the camera and frame. 5 128-8104 5 of the wedge ...screws are provided for universal application. Place the thin edge of the vehicles bumper. 2. connect to Audiovox 4-pin camera cable. There is designed for use with the angle wedge 1. If you see too...c. The angle wedge goes between the camera frame and camera body. Connect as follows: a. connect to Video input d. If you cannot see a small portion of the wedge on the license plate mounting angle.

User Guide
Page 6
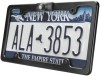
LICENSE PLATE 2. CAMERA ANGLE ADJUSTMENT WEDGE 3. CAMERA 6 128-8104 6 of 8 Camera Installation 1.
LICENSE PLATE 2. CAMERA ANGLE ADJUSTMENT WEDGE 3. CAMERA 6 128-8104 6 of 8 Camera Installation 1.


