

User Manual
Page 1
Vehicle Rear Observation System With Integrated Parking Sensors Model: CAMSBAR Installation/User Manual Features: • 2.5" LCD Color Display • 2 Ultra Sonic Rear Obstacle Sensors • On-screen Display Function • Automatically Displays Image when Vehicle is in Reverse • Monitor Mounts on Dash or Windshield • Mounts on the vehicles license plate or directly to the bumper. • Heavy Duty Chrome plating for long life. • Waterproof and dust proof
Vehicle Rear Observation System With Integrated Parking Sensors Model: CAMSBAR Installation/User Manual Features: • 2.5" LCD Color Display • 2 Ultra Sonic Rear Obstacle Sensors • On-screen Display Function • Automatically Displays Image when Vehicle is in Reverse • Monitor Mounts on Dash or Windshield • Mounts on the vehicles license plate or directly to the bumper. • Heavy Duty Chrome plating for long life. • Waterproof and dust proof

User Manual
Page 2
TABLE OF CONTENTS Warnings 2 Product Description 3 Packing List 4 Installation Instructions 5 CAMSBAR Installation 5 Monitor Installation 8 Operating the System 9 Testing the System 9 Specifications 10 Maintenance 10 Troubleshooting 11 1
TABLE OF CONTENTS Warnings 2 Product Description 3 Packing List 4 Installation Instructions 5 CAMSBAR Installation 5 Monitor Installation 8 Operating the System 9 Testing the System 9 Specifications 10 Maintenance 10 Troubleshooting 11 1

User Manual
Page 3
...in a damaged or non-functional part will void all warranties. 4. Do not use any features of the components contained within this system to components and cabling. 2. Handle all or part of this installation manual. Inspect regularly for damage to the extent it distracts you...safe driving. Excessive force used before, during or after installation that the installation of the vehicle manufacturer's warranty. 3. Audiovox Electronics Corporation cannot accept any of this kit. Please follow the procedures in loss or damage to observe these precautions or safety instructions...
...in a damaged or non-functional part will void all warranties. 4. Do not use any features of the components contained within this system to components and cabling. 2. Handle all or part of this installation manual. Inspect regularly for damage to the extent it distracts you...safe driving. Excessive force used before, during or after installation that the installation of the vehicle manufacturer's warranty. 3. Audiovox Electronics Corporation cannot accept any of this kit. Please follow the procedures in loss or damage to observe these precautions or safety instructions...

User Manual
Page 4
... and may be seen in the monitor. Always look both ways. The system will also alert you to obstructions that could not normally be misleading. CAUTION: Do not back up your blind zone. Use the monitor and sensors as an aid to ensure there are shaped differently. 3 The image on... the vehicle whenever the vehicle is shifted into reverse. The range of the image is limited. Product Description The Vehicle Rear Observation System with Integrated Parking Sensors is designed to assist the driver by dirt. Never rely solely on the monitor is not designed to indicate a set distance and...
... and may be seen in the monitor. Always look both ways. The system will also alert you to obstructions that could not normally be misleading. CAUTION: Do not back up your blind zone. Use the monitor and sensors as an aid to ensure there are shaped differently. 3 The image on... the vehicle whenever the vehicle is shifted into reverse. The range of the image is limited. Product Description The Vehicle Rear Observation System with Integrated Parking Sensors is designed to assist the driver by dirt. Never rely solely on the monitor is not designed to indicate a set distance and...

User Manual
Page 5
Installation/Users Manual - 1 qty Part # 31052020 4 Packing List The model CAMSBAR package consists of the following items: 1. 2.5" LCD Monitor Part # 31052030 2. Hardware Bag Contains: Part # 31052010 a) Straight Bumper Brackets - 2 pieces b) L Shaped Bumper Brackets - 2 pieces c) 4mm x 16mn ... - 2 qty e) 6mm Nuts - 2 qty f) 4mm Nuts - 2 qty g) 6mm Flat Washers - 2 qty h) 4mm Lock Washers - 4 qty i) Tap Connectors - 2 qty j) Double Sided Mounting Tape - 1qty 5. Chrome Camera / Sensor Bar − 1 qty Part # 31052380 3. 2.5m Power / Video Supply Cable − 1 qty Part # 31052160 4.
Installation/Users Manual - 1 qty Part # 31052020 4 Packing List The model CAMSBAR package consists of the following items: 1. 2.5" LCD Monitor Part # 31052030 2. Hardware Bag Contains: Part # 31052010 a) Straight Bumper Brackets - 2 pieces b) L Shaped Bumper Brackets - 2 pieces c) 4mm x 16mn ... - 2 qty e) 6mm Nuts - 2 qty f) 4mm Nuts - 2 qty g) 6mm Flat Washers - 2 qty h) 4mm Lock Washers - 4 qty i) Tap Connectors - 2 qty j) Double Sided Mounting Tape - 1qty 5. Chrome Camera / Sensor Bar − 1 qty Part # 31052380 3. 2.5m Power / Video Supply Cable − 1 qty Part # 31052160 4.

User Manual
Page 6
... be placed where the sensors can clearly detect objects behind the vehicle. CAMSBAR Installation Determine the best location on your vehicle. If mounting below the bumper for better coverage if your vehicle completely before starting. If mounted .... Each vehicle is different you and your vehicle. Installation Instructions READ THIS MANUAL COMPLETELY BEFORE INSTALLATION We have a clear path from the sensors picking up the ground. The CAMSBAR must be mounted below the bumper, use the supplied brackets. 5 However, since all of the items needed for you may experience false...
... be placed where the sensors can clearly detect objects behind the vehicle. CAMSBAR Installation Determine the best location on your vehicle. If mounting below the bumper for better coverage if your vehicle completely before starting. If mounted .... Each vehicle is different you and your vehicle. Installation Instructions READ THIS MANUAL COMPLETELY BEFORE INSTALLATION We have a clear path from the sensors picking up the ground. The CAMSBAR must be mounted below the bumper, use the supplied brackets. 5 However, since all of the items needed for you may experience false...

User Manual
Page 7
... lights and not the license plate illumination lamp or other lamps. The signal / power cable can drill a hole behind the license plate. 3. The system is designed to come on when the vehicle is not available for use, you begin. Some vehicles may have the license plate on the License...selected location near the vehicle's rear license plate. Route the camera cable connector through . Place the CAMSBAR over the license plate and line up the holes. Power wire can be purchased at the back of 13/32" to allow the wire and fuse holder to pass through the grommet and insert...
... lights and not the license plate illumination lamp or other lamps. The signal / power cable can drill a hole behind the license plate. 3. The system is designed to come on when the vehicle is not available for use, you begin. Some vehicles may have the license plate on the License...selected location near the vehicle's rear license plate. Route the camera cable connector through . Place the CAMSBAR over the license plate and line up the holes. Power wire can be purchased at the back of 13/32" to allow the wire and fuse holder to pass through the grommet and insert...
User Manual
Page 8
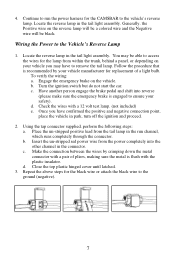
...: a. 4. Engage the emergency brake on the reverse lamp will be a colored wire and the Negative wire will be able to access the wires for the CAMSBAR to the ground (negative). 7 Have another person engage the brake pedal and shift into the other channel in the connector. Place the un-stripped positive...
...: a. 4. Engage the emergency brake on the reverse lamp will be a colored wire and the Negative wire will be able to access the wires for the CAMSBAR to the ground (negative). 7 Have another person engage the brake pedal and shift into the other channel in the connector. Place the un-stripped positive...

User Manual
Page 9
... too much force and damage the unit. 8 Clean the monitor base and mounting area with flexible mounting foot and double sided tape, mounts on the back of the door sill or by either the vehicle windshield or dashboard. 1. Using the supplied Monitor Signal Wire, Plug one side of the double sided...
... too much force and damage the unit. 8 Clean the monitor base and mounting area with flexible mounting foot and double sided tape, mounts on the back of the door sill or by either the vehicle windshield or dashboard. 1. Using the supplied Monitor Signal Wire, Plug one side of the double sided...

User Manual
Page 10
...obstacle. As you get close to the object, the buzzer will activate and show you are shaped differently, the warning system may need to stop. Re-test the system after it to the ground may not be seen by the sensors when it will sound the buzzer. Operating the System The CAMSBAR...very close to the object, the buzzer will sound, beeping more comfortable with Integrated Parking Sensors operates when the vehicle is located, the system will beep faster. In addition, the back up sensor system is a driver assistance device, continue to send out an ultra sonic signal that the ...
...obstacle. As you get close to the object, the buzzer will activate and show you are shaped differently, the warning system may need to stop. Re-test the system after it to the ground may not be seen by the sensors when it will sound the buzzer. Operating the System The CAMSBAR...very close to the object, the buzzer will sound, beeping more comfortable with Integrated Parking Sensors operates when the vehicle is located, the system will beep faster. In addition, the back up sensor system is a driver assistance device, continue to send out an ultra sonic signal that the ...

User Manual
Page 11
Specifications Power Supply Power Consumption Current Draw Operating Temperature Range Fuse DC12V
Specifications Power Supply Power Consumption Current Draw Operating Temperature Range Fuse DC12V

User Manual
Page 12
... at the reverse lamp. If the system continues to a normal temperature. 11 Check the fuse in reverse gear, re-check your wiring at the reverse lamp Backup sensors keep sounding Clean the Bar with a soft cloth. Troubleshooting Symptoms Solutions The CAMSBAR does not turn on all the time... or runs when the vehicle is not in reverse. Check the wiring and connections 2. The system is very dark or the ...
... at the reverse lamp. If the system continues to a normal temperature. 11 Check the fuse in reverse gear, re-check your wiring at the reverse lamp Backup sensors keep sounding Clean the Bar with a soft cloth. Troubleshooting Symptoms Solutions The CAMSBAR does not turn on all the time... or runs when the vehicle is not in reverse. Check the wiring and connections 2. The system is very dark or the ...
