User Manual
Page 2
...© 2018 ASUSTeK COMPUTER INC. Product warranty or service will be registered trademarks or copyrights of ASUSTeK COMPUTER INC. ("ASUS"). ASUS PROVIDES THIS MANUAL "AS IS" WITHOUT WARRANTY OF ANY KIND, EITHER EXPRESS OR IMPLIED, INCLUDING BUT NOT LIMITED TO THE IMPLIED WARRANTIES ... license entitles you to : ASUSTeK Computer Inc. ASUS ASSUMES NO RESPONSIBILITY OR LIABILITY FOR ANY ERRORS OR INACCURACIES THAT MAY APPEAR IN THIS MANUAL, INCLUDING THE PRODUCTS AND SOFTWARE DESCRIBED IN IT. Such software in this manual, including the products and software described in writing ...
...© 2018 ASUSTeK COMPUTER INC. Product warranty or service will be registered trademarks or copyrights of ASUSTeK COMPUTER INC. ("ASUS"). ASUS PROVIDES THIS MANUAL "AS IS" WITHOUT WARRANTY OF ANY KIND, EITHER EXPRESS OR IMPLIED, INCLUDING BUT NOT LIMITED TO THE IMPLIED WARRANTIES ... license entitles you to : ASUSTeK Computer Inc. ASUS ASSUMES NO RESPONSIBILITY OR LIABILITY FOR ANY ERRORS OR INACCURACIES THAT MAY APPEAR IN THIS MANUAL, INCLUDING THE PRODUCTS AND SOFTWARE DESCRIBED IN IT. Such software in this manual, including the products and software described in writing ...
User Manual
Page 6
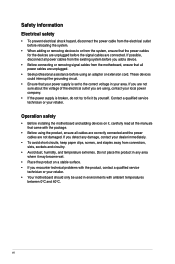
... wet. • Place the product on it, carefully read all cables are correctly connected and the power cables are using the product, ensure all the manuals that came with the product, contact a qualified service technician or your retailer. • Your motherboard should only be used in your power supply is broken...
... wet. • Place the product on it, carefully read all cables are correctly connected and the power cables are using the product, ensure all the manuals that came with the product, contact a qualified service technician or your retailer. • Your motherboard should only be used in your power supply is broken...
User Manual
Page 8
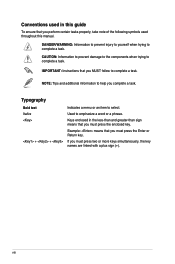
... you must press two or more keys simultaneously, the key names are linked with a plus sign (+). Italics Used to complete a task. Keys enclosed in this manual. viii NOTE: Tips and additional information to help you perform certain tasks properly, take note of the following symbols used in the less-than and...
... you must press two or more keys simultaneously, the key names are linked with a plus sign (+). Italics Used to complete a task. Keys enclosed in this manual. viii NOTE: Tips and additional information to help you perform certain tasks properly, take note of the following symbols used in the less-than and...
User Manual
Page 12
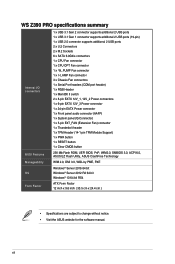
xii WS Z390 PRO specifications summary Internal I/O connectors BIOS Features Manageability OS Form Factor 1 x USB 3.1 Gen 2 connector supports additional 2 USB ports 1 x USB... PWR button 1 x RESET button 1 x Clear CMOS button 256 Mb Flash ROM, UEFI BIOS, PnP, WfM2.0, SMBIOS 3.0, ACPI 6.0, ASUS EZ Flash Utility, ASUS CrashFree Technology WfM 2.0, DMI 3.0, WOL by PME, PXE Windows® Server 2016 64 bit Windows® Server 2012 R2 64 bit Windows&#... inch ( 30.5 cm x 24.4 cm ) • Specifications are subject to change without notice. • Visit the ASUS website for the software manual.
xii WS Z390 PRO specifications summary Internal I/O connectors BIOS Features Manageability OS Form Factor 1 x USB 3.1 Gen 2 connector supports additional 2 USB ports 1 x USB... PWR button 1 x RESET button 1 x Clear CMOS button 256 Mb Flash ROM, UEFI BIOS, PnP, WfM2.0, SMBIOS 3.0, ACPI 6.0, ASUS EZ Flash Utility, ASUS CrashFree Technology WfM 2.0, DMI 3.0, WOL by PME, PXE Windows® Server 2016 64 bit Windows® Server 2012 R2 64 bit Windows&#... inch ( 30.5 cm x 24.4 cm ) • Specifications are subject to change without notice. • Visit the ASUS website for the software manual.
User Manual
Page 57
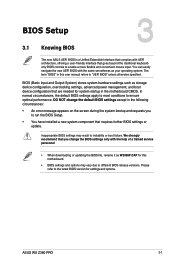
...conditions to the latest BIOS version for settings and options. Please refer to ensure optimal performance. Chapter 3 ASUS WS Z390 PRO 3-1 DO NOT change the default BIOS settings except in the following circumstances: • An error message... vary due to different BIOS release versions. Chapter 3: BIOS Setup BIOS Setup 3.1 Knowing BIOS 3 The new ASUS UEFI BIOS is a Unified Extensible Interface that complies with UEFI architecture, offering a user-friendly interface that you ...same smoothness as WS390P.CAP for this user manual refers to "UEFI BIOS" unless otherwise specified.
...conditions to the latest BIOS version for settings and options. Please refer to ensure optimal performance. Chapter 3 ASUS WS Z390 PRO 3-1 DO NOT change the default BIOS settings except in the following circumstances: • An error message... vary due to different BIOS release versions. Chapter 3: BIOS Setup BIOS Setup 3.1 Knowing BIOS 3 The new ASUS UEFI BIOS is a Unified Extensible Interface that complies with UEFI architecture, offering a user-friendly interface that you ...same smoothness as WS390P.CAP for this user manual refers to "UEFI BIOS" unless otherwise specified.
User Manual
Page 58
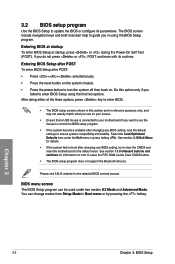
... in this option only if you do not press or , POST continues with its parameters. See section 3.10 Exit Menu for the detailed BIOS content manual. 3.2 BIOS setup program Use the BIOS Setup to update the BIOS or configure its routines. Entering BIOS Setup after POST To enter BIOS Setup after... on how to erase the RTC RAM via the Clear CMOS button. • The BIOS setup program does not support the Bluetooth devices. Please visit ASUS website for details. • If the system fails to boot after changing any BIOS setting, try to clear the CMOS and reset the motherboard to...
... in this option only if you do not press or , POST continues with its parameters. See section 3.10 Exit Menu for the detailed BIOS content manual. 3.2 BIOS setup program Use the BIOS Setup to update the BIOS or configure its routines. Entering BIOS Setup after POST To enter BIOS Setup after... on how to erase the RTC RAM via the Clear CMOS button. • The BIOS setup program does not support the Bluetooth devices. Please visit ASUS website for details. • If the system fails to boot after changing any BIOS setting, try to clear the CMOS and reset the motherboard to...
User Manual
Page 59
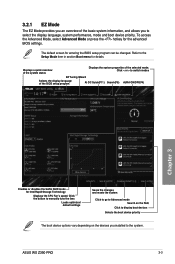
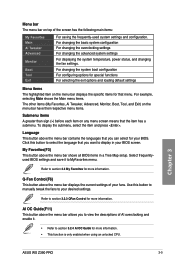
...the basic system information, and allows you to select the display language, system performance, mode and boot device priority. Click the button to manually tune the fans Loads optimized default settings Saves the changes and resets the system Click to go to Advanced mode Search on the FAQ Click... boot device priority The boot device options vary depending on the devices you installed to the Setup Mode item in section Boot menu for details. ASUS WS Z390 PRO 3-3 Refer to the system. 3.2.1 EZ Mode The EZ Mode provides you an overview of the BIOS setup program AI OC Guide(F11) Search(...
...the basic system information, and allows you to select the display language, system performance, mode and boot device priority. Click the button to manually tune the fans Loads optimized default settings Saves the changes and resets the system Click to go to Advanced mode Search on the FAQ Click... boot device priority The boot device options vary depending on the devices you installed to the Setup Mode item in section Boot menu for details. ASUS WS Z390 PRO 3-3 Refer to the system. 3.2.1 EZ Mode The EZ Mode provides you an overview of the BIOS setup program AI OC Guide(F11) Search(...
User Manual
Page 61
...settings Menu items The highlighted item on any menu screen means that you want to display in a Tree Map setup. Click this button to manually tweak the fans to your BIOS screen. To display the submenu, select the item and press . Use this button to select the language... and enable it to MyFavorites menu. My Favorites(F3) This button above the menu bar allows you can select for more information. Chapter 3 ASUS WS Z390 PRO 3-5 Language This button above the menu bar displays the current settings of your BIOS. Q-Fan Control(F6) This button above the menu bar ...
...settings Menu items The highlighted item on any menu screen means that you want to display in a Tree Map setup. Click this button to manually tweak the fans to your BIOS screen. To display the submenu, select the item and press . Use this button to select the language... and enable it to MyFavorites menu. My Favorites(F3) This button above the menu bar allows you can select for more information. Chapter 3 ASUS WS Z390 PRO 3-5 Language This button above the menu bar displays the current settings of your BIOS. Q-Fan Control(F6) This button above the menu bar ...
User Manual
Page 64
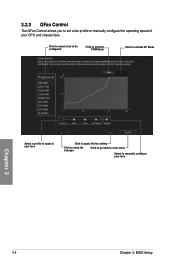
Click to select a fan to be configured Click to activate PWM Mode Click to activate DC Mode Select a profile to apply to your fans Click to apply the fan setting Click to undo the changes Click to go back to main menu Select to set a fan profile or manually configure the operating speed of your fans Chapter 3 3-8 Chapter 3: BIOS Setup 3.2.3 QFan Control The QFan Control allows you to manually configure your CPU and chassis fans.
Click to select a fan to be configured Click to activate PWM Mode Click to activate DC Mode Select a profile to apply to your fans Click to apply the fan setting Click to undo the changes Click to go back to main menu Select to set a fan profile or manually configure the operating speed of your fans Chapter 3 3-8 Chapter 3: BIOS Setup 3.2.3 QFan Control The QFan Control allows you to manually configure your CPU and chassis fans.
User Manual
Page 65
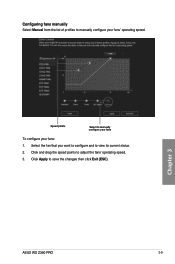
Select the fan that you want to configure and to save the changes then click Exit (ESC). Click Apply to view its current status. 2. Chapter 3 Speed points Select to manually configure your fans: 1. ASUS WS Z390 PRO 3-9 Configuring fans manually Select Manual from the list of profiles to manually configure your fans To configure your fans' operating speed. Click and drag the speed points to adjust the fans' operating speed. 3.
Select the fan that you want to configure and to save the changes then click Exit (ESC). Click Apply to view its current status. 2. Chapter 3 Speed points Select to manually configure your fans: 1. ASUS WS Z390 PRO 3-9 Configuring fans manually Select Manual from the list of profiles to manually configure your fans To configure your fans' operating speed. Click and drag the speed points to adjust the fans' operating speed. 3.
User Manual
Page 71
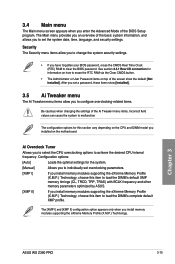
... how to erase the RTC RAM via the Clear CMOS button. • The Administrator or User Password items on the motherboard. Chapter 3 ASUS WS Z390 PRO 3-15 3.4 Main menu The Main menu screen appears when you enter the Advanced Mode of the basic system information, and allows you to...section 2.3.1 Rear I/O connection for this item to clear the BIOS password. Configuration options: [Auto] Loads the optimal settings for the system. [Manual] Allows you have forgotten your BIOS password, erase the CMOS Real Time Clock (RTC) RAM to load the DIMM's complete default XMP profile.
... how to erase the RTC RAM via the Clear CMOS button. • The Administrator or User Password items on the motherboard. Chapter 3 ASUS WS Z390 PRO 3-15 3.4 Main menu The Main menu screen appears when you enter the Advanced Mode of the basic system information, and allows you to...section 2.3.1 Rear I/O connection for this item to clear the BIOS password. Configuration options: [Auto] Loads the optimal settings for the system. [Manual] Allows you have forgotten your BIOS password, erase the CMOS Real Time Clock (RTC) RAM to load the DIMM's complete default XMP profile.
User Manual
Page 72
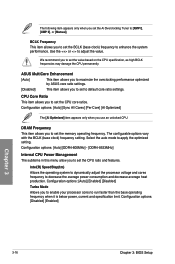
... Chapter 3: BIOS Setup Select the auto mode to [XMP I], [XMP II], or [Manual]. The following item appears only when you use an unlocked CPU. ASUS MultiCore Enhancement [Auto] This item allows you to maximize the oveclocking performance optimized by ASUS core ratio settings. [Disabled] This item allows you to set the Ai Overclocking...
... Chapter 3: BIOS Setup Select the auto mode to [XMP I], [XMP II], or [Manual]. The following item appears only when you use an unlocked CPU. ASUS MultiCore Enhancement [Auto] This item allows you to maximize the oveclocking performance optimized by ASUS core ratio settings. [Disabled] This item allows you to set the Ai Overclocking...
User Manual
Page 80
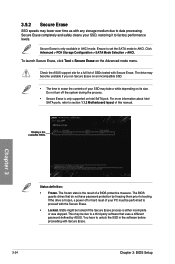
...uses a different password defined by freezing them prior to AHCI. Ensure to set the SATA mode to booting. You have password protection by ASUS. Displays the available SSDs Chapter 3 Status definition: • Frozen. The frozen state is only available in the software before proceeding with Secure...data processing. 3.9.2 Secure Erase SSD speeds may lower over time as with any storage medium due to section 1.1.2 Motherboard layout of this manual. This may be locked if the Secure Erase process is only supported on the Advanced mode menu. To launch Secure Erase, click Tool ...
...uses a different password defined by freezing them prior to AHCI. Ensure to set the SATA mode to booting. You have password protection by ASUS. Displays the available SSDs Chapter 3 Status definition: • Frozen. The frozen state is only available in the software before proceeding with Secure...data processing. 3.9.2 Secure Erase SSD speeds may lower over time as with any storage medium due to section 1.1.2 Motherboard layout of this manual. This may be locked if the Secure Erase process is only supported on the Advanced mode menu. To launch Secure Erase, click Tool ...
User Manual
Page 83
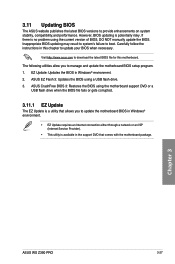
... you to manage and update the motherboard BIOS setup program. 1. Chapter 3 ASUS WS Z390 PRO 3-27 3.11 Updating BIOS The ASUS website publishes the latest BIOS versions to boot. However, BIOS updating is no problem using the current version of BIOS, DO NOT manually update the BIOS. The following utilities allow you to update the motherboard...
... you to manage and update the motherboard BIOS setup program. 1. Chapter 3 ASUS WS Z390 PRO 3-27 3.11 Updating BIOS The ASUS website publishes the latest BIOS versions to boot. However, BIOS updating is no problem using the current version of BIOS, DO NOT manually update the BIOS. The following utilities allow you to update the motherboard...
User Manual
Page 100
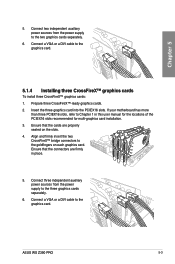
... 5: Multiple GPU Support The graphics cards and the motherboard layout may vary with graphics cards) Goldfingers The CrossFireX™ bridge is firmly in this user manual for the locations of the PCIEX16 slots recommended for multi-graphics card installation. 3.
... 5: Multiple GPU Support The graphics cards and the motherboard layout may vary with graphics cards) Goldfingers The CrossFireX™ bridge is firmly in this user manual for the locations of the PCIEX16 slots recommended for multi-graphics card installation. 3.
User Manual
Page 101
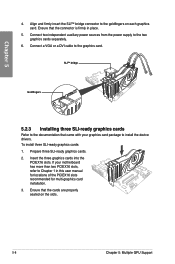
... graphics cards separately. 6. Chapter 5 5. Connect three independent auxiliary power sources from the power supply to the goldfingers on the slots. 4. ASUS WS Z390 PRO 5-3 Ensure that the cards are firmly in this user manual for the locations of the PCIEX16 slots recommended for multi-graphics card installation. 3. Insert the three graphics card into the PCIEX16...
... graphics cards separately. 6. Chapter 5 5. Connect three independent auxiliary power sources from the power supply to the goldfingers on the slots. 4. ASUS WS Z390 PRO 5-3 Ensure that the cards are firmly in this user manual for the locations of the PCIEX16 slots recommended for multi-graphics card installation. 3. Insert the three graphics card into the PCIEX16...

User Manual
Page 102
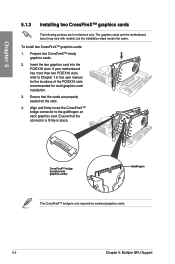
.... 6. Connect four independent auxiliary power sources from the power supply to the goldfingers on the slots. 4. Ensure that the cards are firmly in this user manual for the locations of the PCIEX16 slots recommended for multi-graphics card installation. 3. Prepare four CrossFireX™-ready graphics cards. 2.
.... 6. Connect four independent auxiliary power sources from the power supply to the goldfingers on the slots. 4. Ensure that the cards are firmly in this user manual for the locations of the PCIEX16 slots recommended for multi-graphics card installation. 3. Prepare four CrossFireX™-ready graphics cards. 2.
User Manual
Page 105
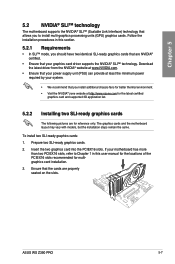
... the minimum power required by your graphics card driver supports the NVIDIA® SLI™ technology. Prepare two SLI-ready graphics cards. 2. ASUS WS Z390 PRO 5-7 The graphics cards and the motherboard layout may vary with models, but the installation steps remain the same. Chapter 5 5.2 NVIDIA®... are NVIDIA® certified. • Ensure that your system. • We recommend that you to Chapter 1 in this user manual for the locations of the PCIEX16 slots recommended for reference only. If your motherboard has more than two PCIEX16 slots, refer to install...
... the minimum power required by your graphics card driver supports the NVIDIA® SLI™ technology. Prepare two SLI-ready graphics cards. 2. ASUS WS Z390 PRO 5-7 The graphics cards and the motherboard layout may vary with models, but the installation steps remain the same. Chapter 5 5.2 NVIDIA®... are NVIDIA® certified. • Ensure that your system. • We recommend that you to Chapter 1 in this user manual for the locations of the PCIEX16 slots recommended for reference only. If your motherboard has more than two PCIEX16 slots, refer to install...
User Manual
Page 106
... or a DVI cable to the documentation that the cards are properly seated on each graphics card. Ensure that the connector is firmly in this user manual for locations of the PCIEX16 slots recommended for multi-graphics card installation. 3.
... or a DVI cable to the documentation that the cards are properly seated on each graphics card. Ensure that the connector is firmly in this user manual for locations of the PCIEX16 slots recommended for multi-graphics card installation. 3.
User Manual
Page 107
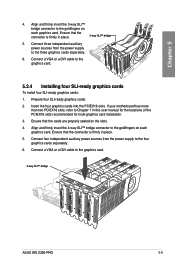
...ready graphics cards: 1. Ensure that the cards are properly seated on each graphics card. Ensure that the connector is firmly in this user manual for the locations of the PCIEX16 slots recommended for multi-graphics card installation. 3. Connect four independent auxiliary power sources from the power supply ... four SLI-ready graphics cards. 2. Align and firmly insert the 4-way SLI™ bridge connector to the graphics card. 4-way SLI™ bridge ASUS WS Z390 PRO 5-9 Connect three independent auxiliary power sources from the power supply to the goldfingers on the slots. 4.
...ready graphics cards: 1. Ensure that the cards are properly seated on each graphics card. Ensure that the connector is firmly in this user manual for the locations of the PCIEX16 slots recommended for multi-graphics card installation. 3. Connect four independent auxiliary power sources from the power supply ... four SLI-ready graphics cards. 2. Align and firmly insert the 4-way SLI™ bridge connector to the graphics card. 4-way SLI™ bridge ASUS WS Z390 PRO 5-9 Connect three independent auxiliary power sources from the power supply to the goldfingers on the slots. 4.


