
User Manual
Page 2
...ARE SUBJECT TO CHANGE AT ANY TIME WITHOUT NOTICE, AND SHOULD NOT BE CONSTRUED AS A COMMITMENT BY ASUS. Such software in writing by ASUS; Products and corporate names appearing in this manual may or may not be reproduced, transmitted, transcribed, stored in a retrieval system, or translated into...licensed under the General Public License ("GPL"), under various Free Open Source Software licenses. ASUS ASSUMES NO RESPONSIBILITY OR LIABILITY FOR ANY ERRORS OR INACCURACIES THAT MAY APPEAR IN THIS MANUAL, INCLUDING THE PRODUCTS AND SOFTWARE DESCRIBED IN IT. The source code will not be...
...ARE SUBJECT TO CHANGE AT ANY TIME WITHOUT NOTICE, AND SHOULD NOT BE CONSTRUED AS A COMMITMENT BY ASUS. Such software in writing by ASUS; Products and corporate names appearing in this manual may or may not be reproduced, transmitted, transcribed, stored in a retrieval system, or translated into...licensed under the General Public License ("GPL"), under various Free Open Source Software licenses. ASUS ASSUMES NO RESPONSIBILITY OR LIABILITY FOR ANY ERRORS OR INACCURACIES THAT MAY APPEAR IN THIS MANUAL, INCLUDING THE PRODUCTS AND SOFTWARE DESCRIBED IN IT. The source code will not be...

User Manual
Page 7
... you add a device. • Before connecting or removing signal cables from the motherboard, ensure that all power cables are using the product, ensure all the manuals that the power cables for the devices are unplugged before the signal cables are not damaged. vii Do not place the product in your retailer...
... you add a device. • Before connecting or removing signal cables from the motherboard, ensure that all power cables are using the product, ensure all the manuals that the power cables for the devices are unplugged before the signal cables are not damaged. vii Do not place the product in your retailer...

User Manual
Page 9
... damage to the components when trying to select. DANGER/WARNING: Information to prevent injury to yourself when trying to complete a task. Keys enclosed in this manual. ix
... damage to the components when trying to select. DANGER/WARNING: Information to prevent injury to yourself when trying to complete a task. Keys enclosed in this manual. ix

User Manual
Page 15
... sensor connector 1 x Power-on button 1 x Reset button 1 x Clear CMOS button 1 x U.2 connector 1 x CPU_OV jumper 1 x COM port header 1 x VGA port header ATX Form Factor 12" x 9.6" WS X299 PRO 1 x 24-pin EATX Power connector 2 x 8-pin ATX 12V Power connectors 1 x 6-pin ATX 12V Power connector 1 x EZ XMP switch 1 x System panel 1 x 5-pin EXT_FAN(Extension Fan) connector...button 1 x Reset button 1 x Clear CMOS button 1 x U.2 connector 1 x CPU_OV jumper 1 x COM port header • Specifications are subject to change without notice. • Visit the ASUS website for the software manual.
... sensor connector 1 x Power-on button 1 x Reset button 1 x Clear CMOS button 1 x U.2 connector 1 x CPU_OV jumper 1 x COM port header 1 x VGA port header ATX Form Factor 12" x 9.6" WS X299 PRO 1 x 24-pin EATX Power connector 2 x 8-pin ATX 12V Power connectors 1 x 6-pin ATX 12V Power connector 1 x EZ XMP switch 1 x System panel 1 x 5-pin EXT_FAN(Extension Fan) connector...button 1 x Reset button 1 x Clear CMOS button 1 x U.2 connector 1 x CPU_OV jumper 1 x COM port header • Specifications are subject to change without notice. • Visit the ASUS website for the software manual.

User Manual
Page 55
Follow the instructions printed on the metal sealing hatch or the illustrations shown below in this section are the same for reference only. Chapter 2 ASUS WS X299 PRO Series 2-1 The motherboard layout may vary with models, but the installation steps are for all models. The plastic cap will pop up automatically once the CPU is in opening/ closing the double latch. CPU installation Please note the order in place and the hatch properly sealed down. Chapter 2: Basic Installation Basic Installation 2.1 Building your PC system 2 2.1.1 The diagrams in this manual.
Follow the instructions printed on the metal sealing hatch or the illustrations shown below in this section are the same for reference only. Chapter 2 ASUS WS X299 PRO Series 2-1 The motherboard layout may vary with models, but the installation steps are for all models. The plastic cap will pop up automatically once the CPU is in opening/ closing the double latch. CPU installation Please note the order in place and the hatch properly sealed down. Chapter 2: Basic Installation Basic Installation 2.1 Building your PC system 2 2.1.1 The diagrams in this manual.
User Manual
Page 75
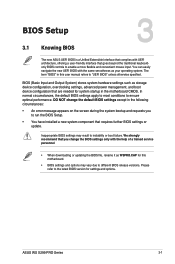
...this user manual refers to the latest BIOS version for system startup in the following circumstances: • An error message appears on the screen during the system bootup and requests you change the default BIOS settings except in the motherboard CMOS. Chapter 3 ASUS WS X299 PRO Series 3-1... a new system component that requires further BIOS settings or update. Chapter 3: BIOS Setup BIOS Setup 3.1 Knowing BIOS 3 The new ASUS UEFI BIOS is a Unified Extensible Interface that complies with the same smoothness as your operating system. We strongly recommend that are needed for...
...this user manual refers to the latest BIOS version for system startup in the following circumstances: • An error message appears on the screen during the system bootup and requests you change the default BIOS settings except in the motherboard CMOS. Chapter 3 ASUS WS X299 PRO Series 3-1... a new system component that requires further BIOS settings or update. Chapter 3: BIOS Setup BIOS Setup 3.1 Knowing BIOS 3 The new ASUS UEFI BIOS is a Unified Extensible Interface that complies with the same smoothness as your operating system. We strongly recommend that are needed for...

User Manual
Page 76
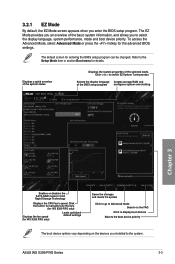
... (POST). Select the Load Optimized Defaults item under two modes: EZ Mode and Advanced Mode. Do this section are for the detailed BIOS content manual. Entering BIOS Setup after POST To enter BIOS Setup after changing any BIOS setting, try to clear the CMOS and reset the motherboard to your... screen. • Ensure that a USB mouse is connected to the default value. Please visit ASUS website for reference purposes only, and may not exactly match what you see on your motherboard if you do not press or , POST continues with...
... (POST). Select the Load Optimized Defaults item under two modes: EZ Mode and Advanced Mode. Do this section are for the detailed BIOS content manual. Entering BIOS Setup after POST To enter BIOS Setup after changing any BIOS setting, try to clear the CMOS and reset the motherboard to your... screen. • Ensure that a USB mouse is connected to the default value. Please visit ASUS website for reference purposes only, and may not exactly match what you see on your motherboard if you do not press or , POST continues with...
User Manual
Page 77
... language Creates storage RAID and of the BIOS setup program configures system overclocking Chapter 3 Enables or disables the SATA RAID mode for WS X299 PRO only) Loads optimized default settings Saves the changes and resets the system Click to go to Advanced mode Search on the FAQ Click... to the system. Click the button to manually tune the fans (for WS X299 PRO only) Displays the fan speed (for Intel Rapid Storage Technology Displays the CPU Fan's speed. Refer to the Setup Mode item in section Boot menu for details. ASUS WS X299 PRO Series 3-3 The EZ Mode provides you an...
... language Creates storage RAID and of the BIOS setup program configures system overclocking Chapter 3 Enables or disables the SATA RAID mode for WS X299 PRO only) Loads optimized default settings Saves the changes and resets the system Click to go to Advanced mode Search on the FAQ Click... to the system. Click the button to manually tune the fans (for WS X299 PRO only) Displays the fan speed (for Intel Rapid Storage Technology Displays the CPU Fan's speed. Refer to the Setup Mode item in section Boot menu for details. ASUS WS X299 PRO Series 3-3 The EZ Mode provides you an...
User Manual
Page 79
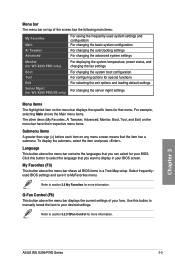
... For changing the server mgmt settings Menu items The highlighted item on any menu screen means that you can select for more information. Chapter 3 ASUS WS X299 PRO Series 3-5 For example, selecting Main shows the Main menu items. The other items (My Favorites, Ai Tweaker, Advanced, Monitor, Boot, Tool... items in your BIOS screen. Select frequentlyused BIOS settings and save it to display in a Tree Map setup. Click this button to manually tweak the fans to section 3.3 My Favorites for that you want to MyFavorites menu. Refer to section 3.2.3 QFan Control for your desired...
... For changing the server mgmt settings Menu items The highlighted item on any menu screen means that you can select for more information. Chapter 3 ASUS WS X299 PRO Series 3-5 For example, selecting Main shows the Main menu items. The other items (My Favorites, Ai Tweaker, Advanced, Monitor, Boot, Tool... items in your BIOS screen. Select frequentlyused BIOS settings and save it to display in a Tree Map setup. Click this button to manually tweak the fans to section 3.3 My Favorites for that you want to MyFavorites menu. Refer to section 3.2.3 QFan Control for your desired...

User Manual
Page 81
Click to select a fan to be configured Click to activate DC Mode Select a profile to apply to your fans Click to apply the fan setting Click to undo the changes Click to go back to main menu Select to set a fan profile or manually configure the operating speed of your fans Chapter 3 ASUS WS X299 PRO Series 3-7 3.2.3 QFan Control (for WS X299 PRO only) The QFan Control allows you to manually configure your CPU and chassis fans.
Click to select a fan to be configured Click to activate DC Mode Select a profile to apply to your fans Click to apply the fan setting Click to undo the changes Click to go back to main menu Select to set a fan profile or manually configure the operating speed of your fans Chapter 3 ASUS WS X299 PRO Series 3-7 3.2.3 QFan Control (for WS X299 PRO only) The QFan Control allows you to manually configure your CPU and chassis fans.

User Manual
Page 82
Configuring fans manually Select Manual from the list of profiles to manually configure your fans: 1. Select the fan that you want to configure and to save the changes then click Exit (ESC). 3-8 Chapter 3: BIOS Setup Chapter 3 Speed points Select to adjust the fans' operating speed. 3. Click Apply to view its current status. 2. Click and drag the speed points to manually configure your fans To configure your fans' operating speed.
Configuring fans manually Select Manual from the list of profiles to manually configure your fans: 1. Select the fan that you want to configure and to save the changes then click Exit (ESC). 3-8 Chapter 3: BIOS Setup Chapter 3 Speed points Select to adjust the fans' operating speed. 3. Click Apply to view its current status. 2. Click and drag the speed points to manually configure your fans To configure your fans' operating speed.

User Manual
Page 88
... Allows you to select the CPU overclocking options to achieve the desired CPU internal frequency. [Auto] Loads the optimal settings for the system. [Manual] Allows you to individually set overclocking parameters. [X.M.P.] If you install memory modules supporting the eXtreme Memory Profile (X.M.P.) Technology, choose this item to... the profiles supported by your BIOS password, erase the CMOS Real Time Clock (RTC) RAM to set the Ai Overclocking Tuner to [Manual]. The following item appears only when you to erase the RTC RAM via the Clear CMOS button. • The Administrator or User ...
... Allows you to select the CPU overclocking options to achieve the desired CPU internal frequency. [Auto] Loads the optimal settings for the system. [Manual] Allows you to individually set overclocking parameters. [X.M.P.] If you install memory modules supporting the eXtreme Memory Profile (X.M.P.) Technology, choose this item to... the profiles supported by your BIOS password, erase the CMOS Real Time Clock (RTC) RAM to set the Ai Overclocking Tuner to [Manual]. The following item appears only when you to erase the RTC RAM via the Clear CMOS button. • The Administrator or User ...

User Manual
Page 98
Ensure to set the SATA mode to section 1.1.2 Motherboard layout of this manual. Check the ASUS support site for a full list of a BIOS protective measure. The BIOS guards drives that uses a different password defined by freezing them prior to booting. This ... become unstable if you run Secure Erase on its size. For more information about Intel SATA ports, refer to AHCI. You have password protection by ASUS. Secure Erase completely and safely cleans your SSD may take a while depending on an incompatible SSD. • The time to erase the contents of your...
Ensure to set the SATA mode to section 1.1.2 Motherboard layout of this manual. Check the ASUS support site for a full list of a BIOS protective measure. The BIOS guards drives that uses a different password defined by freezing them prior to booting. This ... become unstable if you run Secure Erase on its size. For more information about Intel SATA ports, refer to AHCI. You have password protection by ASUS. Secure Erase completely and safely cleans your SSD may take a while depending on an incompatible SSD. • The time to erase the contents of your...
User Manual
Page 101
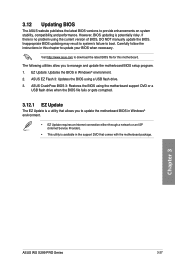
Visit http://www.asus.com to boot. Chapter 3 ASUS WS X299 PRO Series 3-27 If there is potentially risky. ASUS EZ Flash 3: Updates the BIOS using the motherboard support DVD ...The following utilities allow you to provide enhancements on system stability, compatibility,and performance. 3.12 Updating BIOS The ASUS website publishes the latest BIOS versions to update the motherboard BIOS in Windows® environment. • EZ ...problem using the current version of BIOS, DO NOT manually update the BIOS. ASUS CrashFree BIOS 3: Restores the BIOS using a USB flash drive. 3.
Visit http://www.asus.com to boot. Chapter 3 ASUS WS X299 PRO Series 3-27 If there is potentially risky. ASUS EZ Flash 3: Updates the BIOS using the motherboard support DVD ...The following utilities allow you to provide enhancements on system stability, compatibility,and performance. 3.12 Updating BIOS The ASUS website publishes the latest BIOS versions to update the motherboard BIOS in Windows® environment. • EZ ...problem using the current version of BIOS, DO NOT manually update the BIOS. ASUS CrashFree BIOS 3: Restores the BIOS using a USB flash drive. 3.

User Manual
Page 122
... the PCIEX16 slots. The graphics cards and the motherboard layout may vary with graphics cards) Goldfingers The CrossFireX™ bridge is firmly in this user manual for the locations of the PCIEX16 slots recommended for reference only.
... the PCIEX16 slots. The graphics cards and the motherboard layout may vary with graphics cards) Goldfingers The CrossFireX™ bridge is firmly in this user manual for the locations of the PCIEX16 slots recommended for reference only.


