
User Guide
Page 8
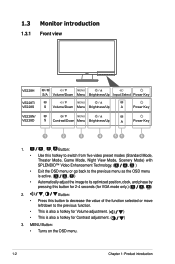
... function. MENU Button: • Turns on the OSD menu. 1-2 Chapter 1: Product introduction 1.3 Monitor introduction 1.3.1 Front view VE228H VE228T/ VE228S S/A Volume/Down Menu Brightness/Up Input Select Power Key S Volume/Down Menu Brightness/Up A Power Key VE228N/ VE228D S Contrast/Down Menu Brightness/Up A Power Key 1 2 3 4 51 6 1. • • • , , Button: Use this hotkey...
... function. MENU Button: • Turns on the OSD menu. 1-2 Chapter 1: Product introduction 1.3 Monitor introduction 1.3.1 Front view VE228H VE228T/ VE228S S/A Volume/Down Menu Brightness/Up Input Select Power Key S Volume/Down Menu Brightness/Up A Power Key VE228N/ VE228D S Contrast/Down Menu Brightness/Up A Power Key 1 2 3 4 51 6 1. • • • , , Button: Use this hotkey...
User Guide
Page 9
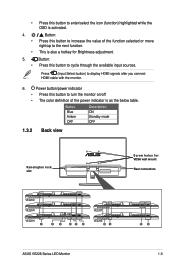
... indicator • Press this button to increase the value of the power indicator is also a hotkey for VESA wall mount Rear connectors VE228D VE228N VE228H 1 23 45 6 VE228T VE228S 31 56 ASUS VE228 Series LED Monitor 1-3 Press (Input Select button) to cycle through the available input sources. Status Blue Amber OFF Description ON...
... indicator • Press this button to increase the value of the power indicator is also a hotkey for VESA wall mount Rear connectors VE228D VE228N VE228H 1 23 45 6 VE228T VE228S 31 56 ASUS VE228 Series LED Monitor 1-3 Press (Input Select button) to cycle through the available input sources. Status Blue Amber OFF Description ON...
User Guide
Page 13
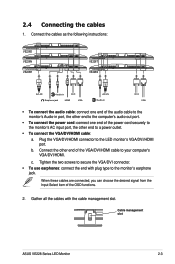
... connector to secure the VGA/DVI connector. • To use earphones: connect the end with the cable management slot. c. Cable management slot ASUS VE228 Series LED Monitor 2-3 2.4 Connecting the cables 1. When these cables are connected, you can choose the desired signal from the Input Select ...VGA/DVI/HDMI cable: a. b. Connect the other end to your computer's VGA/DVI/HDMI. Connect the cables as the following instructions: VE228D VE228N VE228H VE228T VE228S Audio-in Earphone jack HDMI VGA Audio-in VGA • To connect the audio cable: connect one end of the audio ...
... connector to secure the VGA/DVI connector. • To use earphones: connect the end with the cable management slot. c. Cable management slot ASUS VE228 Series LED Monitor 2-3 2.4 Connecting the cables 1. When these cables are connected, you can choose the desired signal from the Input Select ...VGA/DVI/HDMI cable: a. b. Connect the other end to your computer's VGA/DVI/HDMI. Connect the cables as the following instructions: VE228D VE228N VE228H VE228T VE228S Audio-in Earphone jack HDMI VGA Audio-in VGA • To connect the audio cable: connect one end of the audio ...
User Guide
Page 22
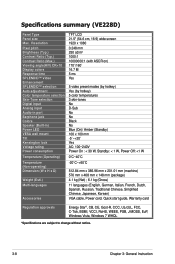
... No Black No Blue (On)/ Amber (Standby) 100 x 100 mm -5˚~+20˚ Yes AC: 100~240V Power On : < 30 W, Standby: < 1 W, Power Off: Specifications summary (VE228D) Panel Type Panel size Max.
... No Black No Blue (On)/ Amber (Standby) 100 x 100 mm -5˚~+20˚ Yes AC: 100~240V Power On : < 30 W, Standby: < 1 W, Power Off: Specifications summary (VE228D) Panel Type Panel size Max.