

Series User Manual
Page 15
... a grounded antistatic pad or in the bag that the ATX power supply is switched off or the power cord is detached from the power supply. ASUS Pro WS C621-64L SAGE Series 1-1 Chapter 1 Chapter 1: Product Introduction Product Introduction 1 1.1 Before you proceed Take note of the following precautions before you install or remove any component, ensure that...
... a grounded antistatic pad or in the bag that the ATX power supply is switched off or the power cord is detached from the power supply. ASUS Pro WS C621-64L SAGE Series 1-1 Chapter 1 Chapter 1: Product Introduction Product Introduction 1 1.1 Before you proceed Take note of the following precautions before you install or remove any component, ensure that...

Series User Manual
Page 17
... 1-31 1-25 1-20 1-21 1-24 1-25 1-11 1-28 1-29 1-26 1-13 1-10 1-22 1-24 1-31 1-19 1-9 1-9 1-23 1-13 1-21 1-14 1-15 1-23 1-32 ASUS Pro WS C621-64L SAGE Series 1-3 Chapter 1 Layout contents 1. Storage Add-on Card LED connector 7. USB 2.0 connector 21. VPP_I2C1 connector (Pro WS C621-64L SAGE/10G only) 26. PMBus 1.2 PSU Select jumper 6. Clear RTC RAM jumper 23.
... 1-31 1-25 1-20 1-21 1-24 1-25 1-11 1-28 1-29 1-26 1-13 1-10 1-22 1-24 1-31 1-19 1-9 1-9 1-23 1-13 1-21 1-14 1-15 1-23 1-32 ASUS Pro WS C621-64L SAGE Series 1-3 Chapter 1 Layout contents 1. Storage Add-on Card LED connector 7. USB 2.0 connector 21. VPP_I2C1 connector (Pro WS C621-64L SAGE/10G only) 26. PMBus 1.2 PSU Select jumper 6. Clear RTC RAM jumper 23.

Series User Manual
Page 19
A DDR4 memory module is notched differently from a DDR, DDR2, or DDR3 module. 1.4 System memory The motherboard comes with twelve (12) Dual Inline Memory Modules (DIMM) slots designed for DDR4 (Double Data Rate 4) memory modules. Chapter 1 ASUS Pro WS C621-64L SAGE Series 1-5 DO NOT install a DDR, DDR2, or DDR3 memory module to the DDR4 slot.
A DDR4 memory module is notched differently from a DDR, DDR2, or DDR3 module. 1.4 System memory The motherboard comes with twelve (12) Dual Inline Memory Modules (DIMM) slots designed for DDR4 (Double Data Rate 4) memory modules. Chapter 1 ASUS Pro WS C621-64L SAGE Series 1-5 DO NOT install a DDR, DDR2, or DDR3 memory module to the DDR4 slot.

Series User Manual
Page 21
Failure to do so may cause you physical injury and damage motherboard components. Slot Description 1 PCIe x16_1 slot 2 PCIe x16_2 slot 3 PCIe x4_1 slot 4 PCIe x16_3 slot 5 PCIe x16_4 slot ASUS Pro WS C621-64L SAGE Series 1-7 1.5 Expansion slots Unplug the power cord before adding or removing expansion cards. Chapter 1 Slot No.
Failure to do so may cause you physical injury and damage motherboard components. Slot Description 1 PCIe x16_1 slot 2 PCIe x16_2 slot 3 PCIe x4_1 slot 4 PCIe x16_3 slot 5 PCIe x16_4 slot ASUS Pro WS C621-64L SAGE Series 1-7 1.5 Expansion slots Unplug the power cord before adding or removing expansion cards. Chapter 1 Slot No.

Series User Manual
Page 23
Reset button Press the Reset button to a power source, indicating that you should shut down the system and unplug the power cable before removing or installing any motherboard component. 2. ASUS Pro WS C621-64L SAGE Series 1-9 The button also lights up the system, or put the system into sleep or softoff mode (depending on the operating system settings). Power button Press the Power button to power up when the system is plugged to reboot the system. Chapter 1 1.6 Onboard buttons 1.
Reset button Press the Reset button to a power source, indicating that you should shut down the system and unplug the power cable before removing or installing any motherboard component. 2. ASUS Pro WS C621-64L SAGE Series 1-9 The button also lights up the system, or put the system into sleep or softoff mode (depending on the operating system settings). Power button Press the Power button to power up when the system is plugged to reboot the system. Chapter 1 1.6 Onboard buttons 1.
Series User Manual
Page 27
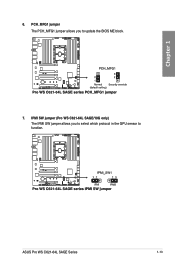
IPMI SW jumper (Pro WS C621-64L SAGE/10G only) The IPMI SW jumper allows you to function. ASUS Pro WS C621-64L SAGE Series 1-13 Chapter 1 6. PCH_MFG1 jumper The PCH_MFG1 jumper allows you to select which protocol in the GPU sensor to update the BIOS ME block. 7.
IPMI SW jumper (Pro WS C621-64L SAGE/10G only) The IPMI SW jumper allows you to function. ASUS Pro WS C621-64L SAGE Series 1-13 Chapter 1 6. PCH_MFG1 jumper The PCH_MFG1 jumper allows you to select which protocol in the GPU sensor to update the BIOS ME block. 7.
Series User Manual
Page 29
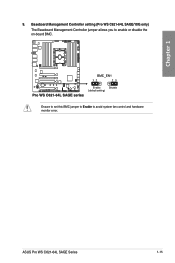
Ensure to set this BMC jumper to Enable to enable or disable the on-board BMC. ASUS Pro WS C621-64L SAGE Series 1-15 Chapter 1 9. Baseboard Management Controller setting (Pro WS C621-64L SAGE/10G only) The Baseboard Management Controller jumper allows you to avoid system fan control and hardware monitor error.
Ensure to set this BMC jumper to Enable to enable or disable the on-board BMC. ASUS Pro WS C621-64L SAGE Series 1-15 Chapter 1 9. Baseboard Management Controller setting (Pro WS C621-64L SAGE/10G only) The Baseboard Management Controller jumper allows you to avoid system fan control and hardware monitor error.
Series User Manual
Page 31
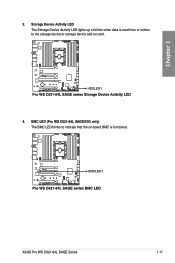
Chapter 1 3. Storage Device Activity LED The Storage Device Activity LED lights up or blinks when data is functional. BMC LED (Pro WS C621-64L SAGE/10G only) The BMC LED blinks to indicate that the on-board BMC is read from or written to the storage device or storage device add-on card. 4. ASUS Pro WS C621-64L SAGE Series 1-17
Chapter 1 3. Storage Device Activity LED The Storage Device Activity LED lights up or blinks when data is functional. BMC LED (Pro WS C621-64L SAGE/10G only) The BMC LED blinks to indicate that the on-board BMC is read from or written to the storage device or storage device add-on card. 4. ASUS Pro WS C621-64L SAGE Series 1-17
Series User Manual
Page 33
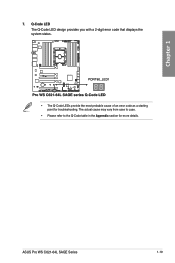
Chapter 1 7. Q-Code LED The Q-Code LED design provides you with a 2-digit error code that displays the system status. • The Q-Code LEDs provide the most probable cause of an error code as a starting point for more details. ASUS Pro WS C621-64L SAGE Series 1-19 The actual cause may vary from case to case. • Please refer to the Q-Code table in the Appendix section for troubleshooting.
Chapter 1 7. Q-Code LED The Q-Code LED design provides you with a 2-digit error code that displays the system status. • The Q-Code LEDs provide the most probable cause of an error code as a starting point for more details. ASUS Pro WS C621-64L SAGE Series 1-19 The actual cause may vary from case to case. • Please refer to the Q-Code table in the Appendix section for troubleshooting.
Series User Manual
Page 35
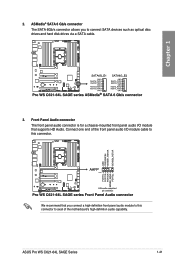
ASMedia® SATA 6 Gb/s connector The SATA 6Gb/s connector allows you connect a high-definition front panel audio module to this connector. ASUS Pro WS C621-64L SAGE Series 1-21 Connect one end of the motherboard's high-definition audio capability. We recommend that you to this connector to avail of the front panel ...
ASMedia® SATA 6 Gb/s connector The SATA 6Gb/s connector allows you connect a high-definition front panel audio module to this connector. ASUS Pro WS C621-64L SAGE Series 1-21 Connect one end of the motherboard's high-definition audio capability. We recommend that you to this connector to avail of the front panel ...
Series User Manual
Page 37
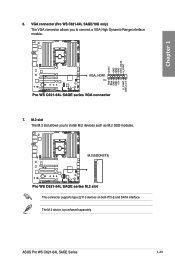
This connector supports type 22110 devices on both PCI-E and SATA interface. ASUS Pro WS C621-64L SAGE Series 1-23 6. The M.2 device is purchased separately. Chapter 1 7. VGA connector (Pro WS C621-64L SAGE/10G only) The VGA connector allows you to connect a VGA High Dynamic-Range interface module. M.2 slot The M.2 slot allows you to install M.2 devices such as M.2 SSD modules.
This connector supports type 22110 devices on both PCI-E and SATA interface. ASUS Pro WS C621-64L SAGE Series 1-23 6. The M.2 device is purchased separately. Chapter 1 7. VGA connector (Pro WS C621-64L SAGE/10G only) The VGA connector allows you to connect a VGA High Dynamic-Range interface module. M.2 slot The M.2 slot allows you to install M.2 devices such as M.2 SSD modules.
Series User Manual
Page 39
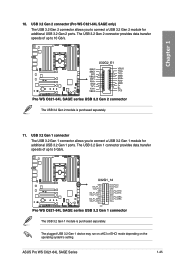
...'s setting. 10. The USB 3.2 Gen 1 connector provides data transfer speeds of up to connect a USB 3.2 Gen 2 module for additional USB 3.2 Gen 1 ports. ASUS Pro WS C621-64L SAGE Series 1-25 USB 3.2 Gen 2 connector (Pro WS C621-64L SAGE only) The USB 3.2 Gen 2 connector allows you to 10 Gb/s. Chapter 1 The USB 3.2 Gen 2 module is purchased separately. The USB 3.2 Gen 1 module is...
...'s setting. 10. The USB 3.2 Gen 1 connector provides data transfer speeds of up to connect a USB 3.2 Gen 2 module for additional USB 3.2 Gen 1 ports. ASUS Pro WS C621-64L SAGE Series 1-25 USB 3.2 Gen 2 connector (Pro WS C621-64L SAGE only) The USB 3.2 Gen 2 connector allows you to 10 Gb/s. Chapter 1 The USB 3.2 Gen 2 module is purchased separately. The USB 3.2 Gen 1 module is...

Series User Manual
Page 41
Chapter 1 • DO NOT forget to connect the fan cables to cool the system. Insufficient air flow inside the system may damage the motherboard components. Do not place jumper caps on the fan connectors! • Ensure the cable is fully inserted into the connector. Fan connector The Fan connector allows you to connect fans to the fan connectors. These are not jumpers! The fan connectors support a maximum of 1A (12W) fan power. ASUS Pro WS C621-64L SAGE Series 1-27 14.
Chapter 1 • DO NOT forget to connect the fan cables to cool the system. Insufficient air flow inside the system may damage the motherboard components. Do not place jumper caps on the fan connectors! • Ensure the cable is fully inserted into the connector. Fan connector The Fan connector allows you to connect fans to the fan connectors. These are not jumpers! The fan connectors support a maximum of 1A (12W) fan power. ASUS Pro WS C621-64L SAGE Series 1-27 14.

Series User Manual
Page 43
ASUS Pro WS C621-64L SAGE Series 1-29 Press the button to connect the Locator button. The Location LED helps visually locate and identify the server in error on a server rack. • Locator button connector (LOCATORBTN) The 2-pin connector allows you to connect the Locator LED. Chapter 1 16. Auxiliary Panel connector (Pro WS C621-64L SAGE/10G only) The Auxiliary Panel connector...
ASUS Pro WS C621-64L SAGE Series 1-29 Press the button to connect the Locator button. The Location LED helps visually locate and identify the server in error on a server rack. • Locator button connector (LOCATORBTN) The 2-pin connector allows you to connect the Locator LED. Chapter 1 16. Auxiliary Panel connector (Pro WS C621-64L SAGE/10G only) The Auxiliary Panel connector...
Series User Manual
Page 45
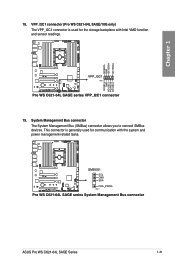
System Management Bus connector The System Management Bus (SMBus) connector allows you to connect SMBus devices. This connector is used for the storage backplane with the system and power management-related tasks. ASUS Pro WS C621-64L SAGE Series 1-31 Chapter 1 18. VPP_I2C1 connector (Pro WS C621-64L SAGE/10G only) The VPP_I2C1 connector is generally used for communication with Intel VMD function and sensor readings. 19.
System Management Bus connector The System Management Bus (SMBus) connector allows you to connect SMBus devices. This connector is used for the storage backplane with the system and power management-related tasks. ASUS Pro WS C621-64L SAGE Series 1-31 Chapter 1 18. VPP_I2C1 connector (Pro WS C621-64L SAGE/10G only) The VPP_I2C1 connector is generally used for communication with Intel VMD function and sensor readings. 19.

Series User Manual
Page 47
ASUS will shoulder the cost of repair only if the damage is missing, or if you see any damage to the PnP cap/socket contacts/motherboard ... contacts resulting from incorrect CPU installation/removal, or misplacement/loss/incorrect removal of the motherboard, ensure that you install the heatsink and fan, if necessary. ASUS Pro WS C621-64L SAGE Series 2-1 The motherboard layout may vary with models, but the installation steps are the same for all models. 2.1.1 CPU and heatsink installation • Ensure that...
ASUS will shoulder the cost of repair only if the damage is missing, or if you see any damage to the PnP cap/socket contacts/motherboard ... contacts resulting from incorrect CPU installation/removal, or misplacement/loss/incorrect removal of the motherboard, ensure that you install the heatsink and fan, if necessary. ASUS Pro WS C621-64L SAGE Series 2-1 The motherboard layout may vary with models, but the installation steps are the same for all models. 2.1.1 CPU and heatsink installation • Ensure that...

Series User Manual
Page 49
2.1.2 Motherboard installation 1. Chapter 2 ASUS Pro WS C621-64L SAGE Series 2-3 Place the motherboard into the chassis, ensuring that its rear I/O ports are aligned to the chassis rear I /O panel. Install the ASUS Q-Shield to the chassis' rear I /O panel. 2.
2.1.2 Motherboard installation 1. Chapter 2 ASUS Pro WS C621-64L SAGE Series 2-3 Place the motherboard into the chassis, ensuring that its rear I/O ports are aligned to the chassis rear I /O panel. Install the ASUS Q-Shield to the chassis' rear I /O panel. 2.

Series User Manual
Page 51
2.1.3 DIMM installation Chapter 2 To remove a DIMM ASUS Pro WS C621-64L SAGE Series 2-5
2.1.3 DIMM installation Chapter 2 To remove a DIMM ASUS Pro WS C621-64L SAGE Series 2-5

Series User Manual
Page 55
2.1.7 Expansion card installation To install PCIe x16 cards Chapter 2 ASUS Pro WS C621-64L SAGE Series 2-9
2.1.7 Expansion card installation To install PCIe x16 cards Chapter 2 ASUS Pro WS C621-64L SAGE Series 2-9

Series User Manual
Page 59
... BIOS program is damaged during the process and results to the system's failure to turn off the light. • Updating BIOS may be interrupted. Chapter 2 ASUS Pro WS C621-64L SAGE Series 2-13 In case of the USB storage device and filename/file format error. This may have risks. If this means that the BIOS Flashback... the light flashes for five seconds and turns into a solid light, this scenario happens, please restart the system to boot up, please contact your local ASUS Service Center.
... BIOS program is damaged during the process and results to the system's failure to turn off the light. • Updating BIOS may be interrupted. Chapter 2 ASUS Pro WS C621-64L SAGE Series 2-13 In case of the USB storage device and filename/file format error. This may have risks. If this means that the BIOS Flashback... the light flashes for five seconds and turns into a solid light, this scenario happens, please restart the system to boot up, please contact your local ASUS Service Center.


