
Users Manual English
Page 1
Motherboard PRIME B360M-K
Motherboard PRIME B360M-K
Users Manual English
Page 2
... FOR INFORMATIONAL USE ONLY, AND ARE SUBJECT TO CHANGE AT ANY TIME WITHOUT NOTICE, AND SHOULD NOT BE CONSTRUED AS A COMMITMENT BY ASUS. Offer to Provide Source Code of their respective companies, and are included in this information. The source code will not be registered trademarks... FOR ANY ERRORS OR INACCURACIES THAT MAY APPEAR IN THIS MANUAL, INCLUDING THE PRODUCTS AND SOFTWARE DESCRIBED IN IT. ii IN NO EVENT SHALL ASUS, ITS DIRECTORS, OFFICERS, EMPLOYEES OR AGENTS BE LIABLE FOR ANY INDIRECT, SPECIAL, INCIDENTAL, OR CONSEQUENTIAL DAMAGES (INCLUDING DAMAGES FOR LOSS OF PROFITS...
... FOR INFORMATIONAL USE ONLY, AND ARE SUBJECT TO CHANGE AT ANY TIME WITHOUT NOTICE, AND SHOULD NOT BE CONSTRUED AS A COMMITMENT BY ASUS. Offer to Provide Source Code of their respective companies, and are included in this information. The source code will not be registered trademarks... FOR ANY ERRORS OR INACCURACIES THAT MAY APPEAR IN THIS MANUAL, INCLUDING THE PRODUCTS AND SOFTWARE DESCRIBED IN IT. ii IN NO EVENT SHALL ASUS, ITS DIRECTORS, OFFICERS, EMPLOYEES OR AGENTS BE LIABLE FOR ANY INDIRECT, SPECIAL, INCIDENTAL, OR CONSEQUENTIAL DAMAGES (INCLUDING DAMAGES FOR LOSS OF PROFITS...

Users Manual English
Page 3
Contents Safety information...iv About this guide...iv Package contents...vi PRIME B360M-K specifications summary vi Chapter 1: Product introduction Before you proceed 1-1 Motherboard overview 1-1 Central Processing Unit (CPU 1-7 System memory...1-8 M.2 Anchor Installation 1-9 Chapter 2: BIOS information BIOS setup program 2-1 EZ Mode...2-2 Advanced Mode...2-3 Exit menu...2-4 Appendix Notices...A-1 ASUS contact information A-4 iii
Contents Safety information...iv About this guide...iv Package contents...vi PRIME B360M-K specifications summary vi Chapter 1: Product introduction Before you proceed 1-1 Motherboard overview 1-1 Central Processing Unit (CPU 1-7 System memory...1-8 M.2 Anchor Installation 1-9 Chapter 2: BIOS information BIOS setup program 2-1 EZ Mode...2-2 Advanced Mode...2-3 Exit menu...2-4 Appendix Notices...A-1 ASUS contact information A-4 iii

Users Manual English
Page 4
If possible, disconnect all the manuals that the power cables for the devices are unplugged before the signal cables are unplugged. • Seek professional assistance before using an adapter or extension cord. Operation safety • Before installing the motherboard and adding components, carefully read all power cables from the existing system before you add a device. • Before connecting or removing signal cables from connectors, slots, sockets and circuitry. • Avoid dust, humidity, and temperature extremes. Do not place the product in your area. About this guide ...
If possible, disconnect all the manuals that the power cables for the devices are unplugged before the signal cables are unplugged. • Seek professional assistance before using an adapter or extension cord. Operation safety • Before installing the motherboard and adding components, carefully read all power cables from the existing system before you add a device. • Before connecting or removing signal cables from connectors, slots, sockets and circuitry. • Avoid dust, humidity, and temperature extremes. Do not place the product in your area. About this guide ...

Users Manual English
Page 5
... provides updated information on ASUS hardware and software products. CAUTION: Information to prevent damage to the components when completing a task IMPORTANT: Instructions that you MUST follow to select. Typography Bold ... names are not part of the following sources for additional information and for product and software updates. 1. DANGER/WARNING: Information to prevent injury to the ASUS contact information. 2. Optional documentation Your product package may include optional documentation, such as warranty flyers, that may have been added by your dealer. Refer to...
... provides updated information on ASUS hardware and software products. CAUTION: Information to prevent damage to the components when completing a task IMPORTANT: Instructions that you MUST follow to select. Typography Bold ... names are not part of the following sources for additional information and for product and software updates. 1. DANGER/WARNING: Information to prevent injury to the ASUS contact information. 2. Optional documentation Your product package may include optional documentation, such as warranty flyers, that may have been added by your dealer. Refer to...
Users Manual English
Page 6
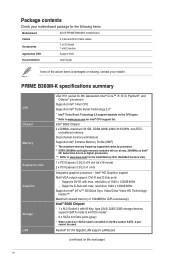
...ports - Realtek® 8111H Gigabit LAN support LANGuard (continued on the M.2 socket, SATA_2 port cannot be used. PRIME B360M-K specifications summary CPU Chipset Memory Expansion slots Graphics Storage LAN LGA1151 socket for 8th Generation Intel® Core™ ...SATA 6.0 Gb/s ports (gray) * When a device in SATA mode is damaged or missing, contact your motherboard package for the following items. Motherboard ASUS PRIME B360M-K motherboard Cables Accessories Application DVD 2 x Serial ATA 6.0 Gb/s cables 1 x I/O Shield 1 x M.2 Anchor Support DVD Documentation User Guide If any...
...ports - Realtek® 8111H Gigabit LAN support LANGuard (continued on the M.2 socket, SATA_2 port cannot be used. PRIME B360M-K specifications summary CPU Chipset Memory Expansion slots Graphics Storage LAN LGA1151 socket for 8th Generation Intel® Core™ ...SATA 6.0 Gb/s ports (gray) * When a device in SATA mode is damaged or missing, contact your motherboard package for the following items. Motherboard ASUS PRIME B360M-K motherboard Cables Accessories Application DVD 2 x Serial ATA 6.0 Gb/s cables 1 x I/O Shield 1 x M.2 Anchor Support DVD Documentation User Guide If any...

Users Manual English
Page 7
..., natural and immersive sound with up to 10Gbps) ports (at the back panel) ASUS 5X PROTECTION III - ASUS DIGI+ VRM: 5 Phase digital power design Superb Performance ASUS OptiMem - EPU UEFI BIOS - ASUS EZ Flash 3 Q-Design - ASUS AI Suite 3 - PRIME B360M-K specifications summary Audio USB ASUS unique features Realtek® ALC887 8-channel* high definition audio CODEC - LED-illuminated design...
..., natural and immersive sound with up to 10Gbps) ports (at the back panel) ASUS 5X PROTECTION III - ASUS DIGI+ VRM: 5 Phase digital power design Superb Performance ASUS OptiMem - EPU UEFI BIOS - ASUS EZ Flash 3 Q-Design - ASUS AI Suite 3 - PRIME B360M-K specifications summary Audio USB ASUS unique features Realtek® ALC887 8-channel* high definition audio CODEC - LED-illuminated design...

Users Manual English
Page 8
... connector 1 x COM connector 1 x Clear CMOS jumper 128 Mb Flash ROM, UEFI AMI BIOS, PnP, SM BIOS 3.1, ACPI 6.1, Multilanguage BIOS, ASUS EZ Flash 3, CrashFree BIOS 3, F6 Qfan Control, F3 My Favorites, Last Modified log, F12 PrintScreen, and...version) Windows® 10 (64-bit) mATX form factor: 8.9 in . (22.6 cm x 18.5 cm) Specifications are subject to change without notice. x 7.3 in . ASUS Fan Xpert - PRIME B360M-K specifications summary ASUS quiet thermal solution Back panel I/O ports Internal I /O ports 1 x USB 3.1 Gen 1 (up to 5Gbps) Type A ports (blue) 2 x USB 2.0/1.1 ports 3-Jack ...
... connector 1 x COM connector 1 x Clear CMOS jumper 128 Mb Flash ROM, UEFI AMI BIOS, PnP, SM BIOS 3.1, ACPI 6.1, Multilanguage BIOS, ASUS EZ Flash 3, CrashFree BIOS 3, F6 Qfan Control, F3 My Favorites, Last Modified log, F12 PrintScreen, and...version) Windows® 10 (64-bit) mATX form factor: 8.9 in . (22.6 cm x 18.5 cm) Specifications are subject to change without notice. x 7.3 in . ASUS Fan Xpert - PRIME B360M-K specifications summary ASUS quiet thermal solution Back panel I/O ports Internal I /O ports 1 x USB 3.1 Gen 1 (up to 5Gbps) Type A ports (blue) 2 x USB 2.0/1.1 ports 3-Jack ...

Users Manual English
Page 9
... U31G1_12 SATA6G_6 SATA6G_5 SATA6G_4 SPEAKER 17 AAFP CLRTC F_PANEL 14 13 12 11 10 6 98 Scan the QR code to get the detailed pin definitions. ASUS PRIME B360M-K 1-1 Product introduction 1 Before you install motherboard components or change any component. • Before handling components, use a grounded wrist strap or touch a safely grounded object or...
... U31G1_12 SATA6G_6 SATA6G_5 SATA6G_4 SPEAKER 17 AAFP CLRTC F_PANEL 14 13 12 11 10 6 98 Scan the QR code to get the detailed pin definitions. ASUS PRIME B360M-K 1-1 Product introduction 1 Before you install motherboard components or change any component. • Before handling components, use a grounded wrist strap or touch a safely grounded object or...
Users Manual English
Page 10
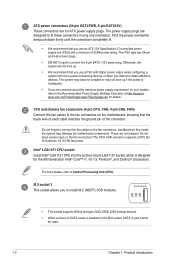
... when configuring a system with a minimum of maximum 1A (12 W) fan power. The CPU_FAN connector supports a CPU fan of 350W power rating. PRIME Z270-P M.2(SOCKET3)s 1-2 Chapter 1: Product introduction Find the proper orientation and push down firmly until the connectors completely fit. • We recommend that... This socket supports M Key and type 2242/ 2260/ 2280 storage devices. 2280 2260 2242 • When a device in only one orientation. asus.com.cn/PowerSupply.aspx?SLanguage=en for the 8th Generation Intel® Core™ i7 / i5 / i3, Pentium®, and Celeron®...
... when configuring a system with a minimum of maximum 1A (12 W) fan power. The CPU_FAN connector supports a CPU fan of 350W power rating. PRIME Z270-P M.2(SOCKET3)s 1-2 Chapter 1: Product introduction Find the proper orientation and push down firmly until the connectors completely fit. • We recommend that... This socket supports M Key and type 2242/ 2260/ 2280 storage devices. 2280 2260 2242 • When a device in only one orientation. asus.com.cn/PowerSupply.aspx?SLanguage=en for the 8th Generation Intel® Core™ i7 / i5 / i3, Pentium®, and Celeron®...

Users Manual English
Page 11
... drives via Serial ATA 6.0 Gb/s signal cables. Turn OFF the computer and unplug the power cord. 2. Plug the power cord and turn ON the computer. 4. ASUS PRIME B360M-K 1-3 USB 3.1 Gen 1 (up to 5Gbps) connector (20-1 pin U31G1_12) Connect a USB 3.1 Gen 1 module to this connector for the chassis-mounted system warning speaker. USB 2.0 connectors...
... drives via Serial ATA 6.0 Gb/s signal cables. Turn OFF the computer and unplug the power cord. 2. Plug the power cord and turn ON the computer. 4. ASUS PRIME B360M-K 1-3 USB 3.1 Gen 1 (up to 5Gbps) connector (20-1 pin U31G1_12) Connect a USB 3.1 Gen 1 module to this connector for the chassis-mounted system warning speaker. USB 2.0 connectors...

Users Manual English
Page 12
Serial port connector (10-1 pin COM) This connector is for a chassis-mounted front panel audio I /O module cable to this connector. • We recommend that supports HD Audio audio standard. Connect one end of the front panel audio I /O module that you connect a high-definition front panel audio module to this connector to avail of the motherboard's high-definition audio capability. • If you want to connect a high-definition front panel audio module to this connector, set to a slot opening at the back of the system chassis. Connect the serial port module cable to this ...
Serial port connector (10-1 pin COM) This connector is for a chassis-mounted front panel audio I /O module cable to this connector. • We recommend that supports HD Audio audio standard. Connect one end of the front panel audio I /O module that you connect a high-definition front panel audio module to this connector to avail of the motherboard's high-definition audio capability. • If you want to connect a high-definition front panel audio module to this connector, set to a slot opening at the back of the system chassis. Connect the serial port module cable to this ...

Users Manual English
Page 13
... you connect USB 3.1 Gen 2 devices to the USB 2.0 and USB 3.1 Gen 2 / Gen 1 ports are controlled by the xHCI controller. Rear panel connectors 1 2 3 4 5 67 11 10 9 8 1. ASUS PRIME B360M-K 1-5 This 15-pin port is for data storage. • Due to the design of the Intel® 300 series chipset, all USB devices connected to...
... you connect USB 3.1 Gen 2 devices to the USB 2.0 and USB 3.1 Gen 2 / Gen 1 ports are controlled by the xHCI controller. Rear panel connectors 1 2 3 4 5 67 11 10 9 8 1. ASUS PRIME B360M-K 1-5 This 15-pin port is for data storage. • Due to the design of the Intel® 300 series chipset, all USB devices connected to...

Users Manual English
Page 14
Line Out port (lime). Refer to CRT and is for any DVI-D compatible device. Audio 2.1, 4.1, 5.1 or 7.1-channel configuration Port Light Blue (Rear panel) Lime (Rear panel) Pink (Rear panel) Lime (Front panel) Headset 2.1-channel Line In Line Out Mic In - 4.1-channel 5.1-channel 7.1-channel Rear Speaker Out Rear Speaker Out Rear Speaker Out Front Speaker Out Front Speaker Out Front Speaker Out Mic In Bass/Center Bass/Center - - This port is not compatible with HD audio module in 2.1, 4.1, 5.1, or 7.1-channel configuration. DVI-D can not be converted to output from RGB Signal ...
Line Out port (lime). Refer to CRT and is for any DVI-D compatible device. Audio 2.1, 4.1, 5.1 or 7.1-channel configuration Port Light Blue (Rear panel) Lime (Rear panel) Pink (Rear panel) Lime (Front panel) Headset 2.1-channel Line In Line Out Mic In - 4.1-channel 5.1-channel 7.1-channel Rear Speaker Out Rear Speaker Out Rear Speaker Out Front Speaker Out Front Speaker Out Front Speaker Out Mic In Bass/Center Bass/Center - - This port is not compatible with HD audio module in 2.1, 4.1, 5.1, or 7.1-channel configuration. DVI-D can not be converted to output from RGB Signal ...

Users Manual English
Page 15
... process Return Merchandise Authorization (RMA) requests only if the motherboard comes with a surface mount LGA1151 socket designed for the LGA1151 socket only. ASUS PRIME B360M-K 1-7 Contact your retailer immediately if the PnP cap is on the socket and the socket contacts are not bent. Installing the CPU 1 A B 2 3 4A D5 4 C 5 B 4 Apply ...
... process Return Merchandise Authorization (RMA) requests only if the motherboard comes with a surface mount LGA1151 socket designed for the LGA1151 socket only. ASUS PRIME B360M-K 1-7 Contact your retailer immediately if the PnP cap is on the socket and the socket contacts are not bent. Installing the CPU 1 A B 2 3 4A D5 4 C 5 B 4 Apply ...

Users Manual English
Page 16
...* DIMM_B1* DIMM_A1* 1-8 Chapter 1: Product introduction Profile is dependent on Intel® 8th Generation 6-core or higher processors. • Memory modules with the retailer to www.asus.com for single-channel operation. • Always install DIMMs with two Double Data Rate 4 (DDR4) Dual Inline Memory Module (DIMM) sockets. Any excess memory from...
...* DIMM_B1* DIMM_A1* 1-8 Chapter 1: Product introduction Profile is dependent on Intel® 8th Generation 6-core or higher processors. • Memory modules with the retailer to www.asus.com for single-channel operation. • Always install DIMMs with two Double Data Rate 4 (DDR4) Dual Inline Memory Module (DIMM) sockets. Any excess memory from...

Users Manual English
Page 17
Insert the M.2 SSD card into the hole. 2. Installing a DIMM 1 To remove a DIMM A B 2 A A B M.2 Anchor Installation The M.2 Anchor is a tool-less design to easily fasten and secure your M.2 SSD card to your motherboard and firmly insert the M.2 Anchor into the M.2 slot. Locate the M.2 mounting hole on your motherboard without using the M.2 Anchor: 1. The notch at the end of the M.2 SSD card shall align with the rod of the M.2 Anchor. ASUS PRIME B360M-K 1-9 To install the M.2 SSD card using extra tools.
Insert the M.2 SSD card into the hole. 2. Installing a DIMM 1 To remove a DIMM A B 2 A A B M.2 Anchor Installation The M.2 Anchor is a tool-less design to easily fasten and secure your M.2 SSD card to your motherboard and firmly insert the M.2 Anchor into the M.2 slot. Locate the M.2 mounting hole on your motherboard without using the M.2 Anchor: 1. The notch at the end of the M.2 SSD card shall align with the rod of the M.2 Anchor. ASUS PRIME B360M-K 1-9 To install the M.2 SSD card using extra tools.

Users Manual English
Page 18
Pull up the ring on itself. To uninstall the M.2 SSD card: 1. 3. Firmly insert the pin on the M.2 Anchor into the hole on the M.2 Anchor until it is separated from the M.2 slot. 1-10 Chapter 1: Product introduction Remove the M.2 SSD card from the hole. 2.
Pull up the ring on itself. To uninstall the M.2 SSD card: 1. 3. Firmly insert the pin on the M.2 Anchor into the hole on the M.2 Anchor until it is separated from the M.2 slot. 1-10 Chapter 1: Product introduction Remove the M.2 SSD card from the hole. 2.

Users Manual English
Page 19
.... • If the system fails to boot after changing any BIOS setting, load the default settings to change between the two modes. 2-1 ASUS PRIME B360M-K Select the Load Optimized Defaults item under two modes: EZ Mode and Advanced Mode. See section Motherboard overview for reference purposes only, and may.... • If the system becomes unstable after POST: Press ++ simultaneously. Entering BIOS Setup at startup To enter BIOS Setup at www.asus.com to download the latest BIOS file for this section are for information on how to the default value. BIOS menu screen The BIOS ...
.... • If the system fails to boot after changing any BIOS setting, load the default settings to change between the two modes. 2-1 ASUS PRIME B360M-K Select the Load Optimized Defaults item under two modes: EZ Mode and Advanced Mode. See section Motherboard overview for reference purposes only, and may.... • If the system becomes unstable after POST: Press ++ simultaneously. Entering BIOS Setup at startup To enter BIOS Setup at www.asus.com to download the latest BIOS file for this section are for information on how to the default value. BIOS menu screen The BIOS ...

Users Manual English
Page 20
Displays the CPU/motherboard temperature, CPU voltage output, CPU/chassis fan speed, and SATA information Selects the display language of the BIOS setup program Displays the system properties of the basic system information, and allows you to select the display language, system performance mode, fan profile and boot device priority. Click the button to manually tune the fans Loads optimized default settings Shows the Displays the bootable Advanced mode devices menus Saves the changes and resets the system Search on FAQs Selects the boot device priority The boot device options vary...
Displays the CPU/motherboard temperature, CPU voltage output, CPU/chassis fan speed, and SATA information Selects the display language of the BIOS setup program Displays the system properties of the basic system information, and allows you to select the display language, system performance mode, fan profile and boot device priority. Click the button to manually tune the fans Loads optimized default settings Shows the Displays the bootable Advanced mode devices menus Saves the changes and resets the system Search on FAQs Selects the boot device priority The boot device options vary...
