
User Manual
Page 17
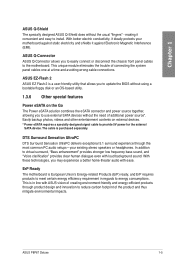
... your existing stereo speakers or headphones. In addition to use external SATA devices without the usual "fingers" - ASUS P8P67 Deluxe 1-5 With these technologies, you to virtual surround, "Bass enhancement" provides stronger low frequency bass sound, and "Voice clarification" provides clear human dialogue even...This unique module eliminates the trouble of connecting the system panel cables one at a time and avoiding wrong cable connections. ASUS Q-Connector ASUS Q-Connector allows you to update the BIOS without using a bootable floppy disk or an OS-based utility. 1.3.6 Other...
... your existing stereo speakers or headphones. In addition to use external SATA devices without the usual "fingers" - ASUS P8P67 Deluxe 1-5 With these technologies, you to virtual surround, "Bass enhancement" provides stronger low frequency bass sound, and "Voice clarification" provides clear human dialogue even...This unique module eliminates the trouble of connecting the system panel cables one at a time and avoiding wrong cable connections. ASUS Q-Connector ASUS Q-Connector allows you to update the BIOS without using a bootable floppy disk or an OS-based utility. 1.3.6 Other...

User Manual
Page 42
... Reserved for ASL (see ASL Status Codes section below) Ready To Boot event Legacy Boot event Exit Boot Services event Runtime Set Virtual Address MAP Begin Runtime Set Virtual Address MAP End Legacy Option ROM Initialization System Reset USB hot plug PCI bus hot plug Clean-up of NVRAM Configuration Reset (reset...
... Reserved for ASL (see ASL Status Codes section below) Ready To Boot event Legacy Boot event Exit Boot Services event Runtime Set Virtual Address MAP Begin Runtime Set Virtual Address MAP End Legacy Option ROM Initialization System Reset USB hot plug PCI bus hot plug Clean-up of NVRAM Configuration Reset (reset...

User Manual
Page 82
... 31 CPU Ratio Auto Intel Adaptive Thermal Monitor Enabled Hyper-threading Enabled Active Processor Cores All Limit CPUID Maximum Disabled Execute Disable Bit Enabled Intel Virtualization Technology Disabled Enhanced Intel SpeedStep Technology Enabled Boot Tool Adjust Non-Turbo Ratio →←: Select Screen ↑↓: Select Item Enter: Select +/-: Change Opt...
... 31 CPU Ratio Auto Intel Adaptive Thermal Monitor Enabled Hyper-threading Enabled Active Processor Cores All Limit CPUID Maximum Disabled Execute Disable Bit Enabled Intel Virtualization Technology Disabled Enhanced Intel SpeedStep Technology Enabled Boot Tool Adjust Non-Turbo Ratio →←: Select Screen ↑↓: Select Item Enter: Select +/-: Change Opt...

User Manual
Page 83
...[Enabled] Allows legacy operating systems to boot even without support for CPUs with extended CPUID functions. [Disabled] Disables this function. Chapter 3 ASUS P8P67 Deluxe 3-15 Enhanced Intel SpeedStep Technology [Enabled] Allows you to enable or disable the Intel® Turbo Mode Technology. [Enabled] [Disabled] ... function. Active Processor Cores [All] Allows you to choose the number of CPU cores to activate in order to virtually function as two logical processors to the operating system, allowing the operating system to schedule two threads or processes simultaneously...
...[Enabled] Allows legacy operating systems to boot even without support for CPUs with extended CPUID functions. [Disabled] Disables this function. Chapter 3 ASUS P8P67 Deluxe 3-15 Enhanced Intel SpeedStep Technology [Enabled] Allows you to enable or disable the Intel® Turbo Mode Technology. [Enabled] [Disabled] ... function. Active Processor Cores [All] Allows you to choose the number of CPU cores to activate in order to virtually function as two logical processors to the operating system, allowing the operating system to schedule two threads or processes simultaneously...
User Manual
Page 125
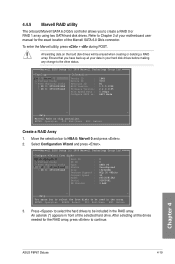
...to be erased when creating or deleting a RAID array. Marvell BIOS Setup (c) 2009 Marvell Technology Group Ltd. Configure->Select free disks HBA 0: Marvell 0 ├ Virtual Disks └ Free Physical Disks * ├ PD 0: ST3160812AS └ PD 8: ST3160812AS Port ID : PD ID : Type : Status : Size : ... bar to select the free disks to Chapter 2 of your data in front of the Marvell SATA 6.0 Gb/s connector. Chapter 4 ASUS P8P67 Deluxe 4-19 All exisiting data on chip controller. To enter the Marvell utility, press + during POST. Press to select the hard drives ...
...to be erased when creating or deleting a RAID array. Marvell BIOS Setup (c) 2009 Marvell Technology Group Ltd. Configure->Select free disks HBA 0: Marvell 0 ├ Virtual Disks └ Free Physical Disks * ├ PD 0: ST3160812AS └ PD 8: ST3160812AS Port ID : PD ID : Type : Status : Size : ... bar to select the free disks to Chapter 2 of your data in front of the Marvell SATA 6.0 Gb/s connector. Chapter 4 ASUS P8P67 Deluxe 4-19 All exisiting data on chip controller. To enter the Marvell utility, press + during POST. Press to select the hard drives ...

User Manual
Page 126
... physical disk to be of a single physical disk failure in the RAID 1 array. The following warning message appears: Create Virtual Disk Do you want to Next and press . Yes No Press to create the RAID array, or press to configure further... Chapter 4: Software support Marvell BIOS Setup (c) 2009 Marvell Technology Group Ltd. ENTER: Select F10: Exit/Save ESC: Return 4. Configure->Select free disksCreate Virtual Disk HBA 0: Marvell 0 ├ Virtual Disks └ Free Physical Disks * ├ PD 0: ST3160812AS * └ PD 8: ST3160812AS RAID Level : RAID 0 Max Size(MB) ...
... physical disk to be of a single physical disk failure in the RAID 1 array. The following warning message appears: Create Virtual Disk Do you want to Next and press . Yes No Press to create the RAID array, or press to configure further... Chapter 4: Software support Marvell BIOS Setup (c) 2009 Marvell Technology Group Ltd. ENTER: Select F10: Exit/Save ESC: Return 4. Configure->Select free disksCreate Virtual Disk HBA 0: Marvell 0 ├ Virtual Disks └ Free Physical Disks * ├ PD 0: ST3160812AS * └ PD 8: ST3160812AS RAID Level : RAID 0 Max Size(MB) ...

User Manual
Page 127
... : 64K : RAID0 : 304128MB : N/A : 2 : 0 8 ▶ ▶ Help Delete the selected virtual disk. ENTER: Operation F10: Exit/Save ESC: Return Chapter 4 ASUS P8P67 Deluxe 4-21 The following warning message appears: Exit Do you want to save the RAID setting and exit the Marvell RAID ...Setup? Marvell BIOS Setup (c) 2009 Marvell Technology Group Ltd. ENTER: Operation F10: Exit/Save ESC: Return 6. Topology HBA 0: Marvell 0 ├ Virtual Disks │ └ VD 0: New_VD │ ├ PD 0: ST3160812AS │ └ PD 8: ST3160812AS └ Free Physical Disks Information...
... : 64K : RAID0 : 304128MB : N/A : 2 : 0 8 ▶ ▶ Help Delete the selected virtual disk. ENTER: Operation F10: Exit/Save ESC: Return Chapter 4 ASUS P8P67 Deluxe 4-21 The following warning message appears: Exit Do you want to save the RAID setting and exit the Marvell RAID ...Setup? Marvell BIOS Setup (c) 2009 Marvell Technology Group Ltd. ENTER: Operation F10: Exit/Save ESC: Return 6. Topology HBA 0: Marvell 0 ├ Virtual Disks │ └ VD 0: New_VD │ ├ PD 0: ST3160812AS │ └ PD 8: ST3160812AS └ Free Physical Disks Information...

User Manual
Page 128
... Do you want to delete the Master Boot Record (MBR) from this virtual disk ? Yes No Press to save the RAID setting and exit the Marvell RAID utility. 2. Yes No Press to exit from Marvell BIOS Setup? Yes ...: Delete MBR Do you want to delete MBR from the selected RAID array. 3. The following warning message appears: Exit Do you want to delete this virtual disk ? Press .
... Do you want to delete the Master Boot Record (MBR) from this virtual disk ? Yes No Press to save the RAID setting and exit the Marvell RAID utility. 2. Yes No Press to exit from Marvell BIOS Setup? Yes ...: Delete MBR Do you want to delete MBR from the selected RAID array. 3. The following warning message appears: Exit Do you want to delete this virtual disk ? Press .