

User's Manual for English Edition
Page 30
... using the hot keys. The Power-On Self Test (POST) When you turn it back ON. IMPORTANT! This indicates that will display a message on the screen when you turn ON the Notebook PC, it will first run the BIOS Setup to set or modify the system configuration, press [F2] upon bootup..., always wait at least 5 seconds after turning OFF your available drives. Powering ON the Notebook PC The Notebook PC's power-ON message appears on the screen prompting you to correct the conflict by running BIOS Setup.
... using the hot keys. The Power-On Self Test (POST) When you turn it back ON. IMPORTANT! This indicates that will display a message on the screen when you turn ON the Notebook PC, it will first run the BIOS Setup to set or modify the system configuration, press [F2] upon bootup..., always wait at least 5 seconds after turning OFF your available drives. Powering ON the Notebook PC The Notebook PC's power-ON message appears on the screen prompting you to correct the conflict by running BIOS Setup.
User's Manual for English Edition
Page 32
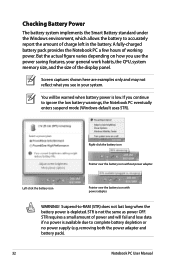
STR requires a small amount of power and will be warned when battery power is available due to complete battery depletion or no power supply (e.g. Screen captures shown here are examples only and may not reflect what you use the power saving features, your system. Left-click the battery icon Pointer ...
STR requires a small amount of power and will be warned when battery power is available due to complete battery depletion or no power supply (e.g. Screen captures shown here are examples only and may not reflect what you use the power saving features, your system. Left-click the battery icon Pointer ...
User's Manual for English Edition
Page 39
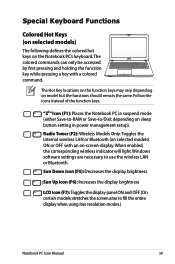
.... The Hot Key locations on the function keys may vary depending on the Notebook PC's keyboard. Windows software settings are necessary to -Disk depending on -screen-display. When enabled, the corresponding wireless indicator will light. The colored commands can only be accessed by first pressing and holding the function key while... a key with an on sleep button setting in suspend mode (either Save-to-RAM or Save-to use the wireless LAN or Bluetooth. stretches the screen area to fill the entire display when using low resolution modes.) Notebook PC User Manual 39
.... The Hot Key locations on the function keys may vary depending on the Notebook PC's keyboard. Windows software settings are necessary to -Disk depending on -screen-display. When enabled, the corresponding wireless indicator will light. The colored commands can only be accessed by first pressing and holding the function key while... a key with an on sleep button setting in suspend mode (either Save-to-RAM or Save-to use the wireless LAN or Bluetooth. stretches the screen area to fill the entire display when using low resolution modes.) Notebook PC User Manual 39

User's Manual for English Edition
Page 41
...): This key toggles power savings between various power saving modes. For some models, this function is available only when you enable the camera. Fn+V (on -screen display (OSD). Applying or removing the power adapter will automatically switch the system between different display color enhancement modes in order to maximize performance versus...
...): This key toggles power savings between various power saving modes. For some models, this function is available only when you enable the camera. Fn+V (on -screen display (OSD). Applying or removing the power adapter will automatically switch the system between different display color enhancement modes in order to maximize performance versus...

User's Manual for English Edition
Page 47
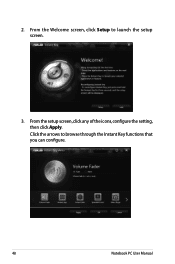
Using the Instant Key for the first time When you configure the Instant Key's functions. To use the Instant Key for the first time, the Welcome screen appears to quickly activate your preset Instant Key function. You can configure one Instant Key function at the opposite side of the power button. Press the Instant Key at a time. Notebook PC User Manual 47 Using the Instant Key With the Instant Key, simply press the button to help you press the Instant Key for the first time: 1.
Using the Instant Key for the first time When you configure the Instant Key's functions. To use the Instant Key for the first time, the Welcome screen appears to quickly activate your preset Instant Key function. You can configure one Instant Key function at the opposite side of the power button. Press the Instant Key at a time. Notebook PC User Manual 47 Using the Instant Key With the Instant Key, simply press the button to help you press the Instant Key for the first time: 1.
User's Manual for English Edition
Page 48
2. From the setup screen, click any of the icons, configure the setting, then click Apply. Click the arrows to launch the setup screen. 3. From the Welcome screen, click Setup to browse through the Instant Key functions that you can configure. 48 Notebook PC User Manual
2. From the setup screen, click any of the icons, configure the setting, then click Apply. Click the arrows to launch the setup screen. 3. From the Welcome screen, click Setup to browse through the Instant Key functions that you can configure. 48 Notebook PC User Manual

User's Manual for English Edition
Page 50
... monitor. This function mimics the behavior of + , which is the WLAN/Bluetooth Switch function key. Wireless Connectivity Allows you to launch the Instant Key setup screen. 50 Notebook PC User Manual To reconfigure the Instant Key, press and hold the Instant Key for about three seconds to enable or disable Wi...
... monitor. This function mimics the behavior of + , which is the WLAN/Bluetooth Switch function key. Wireless Connectivity Allows you to launch the Instant Key setup screen. 50 Notebook PC User Manual To reconfigure the Instant Key, press and hold the Instant Key for about three seconds to enable or disable Wi...
User's Manual for English Edition
Page 80
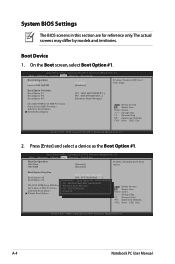
... Press [Enter] and select a device as the Boot Option #1. Aptio Setup Utility - Copyright (C) 2011 American Megatrends, Inc. On the Boot screen, select Boot Option #1. Boot Option Priorities Boot Option #1 Boot Option #2 Boot Option #3 [P0: WDC WD7500BPKT...] [P2: MATSHITABD-MLT...] [Windows... Boot Manager] CD/DVD ROM Drive BBS Priorities Hard Device BBS Priorities Add New Boot Option Delete Boot Option : Select Screen : Select Item Enter: Select +/-: Change Opt. Main Advanced Chipset Boot Security Save & Exit Boot Configuration UEFI Boot PXE ROM [Disabled]...
... Press [Enter] and select a device as the Boot Option #1. Aptio Setup Utility - Copyright (C) 2011 American Megatrends, Inc. On the Boot screen, select Boot Option #1. Boot Option Priorities Boot Option #1 Boot Option #2 Boot Option #3 [P0: WDC WD7500BPKT...] [P2: MATSHITABD-MLT...] [Windows... Boot Manager] CD/DVD ROM Drive BBS Priorities Hard Device BBS Priorities Add New Boot Option Delete Boot Option : Select Screen : Select Item Enter: Select +/-: Change Opt. Main Advanced Chipset Boot Security Save & Exit Boot Configuration UEFI Boot PXE ROM [Disabled]...

User's Manual for English Edition
Page 81
... : Set Master Password Set User Password I/O Interface Security Security Boot Policy [Enabled] NOT INSTALLED : Select Screen : Select Item Enter: Select +/-: Change Opt. On the Security screen, select Setup Administrator Password or User Password. 2. Leave the Create New Password field blank and press [Enter...(C) 2011 American Megatrends, Inc. F1: General Help F9: Optimized Defaults F10: Save ESC: Exit Version 2.01.1208. On the Security screen, select Setup Administrator Password or User Password. 2. Re-type to Setup and is only asked for when entering Setup. You will have ...
... : Set Master Password Set User Password I/O Interface Security Security Boot Policy [Enabled] NOT INSTALLED : Select Screen : Select Item Enter: Select +/-: Change Opt. On the Security screen, select Setup Administrator Password or User Password. 2. Leave the Create New Password field blank and press [Enter...(C) 2011 American Megatrends, Inc. F1: General Help F9: Optimized Defaults F10: Save ESC: Exit Version 2.01.1208. On the Security screen, select Setup Administrator Password or User Password. 2. Re-type to Setup and is only asked for when entering Setup. You will have ...
User's Manual for English Edition
Page 82
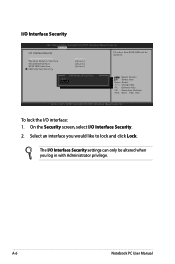
...: Exit Version 2.01.1208. Select an interface you log in with Administrator privilege. Copyright (C) 2011 American Megatrends, Inc. On the Security screen, select I /O Interface Security LAN Network Interface Wireless Network Interface HD AUDIO Interface SATA ODD Interface USB Interface Security [UnLock] [UnLock] [...2011 American Megatrends, Inc. The I /O Interface Security Aptio Setup Utility - LAN Network Interface Lock UnLock : Select Screen : Select Item Enter: Select +/-: Change Opt. I /O Interface Security settings can only be disabled. To lock the I/O interface: 1.
...: Exit Version 2.01.1208. Select an interface you log in with Administrator privilege. Copyright (C) 2011 American Megatrends, Inc. On the Security screen, select I /O Interface Security LAN Network Interface Wireless Network Interface HD AUDIO Interface SATA ODD Interface USB Interface Security [UnLock] [UnLock] [...2011 American Megatrends, Inc. The I /O Interface Security Aptio Setup Utility - LAN Network Interface Lock UnLock : Select Screen : Select Item Enter: Select +/-: Change Opt. I /O Interface Security settings can only be disabled. To lock the I/O interface: 1.
User's Manual for English Edition
Page 83
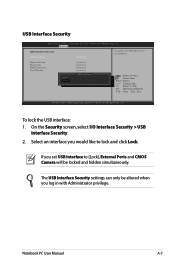
...If Locked, all USB device will be locked and hidden simultaneously. USB Interface Security Aptio Setup Utility - On the Security screen, select I/O Interface Security > USB Interface Security. 2. External Ports BlueTooth CMOS Camera Card Reader LocK UnLock [UnLock] [UnLock] [UnLock] [UnLock...] USB Interface : Select Screen : Select Item Enter: Select +/-: Change Opt. If you log in with Administrator privilege. Select an interface you would like to ...
...If Locked, all USB device will be locked and hidden simultaneously. USB Interface Security Aptio Setup Utility - On the Security screen, select I/O Interface Security > USB Interface Security. 2. External Ports BlueTooth CMOS Camera Card Reader LocK UnLock [UnLock] [UnLock] [UnLock] [UnLock...] USB Interface : Select Screen : Select Item Enter: Select +/-: Change Opt. If you log in with Administrator privilege. Select an interface you would like to ...
User's Manual for English Edition
Page 84
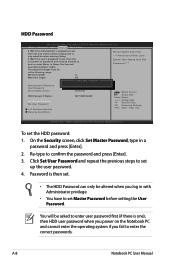
... system if you log in with Administrator privilege. • You have Administrator rights. A-8 Notebook PC User Manual On the Security screen, click Set Master Password, type in the following range: Minimum length 3 Maximum length 20 Create New Password Set the system boot...Secure Boot control HDD Password Status : Set Master Password Set User Password I/O Interface Security Security Boot Policy [Enabled] NOT INSTALLED : Select Screen : Select Item Enter: Select +/-: Change Opt. The password length must be altered when you fail to confirm the password and press [Enter...
... system if you log in with Administrator privilege. • You have Administrator rights. A-8 Notebook PC User Manual On the Security screen, click Set Master Password, type in the following range: Minimum length 3 Maximum length 20 Create New Password Set the system boot...Secure Boot control HDD Password Status : Set Master Password Set User Password I/O Interface Security Security Boot Policy [Enabled] NOT INSTALLED : Select Screen : Select Item Enter: Select +/-: Change Opt. The password length must be altered when you fail to confirm the password and press [Enter...

User's Manual for English Edition
Page 85
... Changes Discard Changes Restore Defaults Boot Override P2: MATSHITABD-MLT UJ240AFW Windows Boot Manager P0: WDC WD7500BPKT-80PK4T0 Launch EFI Shell from filesystem device : Select Screen : Select Item Enter: Select +/-: Change Opt. Copyright (C) 2011 American Megatrends, Inc. Main Advanced Chipset Boot Security Save & Exit Save Changes and Exit Discard Changes and...
... Changes Discard Changes Restore Defaults Boot Override P2: MATSHITABD-MLT UJ240AFW Windows Boot Manager P0: WDC WD7500BPKT-80PK4T0 Launch EFI Shell from filesystem device : Select Screen : Select Item Enter: Select +/-: Change Opt. Copyright (C) 2011 American Megatrends, Inc. Main Advanced Chipset Boot Security Save & Exit Save Changes and Exit Discard Changes and...
User's Manual for English Edition
Page 89
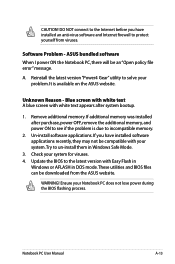
... white text appears after purchase, power OFF, remove the additional memory, and power ON to see if the problem is available on the ASUS website. Software Problem - Check your Notebook PC does not lose power during the BIOS flashing process. Ensure your system for viruses. 4.... It is due to incompatible memory. 2. Blue screen with white text A blue screen with Easy Flash in Windows or AFLASH in Windows Safe Mode. 3. Un-install software applications. If additional memory was installed after...
... white text appears after purchase, power OFF, remove the additional memory, and power ON to see if the problem is available on the ASUS website. Software Problem - Check your Notebook PC does not lose power during the BIOS flashing process. Ensure your system for viruses. 4.... It is due to incompatible memory. 2. Blue screen with white text A blue screen with Easy Flash in Windows or AFLASH in Windows Safe Mode. 3. Un-install software applications. If additional memory was installed after...
User's Manual for English Edition
Page 91
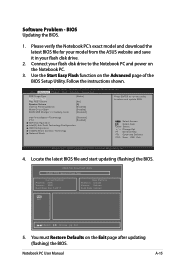
... Technology [Disabled] VT-d [Enabled] SATA Configuration Intel(R) Anti-Theft Technology Configuration USB Configuration Intel(R) Smart Connect Technology Network Stack : Select Screen : Select Item Enter: Select +/-: Change Opt. Locate the latest BIOS file and start updating (flashing) the BIOS. Easy Flash Utility ... [4] [Enabled] [Enabled] [Disabled] Press ENTER to run the utility to the Notebook PC and power on the Notebook PC. 3. ASUS Tek. BIOS Updating the BIOS. 1. Main Advanced Chipset Boot Security Save & Exit POST Logo Type Start Easy Flash Play POST Sound Speaker ...
... Technology [Disabled] VT-d [Enabled] SATA Configuration Intel(R) Anti-Theft Technology Configuration USB Configuration Intel(R) Smart Connect Technology Network Stack : Select Screen : Select Item Enter: Select +/-: Change Opt. Locate the latest BIOS file and start updating (flashing) the BIOS. Easy Flash Utility ... [4] [Enabled] [Enabled] [Disabled] Press ENTER to run the utility to the Notebook PC and power on the Notebook PC. 3. ASUS Tek. BIOS Updating the BIOS. 1. Main Advanced Chipset Boot Security Save & Exit POST Logo Type Start Easy Flash Play POST Sound Speaker ...

User's Manual for English Edition
Page 108
...we publish the chemical substances in particular Section 820.93, Grounding of Outer Conductive Shield of the coaxial cable to the earth at http://csr.asus.com/english/REACH.htm. installation should be grounded (earthed) in accordance with ANSI/NFPA 70, the National Electrical Code (NEC), in our products ...weighing more than 3Kg must use approved power cords greater than or equal to CATV System Installer-Cable distribution system should include bonding the screen of a Coaxial Cable - TV Tuner Notices Note to : H05VV-F, 3G, 0.75mm2 or H05VV-F, 2G, 0.75mm2. A-32 Notebook PC User Manual...
...we publish the chemical substances in particular Section 820.93, Grounding of Outer Conductive Shield of the coaxial cable to the earth at http://csr.asus.com/english/REACH.htm. installation should be grounded (earthed) in accordance with ANSI/NFPA 70, the National Electrical Code (NEC), in our products ...weighing more than 3Kg must use approved power cords greater than or equal to CATV System Installer-Cable distribution system should include bonding the screen of a Coaxial Cable - TV Tuner Notices Note to : H05VV-F, 3G, 0.75mm2 or H05VV-F, 2G, 0.75mm2. A-32 Notebook PC User Manual...


