User Manual
Page 26
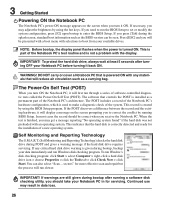
...disk drive icon > choose Properties > click the Tools tab > click Check Now > click Start. IMPORTANT! Press [ESC] and you will display a message on the screen when you turn ON the Notebook PC, it ON. If the POST discovers a difference between the record and the existing hardware, it back ON. If... is installed as a carrying bag. IMPORTANT! 3 Getting Started Powering ON the Notebook PC The Notebook PC's power-ON message appears on the screen prompting you to correct the conflict by running a software disk checking utility, you should be seen. This is given during the splash...
...disk drive icon > choose Properties > click the Tools tab > click Check Now > click Start. IMPORTANT! Press [ESC] and you will display a message on the screen when you turn ON the Notebook PC, it ON. If the POST discovers a difference between the record and the existing hardware, it back ON. If... is installed as a carrying bag. IMPORTANT! 3 Getting Started Powering ON the Notebook PC The Notebook PC's power-ON message appears on the screen prompting you to correct the conflict by running a software disk checking utility, you should be seen. This is given during the splash...
User Manual
Page 27
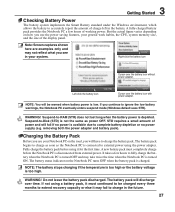
..., the CPU, system memory size, and the size of power and will be charged every three months to charge as soon as power OFF. Note: Screen captures shown here are examples only and may fail to complete battery depletion or no power supply (e.g. Charging the Battery Pack Before you see in...
..., the CPU, system memory size, and the size of power and will be charged every three months to charge as soon as power OFF. Note: Screen captures shown here are examples only and may fail to complete battery depletion or no power supply (e.g. Charging the Battery Pack Before you see in...
User Manual
Page 30
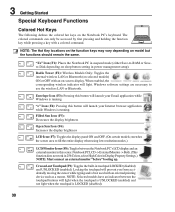
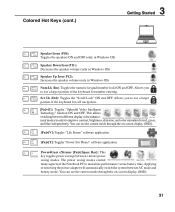
The colored commands can only be accessed by first pressing and holding the function key while pressing a key with an on-screen-display. Crossed-out Touchpad (F9): Toggles the built-in Display Property Settings.) NOTE: Must connect an external monitor "before" booting up. Locking... (On certain models; When enabled, the corresponding wireless indicator will prevent you from accidentally moving the cursor while typing and is running . stretches the screen area to -RAM or Saveto-Disk depending on selected models) ON or OFF with a colored command. "Zz" Icon (F1): Places the Notebook PC...
The colored commands can only be accessed by first pressing and holding the function key while pressing a key with an on-screen-display. Crossed-out Touchpad (F9): Toggles the built-in Display Property Settings.) NOTE: Must connect an external monitor "before" booting up. Locking... (On certain models; When enabled, the corresponding wireless indicator will prevent you from accidentally moving the cursor while typing and is running . stretches the screen area to -RAM or Saveto-Disk depending on selected models) ON or OFF with a colored command. "Zz" Icon (F1): Places the Notebook PC...
User Manual
Page 31
... many aspects of the keyboard for number entering. This allows switching between various power saving modes. You can see the current mode through the on -screen display (OSD). [Fn]+[V]: Toggles "Life Frame" software application. [Fn]+[T]: Toggles "Power For Phone" software application. Scr Lk (Del): Toggles the... "Scroll Lock" ON and OFF. You can see the current mode through the on -screen display (OSD). 31 My Profile ment modes in Windows OS) Num Lk (Ins): Toggles the numeric keypad (number lock) ON and OFF. Power4Gear...
... many aspects of the keyboard for number entering. This allows switching between various power saving modes. You can see the current mode through the on -screen display (OSD). [Fn]+[V]: Toggles "Life Frame" software application. [Fn]+[T]: Toggles "Power For Phone" software application. Scr Lk (Del): Toggles the... "Scroll Lock" ON and OFF. You can see the current mode through the on -screen display (OSD). 31 My Profile ment modes in Windows OS) Num Lk (Ins): Toggles the numeric keypad (number lock) ON and OFF. Power4Gear...
User Manual
Page 33
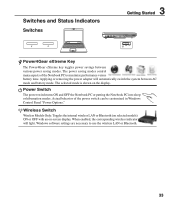
... power savings between AC mode and battery mode. Windows software settings are necessary to maximize performance versus battery time. The selected mode is shown on -screen display. Power Switch The power switch turns ON and OFF the Notebook PC or putting the Notebook PC into sleep or hibernation modes. Wireless Switch...
... power savings between AC mode and battery mode. Windows software settings are necessary to maximize performance versus battery time. The selected mode is shown on -screen display. Power Switch The power switch turns ON and OFF the Notebook PC or putting the Notebook PC into sleep or hibernation modes. Wireless Switch...
User Manual
Page 38
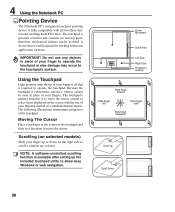
... move the cursor. The touchpad is pressure sensitive and contains no moving parts; Scrolling (on selected models) Slide your finger up or down on the screen with some application software. A device driver is still required for working with the use of your fingertip instead of a standard desktop mouse. Do not use...
... move the cursor. The touchpad is pressure sensitive and contains no moving parts; Scrolling (on selected models) Slide your finger up or down on the screen with some application software. A device driver is still required for working with the use of your fingertip instead of a standard desktop mouse. Do not use...
User Manual
Page 39
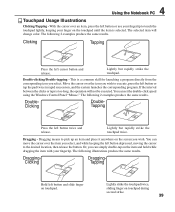
... touchpad twice. If the interval between the clicks or taps is selected. Dragging means to pick up an item and place it anywhere on the screen you select. DraggingClicking DraggingTapping Hold left button or use your fingertip to the desired location, then release the button. With the cursor over an item...
... touchpad twice. If the interval between the clicks or taps is selected. Dragging means to pick up an item and place it anywhere on the screen you select. DraggingClicking DraggingTapping Hold left button or use your fingertip to the desired location, then release the button. With the cursor over an item...
User Manual
Page 56
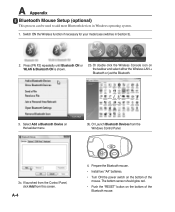
... most Bluetooth devices in Section 3). 2. Press [FN F2] repeatedly until Bluetooth ON or WLAN & Bluetooth ON is shown. 2b. Or Launch Bluetooth Devices from this screen. Prepare the Bluetooth mouse. • Install two "AA" batteries. • Turn ON the power switch on the taskbar menu. 3b.
... most Bluetooth devices in Section 3). 2. Press [FN F2] repeatedly until Bluetooth ON or WLAN & Bluetooth ON is shown. 2b. Or Launch Bluetooth Devices from this screen. Prepare the Bluetooth mouse. • Install two "AA" batteries. • Turn ON the power switch on the taskbar menu. 3b.
User Manual
Page 59
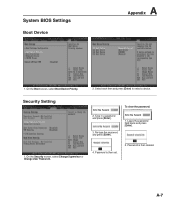
On the Boot screen, select Boot Device Priority. 2. Password is then set. 2. Password is then cleared. Leave the password field blank and press [Enter]. 4. Security Setting 1. Type in a password and press [Enter]. 3. Select each item and press [Enter] to select a device. On the Security screen, select Change Supervisor or Change User Password. Re-type the password and press [Enter]. 1. System BIOS Settings Boot Device A Appendix 1. To clear the password: 2. A-7
On the Boot screen, select Boot Device Priority. 2. Password is then set. 2. Password is then cleared. Leave the password field blank and press [Enter]. 4. Security Setting 1. Type in a password and press [Enter]. 3. Select each item and press [Enter] to select a device. On the Security screen, select Change Supervisor or Change User Password. Re-type the password and press [Enter]. 1. System BIOS Settings Boot Device A Appendix 1. To clear the password: 2. A-7
User Manual
Page 63
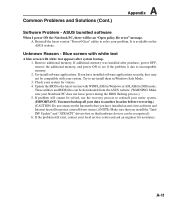
...was installed after system bootup. 1. Check your problem. If problem still cannot be solved, use the recovery process to protect yourself from the ASUS website. (WARNING: Make sure your local service center and ask an engineer for viruses. 4. If you have installed an anti-virus software... white text A blue screen with your data to another location before recovering.) (CAUTION: Do not connect to see if the problem is available on the ASUS website. These utilities and BIOS files can be compatible with white text appears after purchase, power OFF, remove the additional ...
...was installed after system bootup. 1. Check your problem. If problem still cannot be solved, use the recovery process to protect yourself from the ASUS website. (WARNING: Make sure your local service center and ask an engineer for viruses. 4. If you have installed an anti-virus software... white text A blue screen with your data to another location before recovering.) (CAUTION: Do not connect to see if the problem is available on the ASUS website. These utilities and BIOS files can be compatible with white text appears after purchase, power OFF, remove the additional ...
User Manual
Page 67
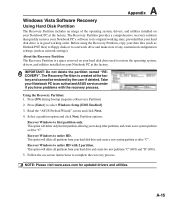
...files) to floppy disks or to a network drive and make note of the operating system, drivers, and utilities installed on -screen instructions to keep other partitions, and create a new system partition as network settings). Before using the Recovery Partition, copy your ...Notebook PC to an authorized ASUS service center if you to complete the recovery process. Read the "ASUS Preload Wizard" screen and click Next. 4. The Recovery Partition provides a comprehensive recovery solution that quickly restores ...
...files) to floppy disks or to a network drive and make note of the operating system, drivers, and utilities installed on -screen instructions to keep other partitions, and create a new system partition as network settings). Before using the Recovery Partition, copy your ...Notebook PC to an authorized ASUS service center if you to complete the recovery process. Read the "ASUS Preload Wizard" screen and click Next. 4. The Recovery Partition provides a comprehensive recovery solution that quickly restores ...
User Manual
Page 68
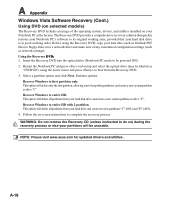
... as network settings). Using the Recovery D�V��D��: 1. This option will be unusable. NOTE: Please visit www.asus.com for updated drivers and utilities. Before using the down cursor and press to its original working order. Recover Windows to complete the... recovery process. Follow the on-screen instructions to entire HD with 2 partition. Partition options: Recover Windows to entire HD. This option will delete only the first partition,...
... as network settings). Using the Recovery D�V��D��: 1. This option will be unusable. NOTE: Please visit www.asus.com for updated drivers and utilities. Before using the down cursor and press to its original working order. Recover Windows to complete the... recovery process. Follow the on-screen instructions to entire HD with 2 partition. Partition options: Recover Windows to entire HD. This option will delete only the first partition,...


