User Manual
Page 3
... for this manual...11 Safety information...12 Setting up your system...12 Care during use...12 Welcome 13 Package contents...13 Getting to know your EeeTop PC 14 Front view...14 Rear view...16 Side views...18 Using the touch screen...19 Showing the touch pointer...19 Cleaning the touch screen...20... Using the keyboard...21 Function keys (for wireless keyboard only 22 Positioning your EeeTop PC 23 Placing on the desktop...23 Mounting to the wall (for wall mount model only 24
... for this manual...11 Safety information...12 Setting up your system...12 Care during use...12 Welcome 13 Package contents...13 Getting to know your EeeTop PC 14 Front view...14 Rear view...16 Side views...18 Using the touch screen...19 Showing the touch pointer...19 Cleaning the touch screen...20... Using the keyboard...21 Function keys (for wireless keyboard only 22 Positioning your EeeTop PC 23 Placing on the desktop...23 Mounting to the wall (for wall mount model only 24
User Manual
Page 12
English Safety information Your EeeTop PC ET2010 Series is designed and tested to meet the latest standards of space around the system for ventilation. Ensure that...a radiator. • Set up your system. • When the system is turned off the system and disconnect the power cord from the wall. • Spray a small amount of the devices plugged into the extension cord does not exceed its ampere rating. Always unplug all instructions in... anything to ensure your retailer. • The power cord or plug is damaged. • The system performance changes. 12 EeeTop PC ET2010 Series
English Safety information Your EeeTop PC ET2010 Series is designed and tested to meet the latest standards of space around the system for ventilation. Ensure that...a radiator. • Set up your system. • When the system is turned off the system and disconnect the power cord from the wall. • Spray a small amount of the devices plugged into the extension cord does not exceed its ampere rating. Always unplug all instructions in... anything to ensure your retailer. • The power cord or plug is damaged. • The system performance changes. 12 EeeTop PC ET2010 Series
User Manual
Page 20
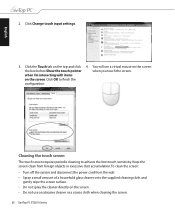
Click the Touch tab on the screen. when I'm interacting with items on the top and click 4. Keep the screen clean from the wall. • Spray a small amount of a household glass cleaner onto the supplied cleaning cloth and gently wipe the screen surface. • Do not ... 3. You will see a virtual mouse on the screen. • Do not use an abrasive cleaner or a coarse cloth when cleaning the screen. 20 EeeTop PC ET2010 Series Click OK to achieve the best touch sensitivity. English 2. Cleaning the touch screen The touch screen requires periodic cleaning to finish the configuration.
Click the Touch tab on the screen. when I'm interacting with items on the top and click 4. Keep the screen clean from the wall. • Spray a small amount of a household glass cleaner onto the supplied cleaning cloth and gently wipe the screen surface. • Do not ... 3. You will see a virtual mouse on the screen. • Do not use an abrasive cleaner or a coarse cloth when cleaning the screen. 20 EeeTop PC ET2010 Series Click OK to achieve the best touch sensitivity. English 2. Cleaning the touch screen The touch screen requires periodic cleaning to finish the configuration.

User Manual
Page 24
... (M4 x 16mm) that you leave a distance of 6cm at least between the system and the wall. 24 EeeTop PC ET2010 Series Firmly install your wall mount kit (VESA75 or VESA100) to the wall following instructions. 1. Install the wall mount kit according to the wall, purchase the optional wall mount kit (VESA 75, 75mm x 75mm or VESA100, 100mm x 100mm).
... (M4 x 16mm) that you leave a distance of 6cm at least between the system and the wall. 24 EeeTop PC ET2010 Series Firmly install your wall mount kit (VESA75 or VESA100) to the wall following instructions. 1. Install the wall mount kit according to the wall, purchase the optional wall mount kit (VESA 75, 75mm x 75mm or VESA100, 100mm x 100mm).
