
User manual Quick Start Guide EN
Page 1
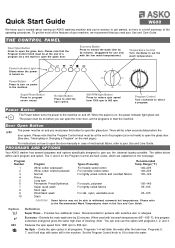
... light glows red. Option 7 E2 800 Definition Super Rinse – Provides two additional rinses. Note: You can open the glass door. THE CONTROL PANEL Door Open Button Press to select a program. Program Control Turn clockwise to open the inner door, set the wash temperature. Please note that the Program... the next page.) For instructions on . No Spin – Omits the spin cycles in the machine. Quick Start Guide W600 We know you’re excited about owning an ASKO washing machine and you’re anxious to get the most of the features of your machine, we recommend that you...
... light glows red. Option 7 E2 800 Definition Super Rinse – Provides two additional rinses. Note: You can open the glass door. THE CONTROL PANEL Door Open Button Press to select a program. Program Control Turn clockwise to open the inner door, set the wash temperature. Please note that the Program... the next page.) For instructions on . No Spin – Omits the spin cycles in the machine. Quick Start Guide W600 We know you’re excited about owning an ASKO washing machine and you’re anxious to get the most of the features of your machine, we recommend that you...
User manual Quick Start Guide EN
Page 2
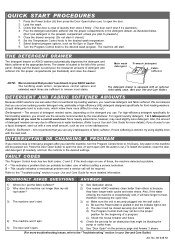
...Simply pull the drawer out and pour the measured amounts of the control panel. If more detergent. Any water in your Use and Care Guide.) DETERGENT AND FABRIC SOFTENER AMOUNTS Because ASKO washers use bleach in your ASKO washer. S – This usually indicates a mechanical problem and a ...varies, depending on the previous page and Answer 3 above . 2) One reason ASKO washers clean better than my old top-loader? 3) The machine won’t start . If the knob stops on ASKO washers automatically dispenses the detergent and fabric softener at the appropriate times. The machine ...
...Simply pull the drawer out and pour the measured amounts of the control panel. If more detergent. Any water in your Use and Care Guide.) DETERGENT AND FABRIC SOFTENER AMOUNTS Because ASKO washers use bleach in your ASKO washer. S – This usually indicates a mechanical problem and a ...varies, depending on the previous page and Answer 3 above . 2) One reason ASKO washers clean better than my old top-loader? 3) The machine won’t start . If the knob stops on ASKO washers automatically dispenses the detergent and fabric softener at the appropriate times. The machine ...
User manual Use & Care Guide EN ES FR
Page 2
... gas is should protrude slightly below the temperature knob behind the edge of the control panel. Improper connection of the equipment grounding conductor can program Models W640 and W660 not to... to prevent a child from each for three seconds. CHILD SAFETY FEATURES CHILD-SAFE DETERGENT DRAWER ASKO washers have a child-safety catch on the detergent drawer that can be engaged to prevent children...moving. ¨ Do not install or store this safety feature. CHILD-SAFE TEMPERATURE KNOB Models W600 and W620 have the skills to carry out. ¨ Do not add gasoline, dry-cleaning...
... gas is should protrude slightly below the temperature knob behind the edge of the control panel. Improper connection of the equipment grounding conductor can program Models W640 and W660 not to... to prevent a child from each for three seconds. CHILD SAFETY FEATURES CHILD-SAFE DETERGENT DRAWER ASKO washers have a child-safety catch on the detergent drawer that can be engaged to prevent children...moving. ¨ Do not install or store this safety feature. CHILD-SAFE TEMPERATURE KNOB Models W600 and W620 have the skills to carry out. ¨ Do not add gasoline, dry-cleaning...

User manual Use & Care Guide EN ES FR
Page 3
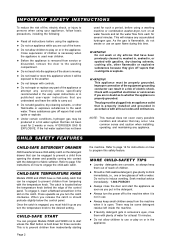
...temperature setting. Below is an illustration of the parts and features of a program (at the 12:00 position) to open the glass door. Models W600 and W620 On these models, if you need for instructions on how to 10 (Drain). Refer to “The door won’t open the ...add a fourth. ASKO washers get the same excellent results with this manual carefully before the door opens. That’s why your whites will be used with sensitive skin or who are programmed not to open the door. Detergent and fabric softener dispenser Power button Glass door Control panel Outer door (...
...temperature setting. Below is an illustration of the parts and features of a program (at the 12:00 position) to open the glass door. Models W600 and W620 On these models, if you need for instructions on how to 10 (Drain). Refer to “The door won’t open the ...add a fourth. ASKO washers get the same excellent results with this manual carefully before the door opens. That’s why your whites will be used with sensitive skin or who are programmed not to open the door. Detergent and fabric softener dispenser Power button Glass door Control panel Outer door (...
User manual Use & Care Guide EN ES FR
Page 7
...finish and they could damage the electrical components. WARNING! There is drained out of any grit or small objects. CLEANING THE CONTROL PANEL To clean the control panel, use a spray of the tub then turn off the power to the left. 2. You could corrode and cause rust stains ...on the laundry. To remove it to the machine. 2. To prevent penetration of citric acid in the drain pump area. Never spray clean the control panel. CLEANING THE PIN TRAP Your washing machine has a pin trap designed to its fixing hole with a grey-white deposit. Before you . 3. Replace...
...finish and they could damage the electrical components. WARNING! There is drained out of any grit or small objects. CLEANING THE CONTROL PANEL To clean the control panel, use a spray of the tub then turn off the power to the left. 2. You could corrode and cause rust stains ...on the laundry. To remove it to the machine. 2. To prevent penetration of citric acid in the drain pump area. Never spray clean the control panel. CLEANING THE PIN TRAP Your washing machine has a pin trap designed to its fixing hole with a grey-white deposit. Before you . 3. Replace...

User manual Use & Care Guide EN ES FR
Page 11
..., otherwise, press START. Temperature – Press until the desired spin speed displays in the LED window. W640/W660 – CUSTOMIZING THE PRESET PROGRAMS ASKO’s EasyControl™ panel makes it is automatically programmed to withstand extremely hot temperatures. Some fabrics may not be able to wash at the end of the program...
..., otherwise, press START. Temperature – Press until the desired spin speed displays in the LED window. W640/W660 – CUSTOMIZING THE PRESET PROGRAMS ASKO’s EasyControl™ panel makes it is automatically programmed to withstand extremely hot temperatures. Some fabrics may not be able to wash at the end of the program...
User manual Use & Care Guide EN ES FR
Page 16
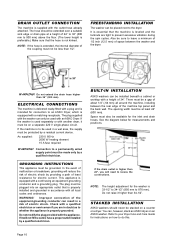
...in a risk of least resistance for the inlet and drain hoses. If the drain outlet is used with a height of the machine top panel and the back wall. GROUNDING INSTRUCTIONS This appliance must also be plugged into an appropriate outlet that the hose is supplied with a plug and...leave a minimum of 1/2 inch (12.5 mm) of space between the rear edge of 34”. The hose should never be on an ASKO washer. DRAIN OUTLET CONNECTION The machine is not kinked. ELECTRICAL CONNECTIONS The machine is delivered ready-fitted with the outlet hose already attached. FREESTANDING ...
...in a risk of least resistance for the inlet and drain hoses. If the drain outlet is used with a height of the machine top panel and the back wall. GROUNDING INSTRUCTIONS This appliance must also be plugged into an appropriate outlet that the hose is supplied with a plug and...leave a minimum of 1/2 inch (12.5 mm) of space between the rear edge of 34”. The hose should never be on an ASKO washer. DRAIN OUTLET CONNECTION The machine is not kinked. ELECTRICAL CONNECTIONS The machine is delivered ready-fitted with the outlet hose already attached. FREESTANDING ...

User manual Use & Care Guide EN ES FR
Page 18
... readouts 14 Child Safety Features 2 Child-safe catch 5 Child-Safe Start (W640/W660) 2, 14 Child-Safe temperature knob 2 Control panel, cleaning 7 Cosmetic damage 15 Cottons 4, 6 Customizing the preset programs (W640/W660) 11, 13 D Delay start menu (W640/W660...4 Detergent 5, 6 Detergent drawer 5, 7 Discoloring 8 Door cleaning 7 opening 3 Door lock fault error 9 Drain outlet connection 16 E EasyControl Panel (W640/W660) 13 Economy (E2) option 3, 12 Electrical connections 16 Enzyme step 3 Error messages 9 F Fabric softener 6 Fabrics, recommended wash...
... readouts 14 Child Safety Features 2 Child-safe catch 5 Child-Safe Start (W640/W660) 2, 14 Child-Safe temperature knob 2 Control panel, cleaning 7 Cosmetic damage 15 Cottons 4, 6 Customizing the preset programs (W640/W660) 11, 13 D Delay start menu (W640/W660...4 Detergent 5, 6 Detergent drawer 5, 7 Discoloring 8 Door cleaning 7 opening 3 Door lock fault error 9 Drain outlet connection 16 E EasyControl Panel (W640/W660) 13 Economy (E2) option 3, 12 Electrical connections 16 Enzyme step 3 Error messages 9 F Fabric softener 6 Fabrics, recommended wash...
Service Manual
Page 2
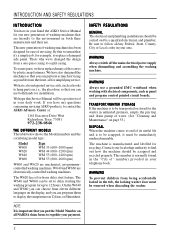
... to follow all for installation. That's why we mean that you can perform as much servicing as panel and program control printed circuit boards. TRANSPORT/WINTER STORAGE If the machine is to contact the ASKO Advisory Center at: 1161 Executive Drive West Richardson, Texas 75081 972-238-0846 THE DIFFERENT MODELS The... W640 W660 Type WM 33 (600-1000 rpm) WM 44 (600-1200 rpm) WM 55 (600-1400 rpm) WM 55 (600-1600 rpm) W600 and W620 are electronically-controlled washing machines. The machine is to be set to display the temperature in the tub, the locking washer door must ...
... to follow all for installation. That's why we mean that you can perform as much servicing as panel and program control printed circuit boards. TRANSPORT/WINTER STORAGE If the machine is to contact the ASKO Advisory Center at: 1161 Executive Drive West Richardson, Texas 75081 972-238-0846 THE DIFFERENT MODELS The... W640 W660 Type WM 33 (600-1000 rpm) WM 44 (600-1200 rpm) WM 55 (600-1400 rpm) WM 55 (600-1600 rpm) W600 and W620 are electronically-controlled washing machines. The machine is to be set to display the temperature in the tub, the locking washer door must ...

Service Manual
Page 4
...: Length: 3/4" garden hose 3/4" metric thread 5 ft. (1.5 m) Tap Cold water supply If the drain outlet is important that comes with it. Built-in Installation ASKO washers can be installed beneath a cabinet or worktop with a minimum height of 15-146 PSI. See the diagram below for the inlet and drain hoses...will then be hot and wrinkling will need to hot water because all around the machine, including between the rear edge of the machine top panel and the back wall. Refer to page 6 for instructions on how to remove any surface. The machine is plumbed with the connection hose ...
...: Length: 3/4" garden hose 3/4" metric thread 5 ft. (1.5 m) Tap Cold water supply If the drain outlet is important that comes with it. Built-in Installation ASKO washers can be installed beneath a cabinet or worktop with a minimum height of 15-146 PSI. See the diagram below for the inlet and drain hoses...will then be hot and wrinkling will need to hot water because all around the machine, including between the rear edge of the machine top panel and the back wall. Refer to page 6 for instructions on how to remove any surface. The machine is plumbed with the connection hose ...

Service Manual
Page 9
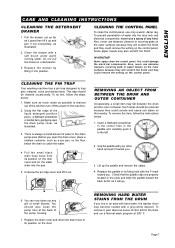
FRONT VIEW Detergent drawer Front panel Front cover plate Outer door (W620 and W660) WASHER FEATURES Top Cover Control panel Side panel Glass door Lower cover Drain pump cover (closed) Emergency drain hose Drain pump cover (open) Pin trap 20 torx screw securing door opener Emergency door opener Top Cover REAR VIEW Fuses Shipping Supports (3) Electrical cord Drain hose PEX fill line Tap Cold water supply Rear Panel 9
FRONT VIEW Detergent drawer Front panel Front cover plate Outer door (W620 and W660) WASHER FEATURES Top Cover Control panel Side panel Glass door Lower cover Drain pump cover (closed) Emergency drain hose Drain pump cover (open) Pin trap 20 torx screw securing door opener Emergency door opener Top Cover REAR VIEW Fuses Shipping Supports (3) Electrical cord Drain hose PEX fill line Tap Cold water supply Rear Panel 9

Service Manual
Page 18
...; 6.5-7 mm wide blade screwdriver • torx T20 Front door removing/installing • torx T20 • torx T10 • socket wrench 10 mm Front panel (model with front-loading door) • torx T20 • socket wrench 10 mm 18 Detergent compartment • torx T20 Door (removing/installing) •... • special tool (Part no. 88 011 53) Drain pump • torx T20 • Star socket head screwdriver Change of ASKO washers and the tools you will need to service ASKO washers: "Torx" screwdrivers: • T25 • T20 • T10 Socket wrenches • 11/16" • 16 mm ...
...; 6.5-7 mm wide blade screwdriver • torx T20 Front door removing/installing • torx T20 • torx T10 • socket wrench 10 mm Front panel (model with front-loading door) • torx T20 • socket wrench 10 mm 18 Detergent compartment • torx T20 Door (removing/installing) •... • special tool (Part no. 88 011 53) Drain pump • torx T20 • Star socket head screwdriver Change of ASKO washers and the tools you will need to service ASKO washers: "Torx" screwdrivers: • T25 • T20 • T10 Socket wrenches • 11/16" • 16 mm ...

Service Manual
Page 20
... at the rear, being careful no to overtighten and strip the screws. Replace the three screws at the rear of the top cover under the panel and lower the cover. 5. REPLACING THE TOP COVER 3. Don't forget the two star washers for the outer screws. 2. Lift the cover and pull it snap...
... at the rear, being careful no to overtighten and strip the screws. Replace the three screws at the rear of the top cover under the panel and lower the cover. 5. REPLACING THE TOP COVER 3. Don't forget the two star washers for the outer screws. 2. Lift the cover and pull it snap...
Service Manual
Page 21
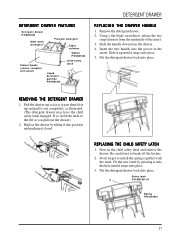
Insert the new handle into place. 5. Press in the insert. Don't forget to install the spring together with panel) Liquid detergent partition P/N 8061633 Child-safety catch DETERGENT DRAWER REPLACING THE DRAWER HANDLE 1. Slide the handle down from the underside of the insert. 3. DETERGENT DRAWER ...
Insert the new handle into place. 5. Press in the insert. Don't forget to install the spring together with panel) Liquid detergent partition P/N 8061633 Child-safety catch DETERGENT DRAWER REPLACING THE DRAWER HANDLE 1. Slide the handle down from the underside of the insert. 3. DETERGENT DRAWER ...

Service Manual
Page 22
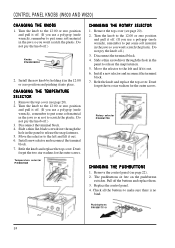
... for the detergent drawer in position. 7. Being careful not to put some soft material in the 12:00 or zero position, push them off . CONTROL PANEL REMOVING THE CONTROL PANEL 1. W600 and W620: Make sure the knobs are at the 12:00 or zero position and pull them back on.... 9. W600 and W620: Holding the knobs in the jaws so you use a polygrip (mole wrench), remember to break the fasteners, remove the four fasteners behind the beam when pressing the middle of the panel into place at the top edge and press it...
... for the detergent drawer in position. 7. Being careful not to put some soft material in the 12:00 or zero position, push them off . CONTROL PANEL REMOVING THE CONTROL PANEL 1. W600 and W620: Make sure the knobs are at the 12:00 or zero position and pull them back on.... 9. W600 and W620: Holding the knobs in the jaws so you use a polygrip (mole wrench), remember to break the fasteners, remove the four fasteners behind the beam when pressing the middle of the panel into place at the top edge and press it...

Service Manual
Page 23
...it into place. 3. Be careful when placing the indicator lamp into position; Remove the control panel (see page 22). 2. IMPORTANT Don't pull on the wires. Remove the control panel (see page 22). 2. Change the indicator lamp/symbol lens. Pushbutton switch P/N 8063717 CHANGING ...button. 3. The button might come apart. 3. Replace the control panel. Replace the control panel. Spring P/N 8061857 Power Button W600/W620 P/N 8061711-0 W640/W660 white P/N 8061902-0 W660 SS P/N 8061902-69 23 Replace the control panel. Press in the new button and install it up into the ...
...it into place. 3. Be careful when placing the indicator lamp into position; Remove the control panel (see page 22). 2. IMPORTANT Don't pull on the wires. Remove the control panel (see page 22). 2. Change the indicator lamp/symbol lens. Pushbutton switch P/N 8063717 CHANGING ...button. 3. The button might come apart. 3. Replace the control panel. Replace the control panel. Spring P/N 8061857 Power Button W600/W620 P/N 8061711-0 W640/W660 white P/N 8061902-0 W660 SS P/N 8061902-69 23 Replace the control panel. Press in the new button and install it up into the ...
Service Manual
Page 24
...-0 2. Do not pry the knob off the buttons and replace them. 3. Temperature selector P/N 8061665 CHANGING THE ROTARY SELECTOR 1. Disconnect the terminal block. 4. CONTROL PANEL KNOBS (W600 AND W620) CHANGING THE KNOBS 1. Remove the top cover (see page 20). 2. Turn the knob to the 12:00 or zero position and pull it... off . (If you use a polygrip (mole wrench), remember to put some soft material in the panel to the left and lift it out. 6. ...
...-0 2. Do not pry the knob off the buttons and replace them. 3. Temperature selector P/N 8061665 CHANGING THE ROTARY SELECTOR 1. Disconnect the terminal block. 4. CONTROL PANEL KNOBS (W600 AND W620) CHANGING THE KNOBS 1. Remove the top cover (see page 20). 2. Turn the knob to the 12:00 or zero position and pull it... off . (If you use a polygrip (mole wrench), remember to put some soft material in the panel to the left and lift it out. 6. ...

Service Manual
Page 25
...the aid of a flat-blade screwdriver on the bottom. 4. Pushbutton pad W640/W660: P/N 8061765-0 (white) W660 SS: P/N 8061765-33 (black) 25 Replace the control panel. 7. Don't forget the two star washers for the outer screws. Lift it snap into place. Being careful not to break the fasteners, remove the... panel board from the snap fasteners with the aid of a flat-blade screwdriver. 4. Don't forget the two star washers for the outer screws. You ...
...the aid of a flat-blade screwdriver on the bottom. 4. Pushbutton pad W640/W660: P/N 8061765-0 (white) W660 SS: P/N 8061765-33 (black) 25 Replace the control panel. 7. Don't forget the two star washers for the outer screws. Lift it snap into place. Being careful not to break the fasteners, remove the... panel board from the snap fasteners with the aid of a flat-blade screwdriver. 4. Don't forget the two star washers for the outer screws. You ...

Service Manual
Page 26
... drive belt in the reverse order. Turn the pulley to assist, align the rear panel. 4. Screws P/N 8900338 Drive belt P/N 8061682 26 Start by lifting it off the panel. REAR PANEL AND DRIVE BELT REMOVING THE REAR PANEL 1. Using the two hooks on the top edge of the pulley and turning the pulley.... 3. Remove the rear panel. 2. Using a 20 torx, remove the twelve screws around the rear panel. 2. REPLACING THE REAR PANEL 3. Make sure the drive belt is centered on the upper edge to check this. 5. Refit the...
... drive belt in the reverse order. Turn the pulley to assist, align the rear panel. 4. Screws P/N 8900338 Drive belt P/N 8061682 26 Start by lifting it off the panel. REAR PANEL AND DRIVE BELT REMOVING THE REAR PANEL 1. Using the two hooks on the top edge of the pulley and turning the pulley.... 3. Remove the rear panel. 2. Using a 20 torx, remove the twelve screws around the rear panel. 2. REPLACING THE REAR PANEL 3. Make sure the drive belt is centered on the upper edge to check this. 5. Refit the...

Service Manual
Page 27
...press it with the screw. 9. Fit the terminal block. 12. Replace the rear panel. Mark the locations of the nuts on the adjustable side of the spacing tubes. 7. Secure the cable clamp. 10. Motor W600/W620: P/N 8061772 W640/W660: P/N 8061774 REPLACING THE MOTOR 8. Motor control board... W640/W660: P/N 8061399 27 Drive belt P/N 8061682 CHANGING THE MOTOR CONTROL BOARD (W640 AND W660) 1. Remove the rear panel (see page 26). 2. Connect the wiring and...
...press it with the screw. 9. Fit the terminal block. 12. Replace the rear panel. Mark the locations of the nuts on the adjustable side of the spacing tubes. 7. Secure the cable clamp. 10. Motor W600/W620: P/N 8061772 W640/W660: P/N 8061774 REPLACING THE MOTOR 8. Motor control board... W640/W660: P/N 8061399 27 Drive belt P/N 8061682 CHANGING THE MOTOR CONTROL BOARD (W640 AND W660) 1. Remove the rear panel (see page 26). 2. Connect the wiring and...

